In addition to being a ubiquitous presentation program, PowerPoint also works great as a simple drawing program as you have explored in our
Drawing Trees in PowerPoint 2011 for Mac tutorial. We have already
done an extensive series of tutorials on shapes, and in this tutorial, we will show you how to use
simple techniques already explained in other tutorials to draw a shopping bag in PowerPoint 2011 for Mac.
You need not go back to those older tutorials since most concepts are drop-dead easy. Yet, if you want to know more, we have linked to all technique tutorials
in the relevant parts of this page. So let's start drawing our shopping bag!
- Add a new slide to any existing presentation,
or just create a new presentation. Make sure that it uses either the Title Only or Blank slide layout (learn
how to change slide layouts in PowerPoint 2011).
- Within the Home tab of the Ribbon, click the
Shape button to open the Shape gallery that you
can see in Figure 1. In this gallery, select the Basic Shapes category, and from the sub-gallery which appears,
select the Trapezoid shape (refer to Figure 1 again).
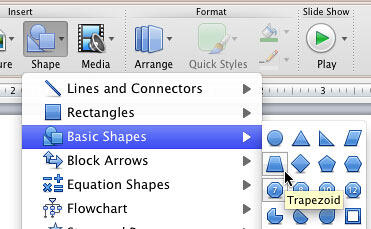
Figure 1: Trapezoid shape selected within Basic Shapes sub-gallery- Place the cursor on your slide, and click once to insert a
Trapezoid. Now, resize it to look like a Bag (see Figure 2).
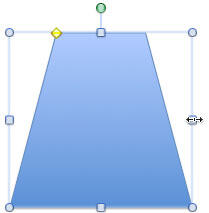
Figure 2: Trapezoid shape resized to match the base of a shopping bag- Now, select the Trapezoid, and press the
Command + D key combination to create a duplicate copy of the shape. For more information, see our
Duplicate Shapes Using
Command+D tutorial. PowerPoint places the duplicated shape over the original Trapezoid. Now,
nudge or move the duplicated shape rightwards and place it next to the original
Trapezoid as shown in Figure 3.

Figure 3: Duplicated Trapezoid moved towards the right of the original Trapezoid- Now resize the duplicated Trapezoid to make it thinner, as
shown in Figure 4.
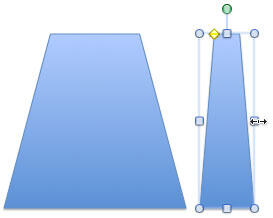
Figure 4: Duplicated Trapezoid resized- Now, rotate the thin Trapezoid to slant it over the original
shape so that it forms the side portion of your bag, as shown in Figure 5.
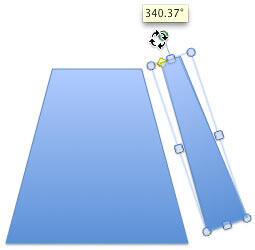
Figure 5: Trapezoid being rotated to form the side portion of the bag- Nudge it towards the original Trapezoid on the left, and adjust
its position to match the side portion of a shopping bag. You may want to make the side portion shorter or taller by
resizing, as required. At this point, your shopping bag without handles is
ready, as shown in Figure 6. Next, we will create those handles.

Figure 6: Two trapezoids together make a shopping bag without handles!- Revisit the Shape gallery (as explained in
Step 2 above), select the Basic Shapes category, and from the sub-gallery which appears, select the Block Arc
shape as shown in Figure 7.
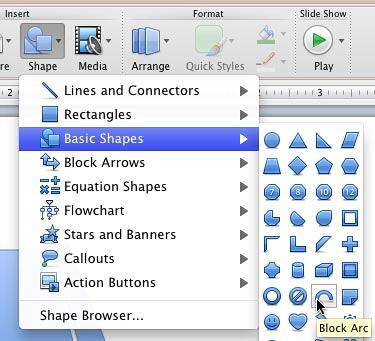
Figure 7: Block Arc selected within Basic Shapes sub-gallery- Place the cursor on the slide which contains your half done shopping bag, and click once to
insert a Block Arc as shown in Figure 8.

Figure 8: Block Arc inserted on the slide- Now, manipulate the Block Arc suitably using its yellow
diamonds to match the handle of a shopping bag as shown in Figure 9.
Hint: One of the yellow diamonds makes the bag handle thinner, and the other makes it longer. You can also
resize the handle using the blueish white resize handles on the Block Arc.
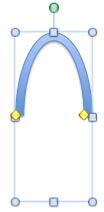
Figure 9: Block Arc resized to match the handle of a shopping bag- Drag this resized Block Arc and place atop the bag. Resize it
further if needed to make it look like a handle of the shopping bag, as shown in Figure 10.

Figure 10: One handle placed on top of the half-done shopping bag- Create a duplicate of the handle (press
Command + D), as shown in Figure 11.

Figure 11: Duplicated handles- Reposition this duplicated handle to be aligned, as shown in Figure 12. You can possibly just
nudge the duplicated shape, or, to be more precise, go ahead and
try the methods explained in our Align Shapes in PowerPoint 2011 for Mac tutorial.
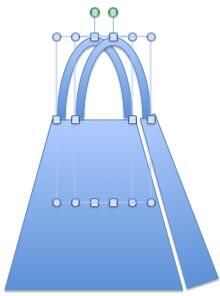
Figure 12: Handles selected to adjust their position- Select the duplicated handle and right-click it—in the
contextual menu that appears, choose the Arrange | Send to Back option. This will place the duplicated handle
behind the original handle, as shown in Figure 13. For more info on reordering slide objects, refer to our
Reorder Slide Objects in PowerPoint 2011 for Mac tutorial.

Figure 13: Duplicated handle sent to back- As of now, the shopping bag is ready. If you want, you can also label it—to do so, first make sure that you are on the same slide on which
you have created the shopping bag. Then access the Home tab of the Ribbon, and click the Text
button—from the drop-down gallery that appears, select the WordArt option as shown in Figure 14.
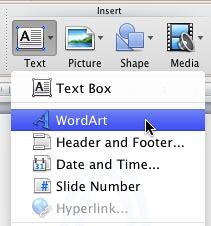
Figure 14: WordArt option within Text drop-down gallery- This brings up and activates the Format contextual tab on the
Ribbon. In this tab, locate the Text Styles group, hover
the mouse cursor over different WordArt thumbnails—a down-arrow appears as shown highlighted in red within
Figure 15. Click the down-arrow to open the WordArt drop-down gallery (see Figure 15 again).
Within the WordArt drop-down gallery, select the WordArt variant of your choice and click on it, while selecting, just make sure
that the variant you choose uses a text color that contrasts well with the color of your shopping bag.
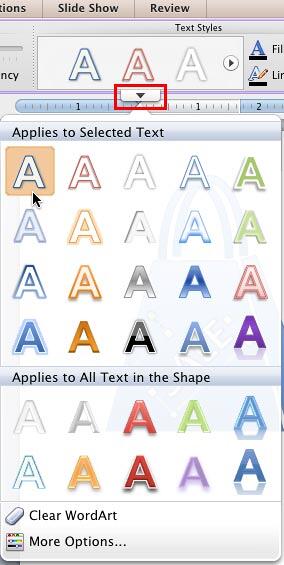
Figure 15: WordArt variant selected- This will insert a text box on your slide with some
dummy text. Type something in this text box to replace the dummy text. In Figure 16, you can see that we have typed the word SALE.

Figure 16: Text applied with selected WordArt- Drag the text box over the bag graphic, and rotate it just a
little as shown in Figure 17. Your shopping bag is now ready. If you want, you can
select all the slide objects that comprise your bag (the two
Trapezoids, the two Block Arcs, and the WordArt text), and group them.

Figure 17: Shopping bag drawn using basic PowerPoint shapes- Save your presentation often.
Tip: Try using different
shapes other than the
Trapezoid to create other types of bags. You can use any of the Ovals, Rectangles and other shapes to create amazing bags. You can also
combine multiple shapes to create different bags. Also,
you are not limited to just drawing bags—use different PowerPoint shapes to create your own graphics!


