Indezine Logo


Hierarchical Guide Options in PowerPoint 365 for Windows

Learn about hierarchical guide options in PowerPoint 365 for Windows. Hierarchies differ between guides in slides, slide layouts, and slide masters.


Author:

Product/Version: PowerPoint 365 for Windows

OS: Microsoft Windows 10 and higher


Marcus thought he'd cracked the code. First, he learned to enable guides. Then, he discovered the right-click menu, and now is adding, coloring, and deleting guides like a pro. Then a colleague mentioned something called guide hierarchy, and Marcus froze. Hierarchy? He thought guides were just... lines.

Hierarchy by Color
Guide Hierarchy in PowerPoint
Let’s Paraphrase
Conclusion
Quiz


Hierarchy by Color

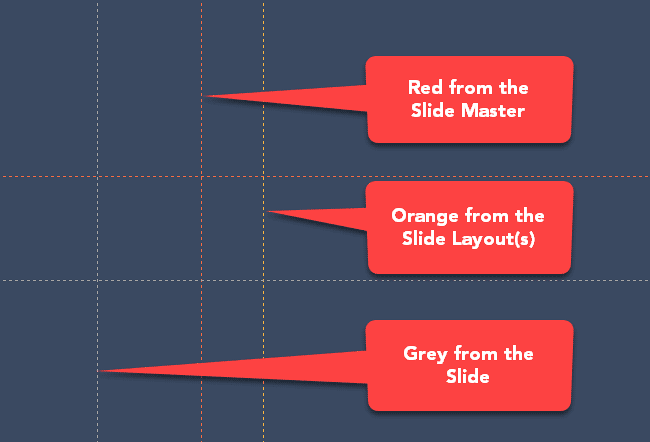
Marcus was happy to learn more. Turns out, guides in PowerPoint have layers, a bit like a family tree. There are guides that belong to the whole family (the Slide Master), guides that belong to individual branches (Slide Layouts), and guides that belong to just one person (your actual slides). Each level can have its own guides, and PowerPoint uses color to keep everyone straight, so nobody mistakes a grandparent's guide for a cousin's. Here are the details:

  1. Guides belonging to the Slide Master are colored red.
  2. Guides from the Slide Layouts are colored orange.
  3. Guides from individual slides are grey in color.

We've already walked through the basic guide options, which only cover guides sitting directly on your slides. This page climbs one level up the family tree.

Back

Guide Hierarchy in PowerPoint

Follow these steps to explore the hierarchy for guides in PowerPoint 365 for Windows:
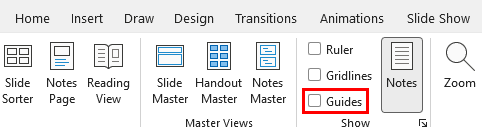
  1. Launch PowerPoint and make sure your guides are not enabled. To check, access the View tab of the Ribbon, and confirm the Guides checkbox is not selected, as shown highlighted in red within Figure 1, below.
  2. Guides check-box not enabled
    Figure 1: Guides check-box not enabled
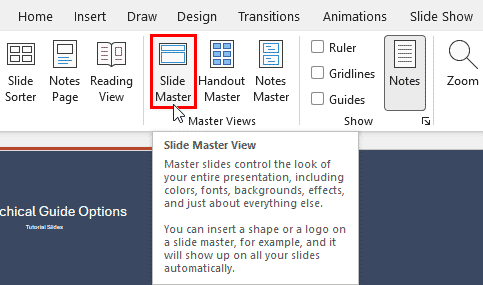
  3. Access the View tab of the Ribbon, and click the Slide Master button, as shown highlighted in red within Figure 2, below.
  4. Slide Master button
    Figure 2: Slide Master button
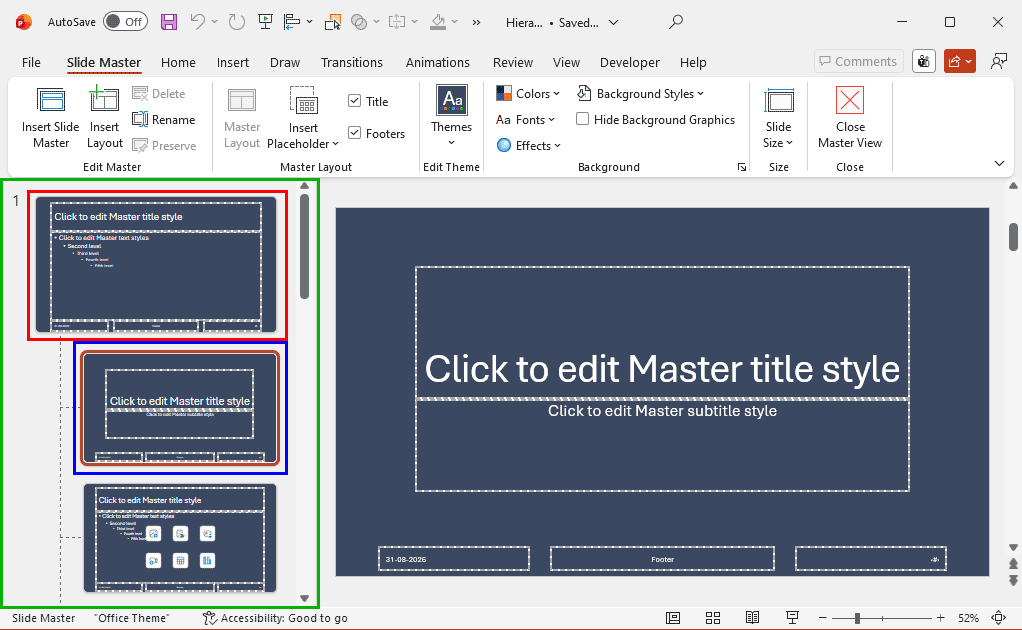
  5. Doing so brings up Slide Master view, as shown in Figure 3, below. Here, within the left pane, highlighted in green, you will see the Slide Master, the larger thumbnail within the pane highlighted in red within Figure 3.
  6. Slide Master selected
    Figure 3: Slide Master selected
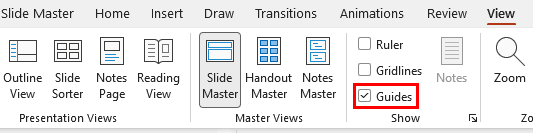
  7. Access the View tab and select the Guides check-box, as shown highlighted in red within Figure 4, below.
  8. Guides check-box enabled in the Slide Master
    Figure 4: Guides check-box enabled in the Slide Master

    Changes in Slide Master Influence All Slides

    Selecting the Slide Master and making guides visible influences every Slide Layout and every individual slide that belongs to this Slide Master. It's the family-tree equivalent of a rule set by a grandparent that quietly applies to the whole household, nobody in the family had to agree to it, nobody explicitly passed it down to each generation, it simply exists at the top of the tree and trickles down to everyone below.

    Add a guide to the Slide Master, and every Slide Layout inherits it automatically, and every individual slide built from those layouts inherits it in turn, all without a single extra click on your part.
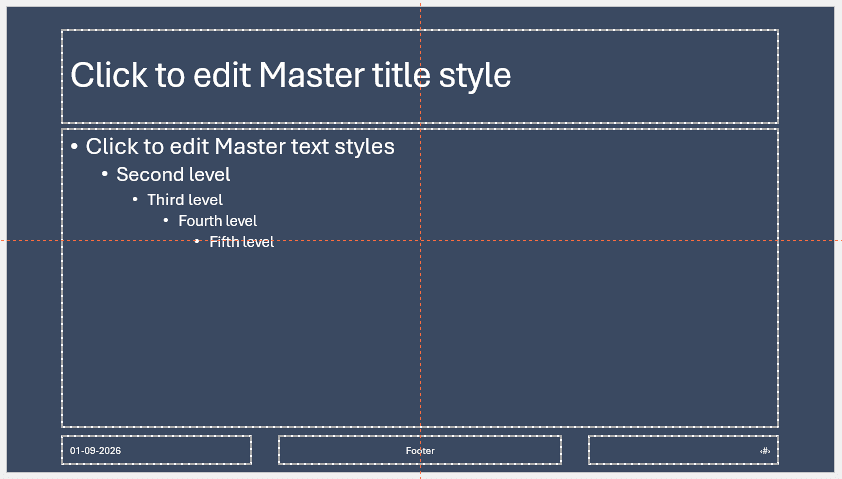
  9. Enabling the Guides check-box makes the default guides visible on the Slide Master, as shown in Figure 5, below. Note that these guides are red in color.
  10. Guides within the Slide Master
    Figure 5: Guides within the Slide Master
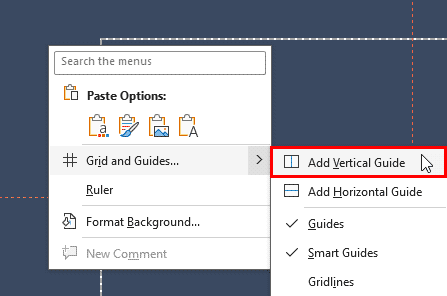
  11. Select any individual Slide Layout within the Slides pane. We clicked on the layout thumbnail immediately below the larger Slide Master thumbnail, as shown highlighted in blue within Figure 3, previously on this page. Doing so displays the selected Slide Layout in the Slide Area. Right-click anywhere on the empty Slide Area to bring up a contextual menu, as shown in Figure 6, below. Within the contextual menu, select Grid and Guides | Add Vertical Guide, as shown in Figure 6.
  12. Add Vertical Guide option
    Figure 6: Add Vertical Guide option
  13. This action adds an orange-colored vertical guide right above the previous red-colored vertical guide, as shown zoomed in Figure 7, below.
  14. Orange vertical guide overlapping the red vertical guide
    Figure 7: Orange vertical guide overlapping the red vertical guide
  15. How do you know the orange guide is overlapping the red one? Drag the orange vertical guide left or right, and the red guide underneath reveals itself, as shown zoomed in Figure 8, below. It's a bit like peeling back a sticky note to find another one hiding underneath.
  16. Orange guide being dragged
    Figure 8: Orange guide being dragged
  17. Return to Normal view. You should see the red horizontal and vertical guides, but you see only one orange vertical guide, plus the grey horizontal and vertical guides. So, what happened to the red guides from the Slide Master? Let's find out next.
  18. Guides within Normal view
    Figure 9: Guides within Normal view
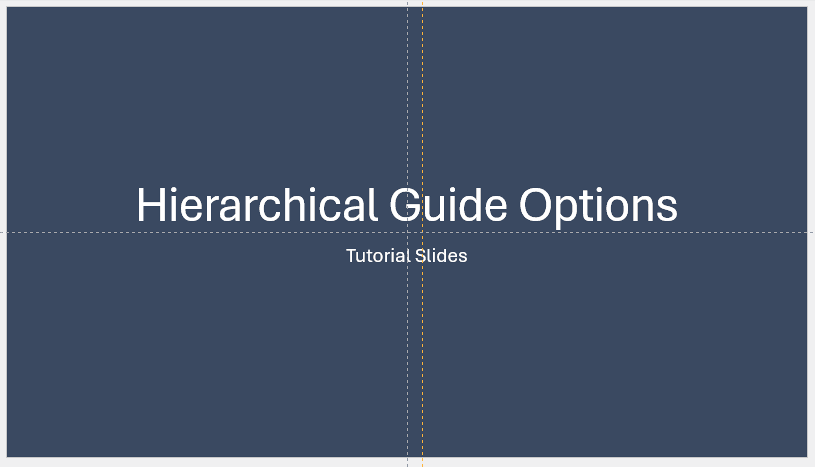
  19. The red guides from the Slide Master haven't gone anywhere, they're simply hidden beneath the grey guides, like the youngest sibling standing in front of the family photo. Drag either the grey horizontal or vertical guide away from its default position, and the red guide underneath appears, as shown zoomed in Figure 10, below.
  20. Guides of all hierarchies
    Figure 10: Guides of all hierarchies
Back

Let’s Paraphrase

Think of it as a family photo with three generations lined up by height:

  • Red guides come from the Slide Master, and sit at the very back of the group.
  • Orange guides come from Slide Layouts, and stand in the middle.
  • Grey guides belong to individual Slides, and always stand right at the front, closest to the camera.

This is exactly why it's worth resisting the urge to recolor your own guides (covered in our Guide Options in PowerPoint 365 tutorial). Red, orange, and grey are standardized, and repainting them defeats the whole point of the system.

Why Cannot I Select a Guide?

Guides placed within the Slide Master or Slide Layouts cannot be selected while working on individual slides in Normal view, a bit like a house rule set by a grandparent: everyone follows it, but nobody in the younger generation gets to rewrite it directly. That said, every guide, regardless of which level it belongs to, still assists with snapping and positioning of objects on your slide.

You can always add more guides wherever needed, either by dragging existing guides, or through options in the right-click contextual menu, the same trick Marcus now can't stop using.

Back

Conclusion

Guide hierarchy might sound like a technical detail buried deep in PowerPoint's interface, but as Marcus discovered, it's really just a family tree working quietly in the background.

Red guides set the ground rules from the Slide Master, orange guides adjust things at the Slide Layout level, and grey guides handle the fine-tuning on individual slides, each generation building on the one before it without stepping on its toes.

Understanding this hierarchy means fewer surprises when a guide won't budge, or when a layout seems to follow rules you never explicitly set. Once you know which color belongs to which level, guides stop feeling like scattered lines and start feeling like the structured system they actually are.

Back

Quick Quiz: Hierarchical Guide Options in PowerPoint 365 for Windows


People Also Ask:

Why are hierarchical guides useful in PowerPoint?

They help maintain consistent alignment and margins across multiple slides.

Can hierarchical guides help enforce brand layouts?

Yes. They establish fixed margins and alignment zones for consistent branding.

What is the difference between master guides and slide guides?

Master guides apply globally, while slide guides affect only the current slide.

See Also:

01 09 18 - Working with Slides: Hierarchical Guide Options in PowerPoint (Glossary Page)

Hierarchical Guide Options in PowerPoint 2016 for Windows
Hierarchical Guide Options in PowerPoint 2016 for Mac
Hierarchical Guide Options in PowerPoint 2013 for Windows

You May Also Like: 5 Slide Design Tips to Take Home From a Successful IPO Presentation Project | 5 Ideas to Help You Remember Your Speech


Popular Posts

Creating Slide Backgrounds in Photoshop for PowerPoint
Learn how to create slide backgrounds for PowerPoint in Photoshop.

Formatting Arrows (Arrowheads) in PowerPoint 2016 for Windows
Learn how to format arrowheads for lines in PowerPoint 2016 for Windows.

Creating Semi-Circles in PowerPoint 2013
Learn how to create a semi-circle in PowerPoint 2013.

Apply Two or More Animations to One Object at the Same Time in PowerPoint
Apply multiple animations to one slide object in PowerPoint, and make all animations play together.


Handmade Slides: Pushpins for PowerPoint

These “pushpin” graphics are already placed in PowerPoint slides. Just copy them and paste within your slides to create a look that makes a picture, shape, or anything else appear as if it has been pushed onto a surface, board, or wall with a pin! These ready-made pushpins are already within PowerPoint slides, and have been provided in five colors. Just copy them and paste them on your slides.

Download these Pushpins for just $19.99


Microsoft and the Office logo are trademarks or registered trademarks of Microsoft Corporation in the United States and/or other countries.
Home | PowerPoint | Photoshop | PowerPoint Templates | PowerPoint Tutorials | Blog | Notes | Ezine | Media Kit | Feedback | Site Map | About Us | Contact Us

Link to Us | Privacy | Testimonials

PowerPoint Backgrounds | Christian PowerPoint Backgrounds | Business PowerPoint Presentation Templates

Plagiarism will be detected by Copyscape

©2000-2026, . All rights reserved.