Indezine Logo


Creating Slide Backgrounds in Photoshop for PowerPoint

Learn how to create slide backgrounds for PowerPoint in Photoshop. Changing some Photoshop settings can make this task easier.


Author:

Product/Version: PowerPoint

OS: Microsoft Windows and Mac OS X


Think of your PowerPoint slide as a room you're decorating for a big party. The background? That’s your wallpaper—it sets the mood. But you wouldn’t stop at wallpaper, right? You’d also pick the right furniture (fonts), paint colors (theme colors), and maybe some lights (visual effects). Each element works together so your guests (a.k.a. your audience) say, “Wow, this place really tells a story!”

Just like choosing the right outfit for a first impression, your slide’s background needs to match the vibe of your entire brand. Business formal? Artsy boho? Retro arcade chic? Yep, your background helps set the tone before a single word is read.

Now, we won’t throw everything at you at once—fonts, layouts, effects—that buffet is served elsewhere on this site. In this tutorial, we’re pulling out the magnifying glass and zooming in on just one delightful design choice: backgrounds.

So, you want to create slide backgrounds that look snazzy and professional? Great! In this tutorial, we’re diving into Adobe Photoshop, the big kahuna of image editing. Think of Photoshop as the Swiss Army knife of design—it’s got a blade for every job and probably a corkscrew you didn’t know you needed.

But don’t sweat it if Photoshop isn’t your jam. Just like you don’t need Gordon Ramsay’s kitchen to whip up a tasty meal, you don’t need Photoshop to edit backgrounds. The principles of image editing—like layering, cropping, and adding effects—work across tools like Corel Paintshop Pro, Photo-Paint, Canva, GIMP, Paint.NET, or even apps on your phone. They’re like universal cooking techniques: sautéing works whether you’re using cast iron or non-stick.

Before you start designing your PowerPoint masterpiece, you’ve got to answer a very basic—but super important—question: Where will your slides live? It's kind of like choosing between a cozy city apartment or a wide countryside villa.

  • Standard (4:3) is like your reliable old sedan. Fits most garage doors (i.e., older projectors and screens). This is the default resolution used in older versions of PowerPoint.
  • Widescreen (16:9) is the sleek convertible—built for modern highways (hello, HD monitors and wide displays!). This is what you will typically use unless you have a compelling reason to use the Standard (4:3) resolution.

Widescreen became the go-to format around the time people traded in VHS tapes for streaming and tube TVs for flat screens. So, if your screen looks more rectangle than square, you’re probably going widescreen.

You might wonder: “Is anyone still using Standard (4:3) slides in this widescreen, high-def, ultra-cinematic era?” The answer is yes—and the star of the show is the Apple iPad. Think of PowerPoint slide sizes like picture frames. Most modern devices go for that panoramic widescreen frame (16:9)—perfect for blockbuster movie vibes. But the iPad? It’s rocking the classic Standard frame (4:3). Less movie theater, more cozy photo album.

Standard or Widescreen?

Still wondering about what aspect ratio you should choose between Standard or Widescreen? Read our Should You Create Widescreen Slides article to understand more.

Once you’ve chosen your slide size and prepped your coffee, it’s time to roll up your sleeves and jump into the step-by-step action. But before we start clicking buttons like a gamer on launch day—let’s clear the air:

You don’t need a specific Photoshop version to follow along. Seriously. Whether you’re rocking the vintage vibes of Photoshop CS6 or sipping the cloud-based coolness of Photoshop 2025, the principles stay the same. It’s like cooking pasta—you don’t need Nonna’s exact pot to make it taste delicious.

Fun Fact: Photoshop CS6

Photoshop CS6 came out back in 2012—the same year the Mars rover Curiosity landed. So yes, the screenshots in this tutorial are a little space-age nostalgic.

So, grab whatever flavor of Photoshop you have installed and let’s dive in. The magic isn’t in the version—it’s in the vision.
  1. Creating a new image in Photoshop is like choosing your baking tray before whipping up a delicious cake—you’ve gotta get the size right so your creation doesn’t spill over or come out too flat.
  2. First up, open Photoshop and get ready to set those dimensions!
    1. If you’re designing for a Standard (4:3) PowerPoint, type in 1024 x 768 pixels. That’s like baking a small round cake—classic, comfy, fits most plates (or screens).
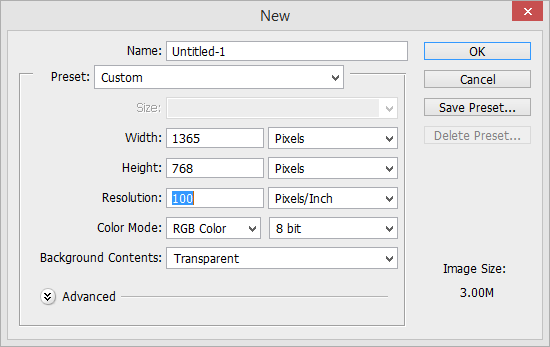
    2. If you’re going for Widescreen (16:9), enter 1365 x 768 pixels. It’s the rectangular tray—better for those long, stylish presentations on modern screens.
  3. But wait... why choose between chocolate and vanilla when you can swirl both? To get the best of both worlds, we’ve picked 1365 (width) x 768 (height), as shown in Figure 1, below.
  4. Create a new image in Photoshop
    Figure 1: Create a new image in Photoshop
  5. Resolution time! Set it to 100 Pixels/Inch. Think of resolution like sugar in your batter—it affects the texture and detail. More pixels = more sweetness for the eyes. Just match your settings to what you see in Figure 1, above, and click the OK button. You’re now ready to mix, layer, and decorate your slide background like a digital pastry chef.

    Fun Fact: Pixels

    The term "pixel" comes from "picture element"—the tiny building blocks of every digital image. Kind of like sprinkles on a cake, if each sprinkle made a square of color!
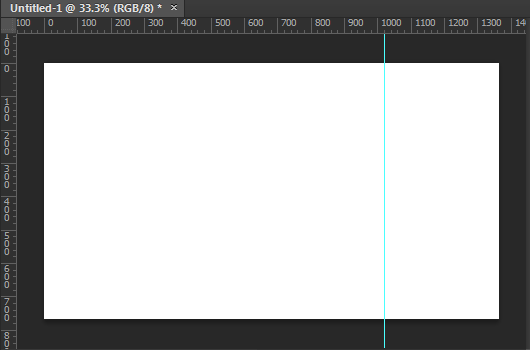
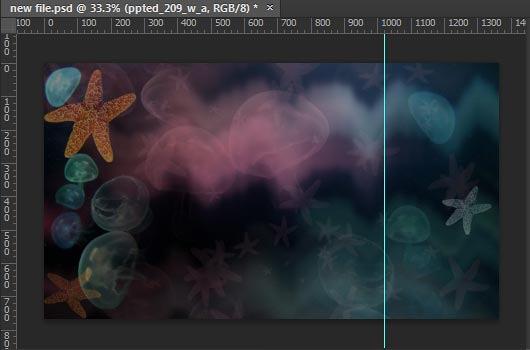
  6. Now that your canvas is set, it’s time to drop in a guide—think of it as a helpful road line telling you where to stop, park, or build. We're placing this guide right at 1024 pixels, like marking the pausing point on a giant sandwich so you know exactly where to a bite!
  7. Photoshop document with guide
    Figure 2: Photoshop document with guide
  8. Not familiar with guides? No worries—we’ve got a pre-formatted Photoshop file ready to roll—with guides already in place, like a baking sheet lined with parchment paper. Just download it and get creating, mess-free.
  9. You’ve got your canvas set, your guide in place, and your creativity bubbling—now it’s time to do something! Whether you're a digital doodler or a layer-layering ninja, fire up your favorite Photoshop tools and start crafting a background that’ll wow your audience. Think of this part like frosting a cake—sure, the base is important, but now you get to swirl, sprinkle, and decorate to your heart’s content.
  10. Not sure how to begin? Don’t panic! We’ve got quick background tutorials ready to help you jump-start your masterpiece. Like baking with a boxed mix—it’s speedy, sweet, and still counts as homemade.
  11. One golden rule before you go full Picasso: Keep all your important stuff to the left of the guide, as shown in Figure 3, below. That’s the roomier half of your canvas where your visuals won’t get chopped off or squished when used in a Standard slide layout.
  12. Important graphic elements are placed leftwards
    Figure 3: Important graphic elements are placed leftwards
  13. You’ve designed your slide background, layered it like a seven-tier cake, and now it’s time to export that beauty out into the wild! But before you hit “Save,” let’s talk about which format fits your screen-size party best. Think of this like choosing the right envelope for your birthday card:
    • For Widescreen (16:9)—the modern, panoramic envelope—just hit save and choose a format like JPG or PNG. Easy peasy. You're good to go, no trimming required!
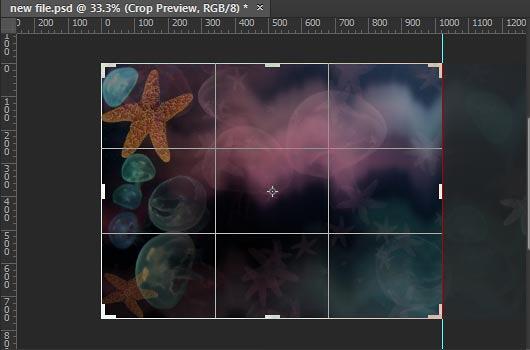
    • For Standard (4:3)—the cozy, square-ish envelope—you’ll need to make one extra move. Open up Photoshop’s Crop Tool and slice off the bits to the right of your guide. Yep, everything leftwards of the guide is your golden zone, like keeping just the scenic half of a postcard, as shown in Figure 4, below.
  14. From Widescreen to Standard!
    Figure 4: From Widescreen to Standard
  15. Analogy time! Cropping for Standard is like prepping a travel photo for your square Instagram post—you keep the breathtaking mountain but gently trim the extra sky so it fits perfectly in the frame.
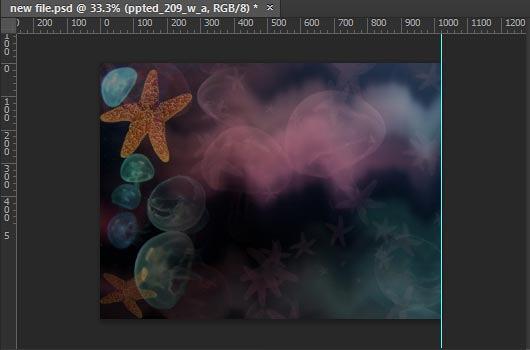
  16. Once the cropping is done, you'll be left with a Standard (4:3) aspect ratio background, as shown in Figure 5, below.
  17. Your Standard aspect ratio background
    Figure 5: Your Standard aspect ratio background
  18. Hold your horses, pixel Picasso! Before you gallop off to save your file, here’s a pro tip that could save your efforts (or at least your uncropped artwork).
  19. In Photoshop, exporting as a JPG or PNG is like taking a photo of your cake—you capture how it looks right now, frosting and sprinkles included. But if you hit Save, you’re locking in those edits like putting the cake in the freezer... no going back for changes unless you've got a time machine.
  20. Want to preserve your uncropped design? Here’s the magic spell:
    1. Export your cropped image (JPG or PNG).
    2. Then use Edit | Step Backward—Photoshop’s version of a rewind button. Like stepping back from a paint spill before it touches your shoes.
  21. Unlike PowerPoint, Photoshop doesn’t have a “progressive undo” history panel by default. It’s more like a typewriter with a backspace key, not a Google Doc with infinite revision history.

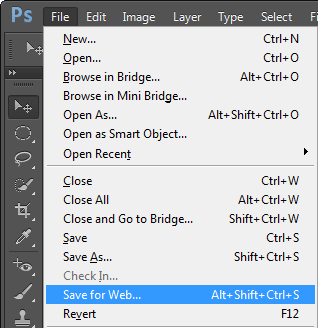
    Save for Web in Photoshop

    Explore Photoshop's File | Save for Web option, as shown in Figure 6, below. This option exports high-quality PNG and JPG graphics that are optimized for size.
    Summon Photoshop's Save for Web option
    Figure 6: Summon Photoshop's Save for Web option

  22. You’ve baked your image to perfection in Photoshop and exported it as a tasty JPG or PNG—now it’s time to serve it up on your PowerPoint slide. Refer to our Slide Background Fills: Picture page for more info.

    Background or Wallpaper?

    The Picture Fill feature in PowerPoint for backgrounds is like instant wallpaper—your custom design stretches neatly across the slide, giving it personality before you even add text.

  23. Have fun creating backgrounds for your PowerPoint presentations in Photoshop or other image editors.

Need expert-prepared custom PowerPoint presentations? Contact this professional presentation writing service online!


People Also Ask:

Should I design different backgrounds for title and content slides in Photoshop?

Yes, it’s good practice to design unique but consistent backgrounds for titles, content, and section slides.

What file format should I export from Photoshop for PowerPoint backgrounds?

Export as JPEG or PNG for best compatibility and quality in PowerPoint.

Should I use RGB or CMYK color mode for PowerPoint backgrounds in Photoshop?

Use RGB color mode, as PowerPoint is optimized for screen and digital display.

04 10 02 - Other Tutorials: Creating Slide Backgrounds in Photoshop for PowerPoint (Glossary Page)

You May Also Like: Ten Easy Topics for Pecha Kucha | Turnip PowerPoint Templates


Popular Posts

Change the Unit of Measurement in Windows 10
Learn how to change the unit of measurement from US to Metric, and vice versa in Windows 10.

PowerPoint Tutorials, Articles and Reviews
Tutorials, reviews, articles and templates for Microsoft PowerPoint and other presentation software.

PowerPoint Templates
Find over 6000 PowerPoint templates in thousands of categories and all colors—from a trusted PowerPoint template resource for 20 years.

Create Animated GIFs from PowerPoint Slides
Explore ways to create animated GIFs from PowerPoint slides.


Ebook PowerPoint Keyboard Shortcuts

PowerPoint Keyboard Shortcuts and Sequences Ebook

PowerPoint 365, 2019, 2016, 2013, 2011, 2010, 2007 and 2003 for Windows

PowerPoint 365, 2019, 2016 and 2011 for Mac

PowerPoint for the Web on Windows and Mac

Have you ever used keyboard shortcuts and sequences in PowerPoint? Or are you a complete keyboard aficionado? Do you want to learn about some new shortcuts? Or do you want to know if your favorite keyboard shortcuts are documented?

Go and get a copy of our PowerPoint Keyboard Shortcuts and Sequences ebook.


Microsoft and the Office logo are trademarks or registered trademarks of Microsoft Corporation in the United States and/or other countries.

Home | PowerPoint | Photoshop | PowerPoint Templates | PowerPoint Tutorials | Blog | Notes | Ezine | Media Kit | Feedback | Site Map | About Us | Contact Us

Link to Us | Privacy | Testimonials

PowerPoint Backgrounds | Christian PowerPoint Backgrounds | Business PowerPoint Presentation Templates

Plagiarism will be detected by Copyscape

©2000-2025, . All rights reserved.