Indezine Logo


Hierarchical Guide Options in PowerPoint 2016 for Windows

Learn about hierarchical guide options in PowerPoint 2016 for Windows. Hierarchies differ between guides in slides, slide layouts, and slide masters.


Author:

Product/Version: PowerPoint 2016 for Windows

OS: Microsoft Windows 7 and higher


Enabling guides helps ensure objects are aligned consistently and positioned in the same relative location across successive slides. This, however, is only a starting point. Guides can be customized further through hierarchical options, extending well beyond basic alignment. We've already covered the guide options, where the available options apply only to guides placed directly on slides.

PowerPoint also supports guides at a higher level, within the Slide Master and individual Slide Layouts. Guides are color-coded based on where they're added, whether in the Slide Master, a specific Slide Layout, or a regular slide, making it easy to identify their origin at a glance.

Guide Hierarchy in PowerPoint
Let’s Paraphrase


Guide Hierarchy in PowerPoint

Follow these steps to explore the hierarchy for guides in PowerPoint 2016 for Windows:
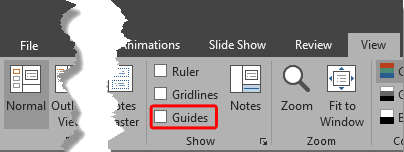
  1. Launch PowerPoint, and make sure that your guides are not enabled. To be sure, access the View tab of the Ribbon, and make sure that the Guides check-box is not selected, as shown highlighted in red within Figure 1, below.
  2. Guides check-box not selected
    Figure 1: Guides check-box not selected
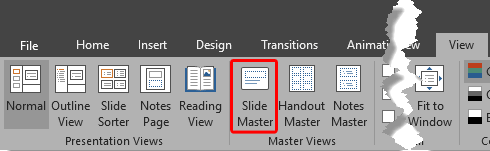
  3. Now, access the View tab of the Ribbon, and click the Slide Master button, as shown highlighted in red within Figure 2, below.
  4. Slide Master button
    Figure 2: Slide Master button
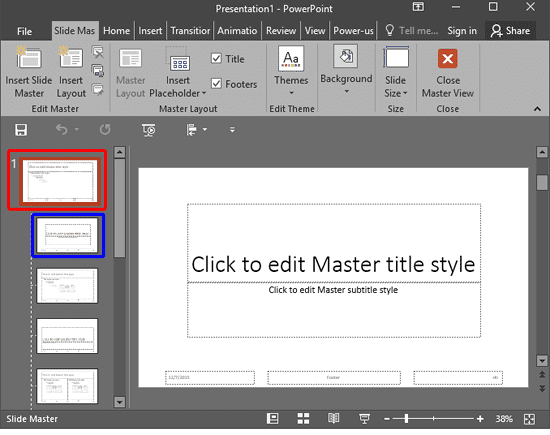
  5. Doing so brings up Slide Master view, as shown in Figure 3, below. Here, select the Slide Master, the larger thumbnail within the pane on the right side, as shown highlighted in red within Figure 3.
  6. Slide Master selected
    Figure 3: Slide Master selected
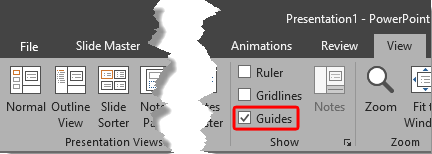
  7. Now, access the View tab and select the Guides check-box, as shown highlighted in red within Figure 4, below.
  8. Guides check-box selected
    Figure 4: Guides check-box selected
  9. Changes in Slide Master Influence All Slides

  10. Selecting the Slide Master and making the guides visible will influence all Slide Layouts and individual slides within the particular Slide Master.
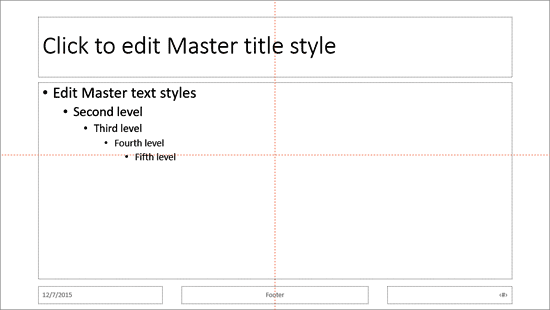
  11. This action makes the default guides visible on the Slide Master, as shown in Figure 5, below. Note that these guides are red in color.
  12. Guides within Slide Master
    Figure 5: Guides within Slide Master
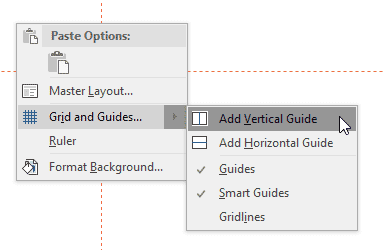
  13. Now, select any individual Slide Layout within the Slides pane, as shown highlighted in blue within Figure 3, previously on this page. Doing so will show the selected Slide Layout in the Slide Area. Now, right-click anywhere on the empty Slide Area to bring up a contextual menu, as shown in Figure 6, below. Within the contextual menu, select the Grid and Guides | Add Vertical Guide option, as shown in Figure 6.
  14. Add Vertical Guide option to be selected
    Figure 6: Add Vertical Guide option to be selected
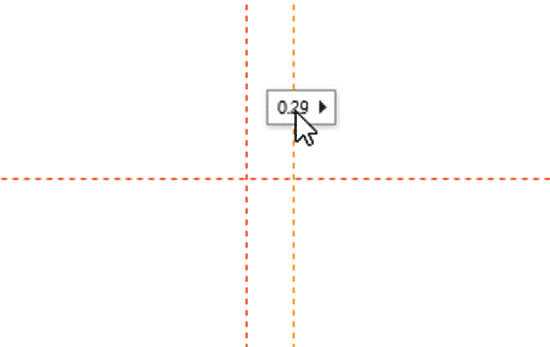
  15. This step adds an orange-colored vertical guide right above the previous red-colored vertical guide, as shown zoomed in Figure 7, below.
  16. Zoomed in view of the Orange Vertical Guide overlapping the Red Vertical Guide
    Figure 7: Zoomed in view of the Orange Vertical Guide overlapping the Red Vertical Guide
  17. How do we know that this orange guide is overlapping the red guide? That's easy. Just drag the added orange vertical guide anywhere towards left or right to see the red guide beneath it, as shown in the zoomed view in Figure 8, below.
  18. Orange Guide being dragged
    Figure 8: Orange Guide being dragged
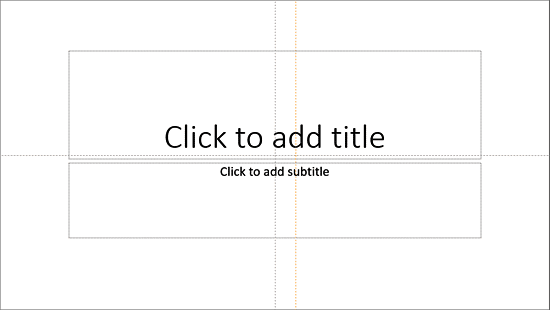
  19. Now, go back to Normal view. Here, you will see red-colored horizontal and vertical guides, and one orange-colored vertical guide. Now, add horizontal and vertical guides on the active slide. You will see that grey-colored vertical guides get placed over the red-colored guide, as shown in Figure 9, below. What happened to the red guides added to the Slide Master? Let's find out next.
  20. Guides within Normal view
    Figure 9: Guides within Normal view
  21. The red guides from the Slide Master are hidden beneath the grey guides! If you drag either the grey horizontal or vertical guides away from their default position, you will see the red-colored guides below, as shown zoomed in Figure 10, below.
  22. Guides of all three colors visible on the slide
    Figure 10: Guides of all three colors visible on the slide
Back

Let’s Paraphrase

To paraphrase, let us remember:

  • Red colored guides are from Slide Master and are placed at the bottom of the grey and orange guides.
  • Orange colored guides are from Slide Layouts and are placed between the red and the grey guides.
  • Grey colored guides are for the Slides themselves and are always placed atop the red and orange guides.

It's for this reason that you should avoid recoloring your guides (recoloring guides has been explained in our Guide Options in PowerPoint 2016 tutorial). Red, Orange, and Grey are standardized colors for guides.

Why Cannot I Select a Guide?

You cannot select guides placed within the Slide Master or the Slide Layouts within the Slides in Normal view. You can also not select guides placed within the Slide Layout on your Slides in Normal view. However, all guides will allow snapping and positioning of slide objects.

You can add more guides anywhere you want based on your requirement by dragging existing guides or using options within the right-click contextual menu.

Back

See Also:

01 09 18 - Working with Slides: Hierarchical Guide Options in PowerPoint (Glossary Page)

Hierarchical Guide Options in PowerPoint 365 for Windows
Hierarchical Guide Options in PowerPoint 2016 for Mac
Hierarchical Guide Options in PowerPoint 2013 for Windows

You May Also Like: Morph in PowerPoint: Conversation with Lauren Janas | How to Make Your Presentation Fly


Popular Posts

Flowchart Symbols: What They Represent?
Explore various flowchart symbols, and learn about what they represent.

Types of Animation in PowerPoint 2010 for Windows
Learn about different animation types in PowerPoint 2010 for Windows.

Restoring Earlier Versions of Presentations in PowerPoint 2010 for Windows
Learn how to restore earlier versions of your current presentation in PowerPoint 2010.

What is Animation in PowerPoint?
Learn what animations is and how to effectively plan animation for PowerPoint.


Polygon Center Circles for PowerPoint

These special circles have polygon centers: the centers are made of triangles, squares, pentagons, and hexagons! And based on the sides of the polygon, the rest of the circle has that many segments.

Download and use these Polygon Center Circles in your slides for just $4.99


Microsoft and the Office logo are trademarks or registered trademarks of Microsoft Corporation in the United States and/or other countries.

Home | PowerPoint | Photoshop | PowerPoint Templates | PowerPoint Tutorials | Blog | Notes | Ezine | Media Kit | Feedback | Site Map | About Us | Contact Us

Link to Us | Privacy | Testimonials

PowerPoint Backgrounds | Christian PowerPoint Backgrounds | Business PowerPoint Presentation Templates

Plagiarism will be detected by Copyscape

©2000-2026, . All rights reserved.