Learn about Presenter view in PowerPoint 2016 for Mac. This is the view that allows you to use two displays effectively to deliver your slides in PowerPoint.
Author: Geetesh Bajaj
Product/Version: PowerPoint 2016 for Mac
OS: Mac OS X
Presenter view is a purpose-built view that accompanies Slide Show view. This view is beneficial in an environment that has at least two displays, such as a laptop and a projector. The projector then shows the actual slides, commonly called Slide Show view. However, you see the Presenter view on the laptop.
Figure 1, below, shows Presenter view in PowerPoint 2016 for Mac. Notice that you get to see much more than just the slide. Rest assured that the audience viewing the projector output only sees the slide!
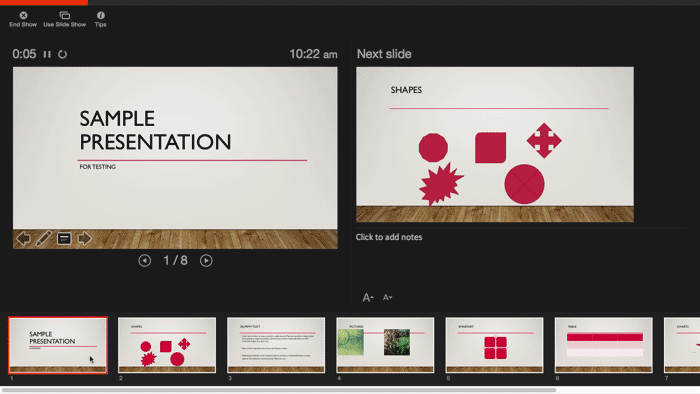
Figure 1: Presenter view in PowerPoint 2016 for Mac
While in earlier versions, Presenter view had to be turned on, PowerPoint 2016 automatically detects if you have two displays and turn on Presenter view. You should however still check and ensure that this view shows up on your laptop and not on the projected view. We show you how you can swap displays using the Use Slide Show option, later on this page.
If you are using only a single display, you can still choose to change to Presenter view from within Slide Show view. Hover your cursor over the bottom left area of the slide to find four watermarked navigation icons, as shown in Figure 2, below. Click the third icon, and from the resultant menu, choose the Use Presenter View option, as shown in Figure 2.
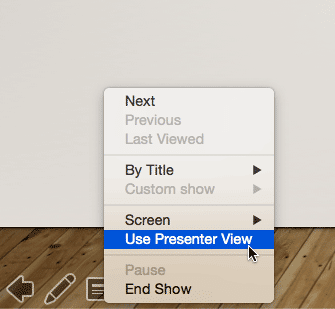
Figure 2: Use Presenter View option
Alternatively, you can access the Slide Show tab of the Ribbon and click the Presenter view button, as shown highlighted in red within Figure 3, below.
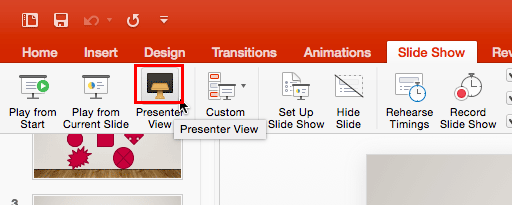
Figure 3: Presenter view button
Either of the above options brings up PowerPoint 2016's Presenter view, as shown in Figure 1, previously on this page and in Figure 4, below.
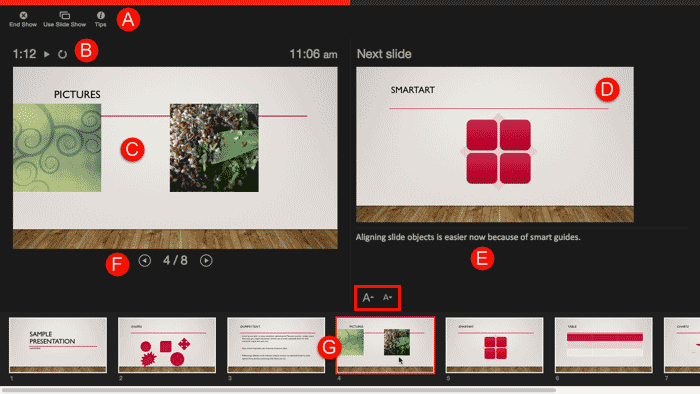
Figure 4: Presenter View interface
We explain all these features, and more, as marked above in Figure 4.
Here you find three options:
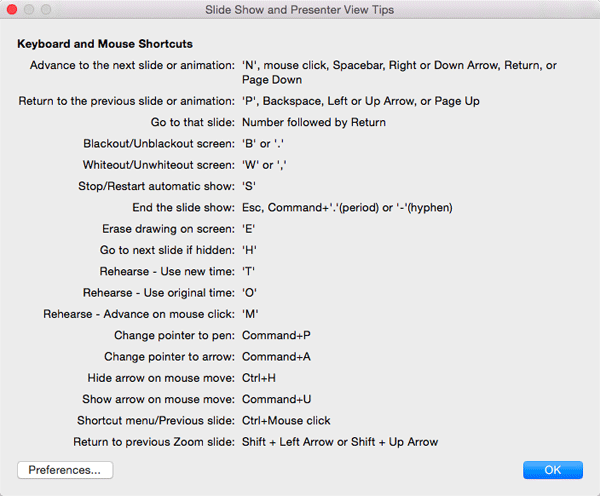
The Timer determines the time elapsed since the slide show started. Additionally, PowerPoint 2016 introduces two extra buttons for Pause/Resume and Restart.
This shows the active slide, as shown in Figure 4, above. The same slide is simultaneously displayed full screen on the projected screen (secondary display).
Towards the right of the Preview area, you'll find a preview of the next slide.
This section displays the notes (if there are any) for the current slide. Here you'll find two buttons to Make the text larger and Make the text smaller, as shown highlighted in red within Figure 4, previously on this page.
Click the Previous Slide or the Next Slide arrow buttons to navigate to those slides. Also, the area in between shows which slide is active out of the total number of slides.
The bottom area of Presenter view shows thumbnail views of all slides in the active presentation. You can click any of these slide thumbnails to make it the active, projected slide.
01 07 11 - Views: Presenter View in PowerPoint (Glossary Page)
Presenter View in PowerPoint 365 for Windows
Presenter View in PowerPoint 365 for Mac
Presenter View in PowerPoint 2019 for Windows
Presenter View in PowerPoint 2016 for Windows
Presenter View in PowerPoint 2013 for Windows
Presenter View in PowerPoint 2011 for Mac
Presenter View in PowerPoint 2010 for Windows
You May Also Like: How to Make Long-Lasting Change | Paisley PowerPoint Templates


Microsoft and the Office logo are trademarks or registered trademarks of Microsoft Corporation in the United States and/or other countries.