Indezine Logo


Presenter View in PowerPoint 365 for Windows

Learn about Presenter view in PowerPoint 365 for Windows. This is the view that allows you to use two displays effectively to deliver your slides in PowerPoint.


Author:

Product/Version: PowerPoint 365 for Windows

OS: Microsoft Windows 10 and higher


Presenter view is a purpose-built view that accompanies Slide Show view in PowerPoint. This view is beneficial in an environment that has at least two displays such as a laptop and a projector, or even two monitors attached to your desktop system. The projector or the secondary display then shows the actual slides, in what is commonly called Slide Show view. However, you see Presenter view on the laptop or on the primary display.

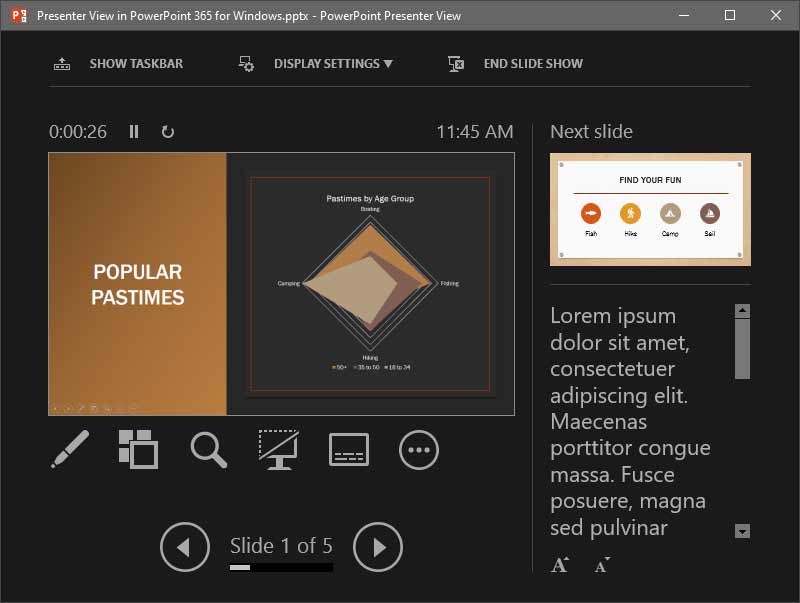
Figure 1, below, shows Presenter view in PowerPoint 365 for Windows. Notice that you get to see much more than just the slide. Rest assured that the audience viewing the projector or secondary output only sees the slide!
Presenter view in PowerPoint 365
Figure 1: Presenter view in PowerPoint 365

While Presenter view in older versions of PowerPoint had to be manually turned on, newer versions of PowerPoint automatically detect if you have two displays, and turn on Presenter view. You should however still check and ensure that this view shows up on your primary display and not on the secondary display. We show you how you can swap displays using the Display Settings option, later on this page.

If you are using only a single display, you can still choose to change to Presenter view from within Slide Show view. Hover your cursor over the bottom left area of the slide to find seven watermarked navigation icons, as shown in Figure 2, below. Click the last icon and from the resultant menu, choose the Show Presenter View option, as shown in Figure 2.
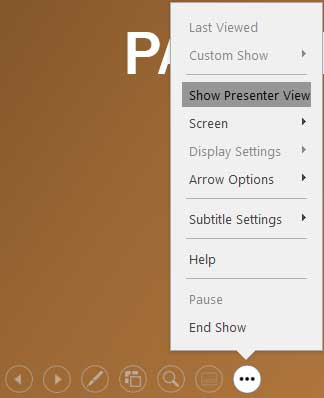
Show Presenter View option to be selected
Figure 2: Show Presenter View option to be selected

Doing so brings up PowerPoint 365's Presenter view, as previously shown in Figure 1, above. Notice that PowerPoint 365's Presenter view has an enhanced Web 2.0 style interface and there are many other features in the Presenter view's console such as zooming onto a specific part of the slide, and then panning across the slide area. Also, you have dedicated Pause, Resume, and Restart buttons to give you more control over slide timings. Additionally, you have easy access to the Laser Pointer tool, which directs the audience’s eye with a bright-colored point of light.

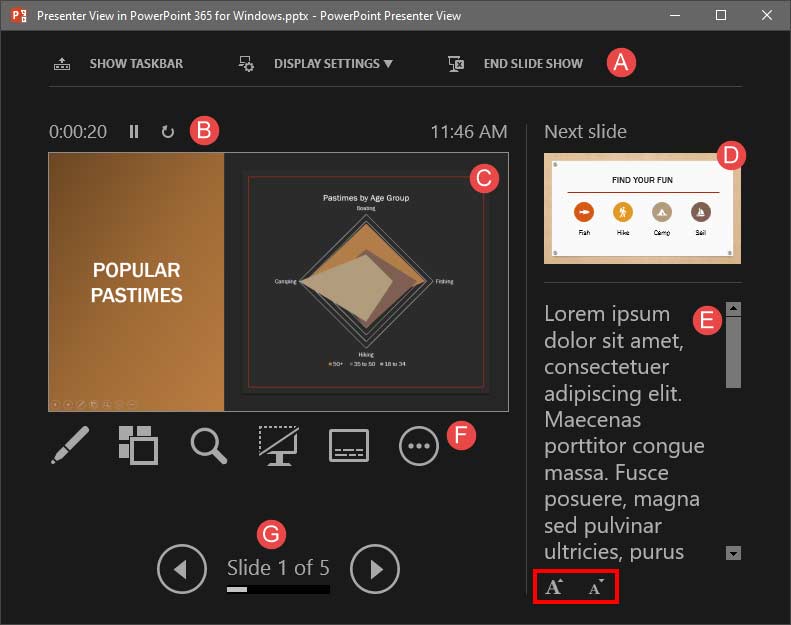
We explain all these features, and more, as marked below in Figure 3, below.
Presenter View
Figure 3: Presenter view

A. Toolbar

Here you find three options:

  1. Show Taskbar: A toggle that alternates between showing your Window taskbar. Click once to make the taskbar available. You'll then find that the option is now highlighted, as shown in Figure 4, below.
  2. Show Taskbar option gets highlighted on clicking
    Figure 4: Show Taskbar option gets highlighted on clicking
  3. It can be useful to have access to the taskbar if you need to access any open application. Then once you get back to your slide show, you can click the Show Taskbar option again to hide the taskbar. The option is then no longer highlighted.
  4. Display Settings: This option, when clicked spawns a drop-down menu, as shown in Figure 5, below. Here you'll get options to Swap Presenter View and Slide Show, and also another option to Duplicate Slide Show.
  5. Display Settings drop-down menu
    Figure 5: Display Settings drop-down menu
  6. If you are on a single display environment, these options will be grayed out. On a dual-display environment, you can use the Swap Presenter View and Slide Show option to swap displays between your primary and secondary displays. The Duplicate Slide Show option will show Slide Show view on both displays.
  7. End Slide Show: Exits the presentation. You can also duplicate this option using the Esc keyboard shortcut.

B. Timer

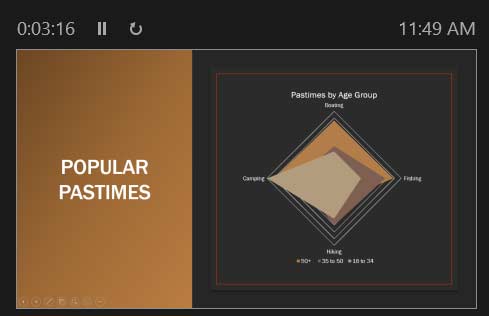
Shows above the Slide Preview area, as shown in Figure 6, below. The Timer determines the time elapsed since the slide show started. Additionally, PowerPoint provides two buttons for Pause/Resume and Restart.
Slide Preview and Timer
Figure 6: Slide Preview and Timer

C. Preview area

This shows the active slide, as shown in Figure 6, above. The same slide is simultaneously displayed full screen on the projected screen (secondary display).

D. Next Slide

On the top right side, you'll find a preview of the next slide.

E. Notes pane

This section displays the notes (if there are any) for the current slide. Here you'll find two buttons to Make the text larger and Make the text smaller, as shown highlighted in red within Figure 3, previously on this page.

F. Extra Controls

There are six extra controls available below the Slide Preview, as shown in Figure 7, below. These are explained from left to right:

Extra Controls within Presenter view
Figure 7: Extra Controls within Presenter view

  1. Pen and Laser Pointer tools: Click on this button to bring up a menu, as shown in Figure 8, below.
  2. Contextual menu in Presenter view
    Figure 8: Contextual menu in Presenter view
  3. The options within this menu are explained below:
  4. Laser Pointer: Directs the audience's eye with a bright-colored point of light. You can set the Laser Pointer color within the Set Up Show dialog box. To access this dialog box, choose the Slide Show tab of the Ribbon, and then click the Set Up Slide Show button.
  5. Pen: Lets you draw or annotate with a pen. Learn more in our Using the Pen and Highlighter Tools in Slide Show View in PowerPoint tutorial.
  6. Highlighter: Almost like a virtual highlighter pen. Learn more in our Using the Pen and Highlighter Tools in Slide Show View in PowerPoint tutorial.
  7. Ink Color: Changes the pen color.
  8. Eraser: Lets you erase any pen or highlighter marked areas (grayed out if there are no marked areas on the current slide).
  9. Erase All Ink on Slide: Removes all ink markings (grayed out if there are no marked areas on the current slide).
  10. Arrow Options: Brings up a sub-menu with options to show (Visible) or hide (Hidden) the cursor while presenting. The Automatic option is turned on by default. This option shows the cursor when you move your mouse or trackpad for a while and hides it again when there's no moving activity for a while.
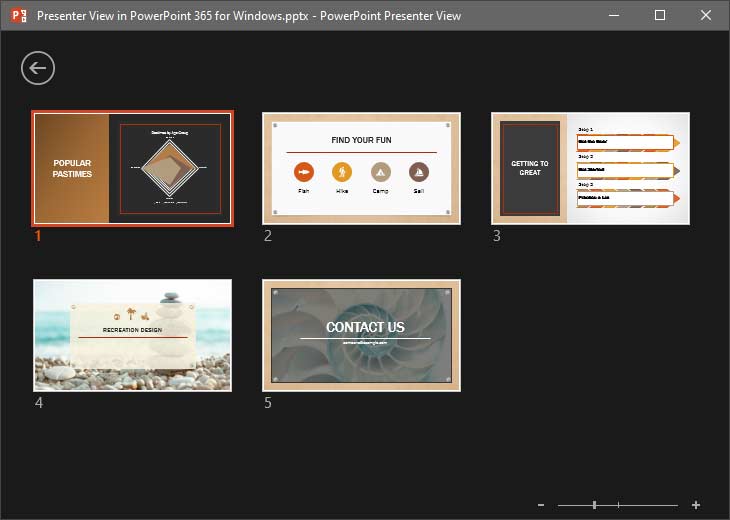
  11. See All Slides: Click on this button to bring up the whole slide stack, as shown in Figure 9, below, and choose any slide. With this option, you can easily switch slides in or out of sequence from a grid that only you see. Your audience only sees the slide you’ve selected.
  12. Slides stack
    Figure 9: Slides stack
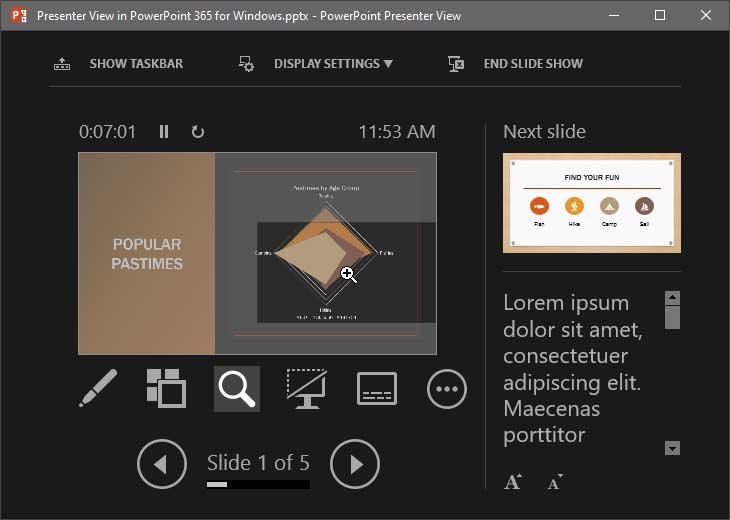
  13. Zoom into the slide: With this tool, you can zoom a part of the slide and then pan around. Figure 10, below, shows the zoom option as active.
  14. Zoom active within the Presenter view
    Figure 10: Zoom active within the Presenter view
  15. Black or Unblack Slide Show: This is the toggle button to turn the screen completely black, click again to un-black the screen. You can get the same results by pressing the B shortcut key. Similarly, you can press the W shortcut key to get a white screen, and press W again to un-white the screen.
  16. Captions and Subtitles: Shows subtitles automatically generated from what you speak, as shown highlighted in red within Figure 11, below. These captions are also shown on the secondary display in Slide Show view. This Captions and Subtitles feature needs a connected microphone to work.
  17. Captions and Subtitles
    Figure 11: Captions and Subtitles
  18. More Slide Show Options: Click this button to bring up a drop-down list, as shown in Figure 12, below.
  19. More slide show options
    Figure 12: More slide show options
  20. Within this list, you'll find more options:
  21. Last Viewed: Goes to the last viewed slide.
  22. Custom Show: Opens a sub-menu that lists all custom shows available in the open presentation. This option is grayed out if there are no Custom Shows created within the presentation being viewed.
  23. Hide Presenter View: Hides Presenter View and takes you back to Slide Show view on a single display environment.
  24. Screen: Lets you show a Black or White screen to the audience, Show/Hide Ink Markup (pen, highlighter, etc.), and reveal the Windows taskbar (Switch Programs).
  25. Help: Brings up a list of keyboard shortcuts that you can use while presenting, as shown in Figure 13, below.
  26. Keyboard shortcuts for presenting
    Figure 13: Keyboard shortcuts for presenting
  27. Keyboard Shortcuts for PowerPoint

    PowerPoint Keyboard Shortcuts

    Do you want more keyboard shortcuts?

    Explore our PowerPoint Keyboard Shortcuts and Sequences Ebook that is updated for all PowerPoint versions.

  28. Pause: Lets you pause your slide show. Animations pause too, and you click Pause again to restart, or just press the Pause/Break key on your keyboard. Most laptop keyboards may not have this key but bigger desktop keyboards have the Pause/Break key.
  29. End Show: Exits Slide Show and Presenter view.

G. Navigation

Use the Previous Slide or the Next Slide arrow buttons to navigate to those slides. Also, the area between these buttons shows which slide is active.


People Also Ask:

Why is Presenter View not working in PowerPoint?

Make sure you're connected to a second display and have Presenter View enabled in the Slide Show settings.

Can I use Presenter View with one monitor?

Officially no, but you can simulate it by duplicating windows or using external tools.

Can I customize the layout in Presenter View?

No, the layout is fixed, but you can toggle tools and resize the notes pane slightly.

See Also:

01 07 11 - Views: Presenter View in PowerPoint (Glossary Page)

Presenter View in PowerPoint 365 for Mac
Presenter View in PowerPoint 2019 for Windows
Presenter View in PowerPoint 2016 for Windows
Presenter View in PowerPoint 2016 for Mac
Presenter View in PowerPoint 2013 for Windows
Presenter View in PowerPoint 2011 for Mac
Presenter View in PowerPoint 2010 for Windows

You May Also Like: 5 Ideas to Help You Remember Your Speech | Geometrical Arabic PowerPoint Templates


Popular Posts

Applying Slide Masters to Individual Slides in PowerPoint 2010
Learn how to apply Slide Masters to individual slides in PowerPoint 2010.

Copy and Remove Highlighting for Text in PowerPoint 2013
Learn how to copy and remove highlighting for text in PowerPoint 2013.

Add Headers and Footers to Slides in PowerPoint 2016 for Windows
Learn how to add Headers and Footers to slides in PowerPoint 2016 for Windows.

Text Box Autofit Options in PowerPoint 2016 for Windows
Learn about Text Box autofit options in PowerPoint 2016.


PowerPoint Keyboard Shortcuts and Sequences:
PowerPoint 2016, 2013, 2011, 2010, 2007 and 2003 for Windows
PowerPoint 2016 and 2011 for Mac
PowerPoint Online for Windows and Mac

Have your ever used keyboard shortcuts and sequences in PowerPoint? Or are you a complete keyboard aficionado? Do you want to learn about some new shortcuts? Or do you want to know if your favorite keyboard shortcuts are documented?

Go and get a copy of our PowerPoint Keyboard Shortcuts and Sequences ebook.


Microsoft and the Office logo are trademarks or registered trademarks of Microsoft Corporation in the United States and/or other countries.

Home | PowerPoint | Photoshop | PowerPoint Templates | PowerPoint Tutorials | Blog | Notes | Ezine | Media Kit | Feedback | Site Map | About Us | Contact Us

Link to Us | Privacy | Testimonials

PowerPoint Backgrounds | Christian PowerPoint Backgrounds | Business PowerPoint Presentation Templates

Plagiarism will be detected by Copyscape

©2000-2025, . All rights reserved.