Do you want to insert video clips within your PowerPoint slides? Videos can be useful to express your message, and PowerPoint lets you easily insert video clips. There are some prerequisites though that you must have in place before you use video clips in PowerPoint and also, you must be sure that you are using video clips for the right reasons.
Why Add Video Clips in PowerPoint Slides?
The Wrong Reasons
Before you proceed, spare a thought for the many wrong reasons why people add video clips to their slides:
- Video clips are often added to grab the audience's attention. The presenter or the message of your presentation should be relevant first, and only then, will a memorable video clip help.
- Some presenters think that a video clip will add some oomph! However, that’s just not the reason to add video clips.
- Other presenters believe that since many presentations contain video, they need to do the same. This herd-mentality won’t help. You must have a compelling reason to add video clips in your PowerPoint presentations.
The Correct Reasons
Fortunately, there are several good reasons for adding video clips to your slides:
- You need to show how a machine process works, and a recorded video clip is far more simpler to insert than animating the entire sequence.
- An important person cannot attend an event and sends his or her message as a recorded video clip. You insert this on the first slide.
- You want to show recorded video coverage to strengthen your point-of-view.
- Finally, the video clip should add value to the presentation and be beneficial to your audience.
Before You Begin with Video Files
Some points that you should consider while inserting a video clip in PowerPoint 2013 for Windows are:
- Your presentation should have been saved at least once before inserting the video.
- Your video clip should be in a PowerPoint-friendly file format.
- Preferably, copy any movie/video file you want to insert to the same folder which includes the presentation.
The last option ensures that your video links always work. This is less of a problem with PowerPoint 2013 since this version embeds any inserted videos as part of the presentation, unless you expressly override this option and choose to link to the video file instead. We will explain this further later on this page.
Now, follow these steps to learn how to insert a video clip in PowerPoint 2013 for Windows:
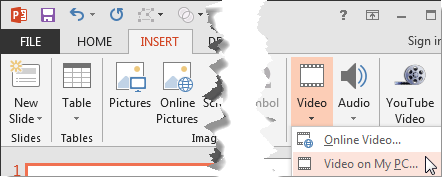
- Open your presentation and navigate to the slide where you want to insert a video clip. From the Insert tab of the Ribbon, click the lower half of the Video button to bring up the drop-down menu as shown in Figure 1, below. Within the drop-down menu choose the Video on My PC option.

Figure 1: Video on My PC option - Doing so brings up the Insert Video dialog box, as shown in Figure 2, below. Locate the folder where your videos are saved, and select any video clip you want to insert by clicking on it.

Figure 2: Insert Video dialog box - You can now click the Insert button, as shown in Figure 2, above. Clicking this option adds the video clip to the slide and also embeds it as part of your presentation file. Doing so can balloon the file size, and to avoid this bloat, you can just link the video clip rather than embedding it by following the alternative option explained next.
- To link rather than embed, click on the down-arrow next to the Insert button, as shown in Figure 3, below. Doing so brings up a menu with three options:

Figure 3: Link to File option Insert
- This is the default option, and the same as what we have discussed in the preceding paragraph. Yes, this option embeds the video as part of the PowerPoint file.
Link to File
- This option links the video file. Note that if you choose to link rather than embed, always copy your video or movie clip to the same folder as your presentation before you insert it within your slide.
Show previous versions
- Allows you to open a previous version of the video (if it exists). This option is based on native functionality available in recent versions of Microsoft Windows.
- Whichever option you choose, PowerPoint will place the video at the center of the slide, as shown in Figure 4, below.

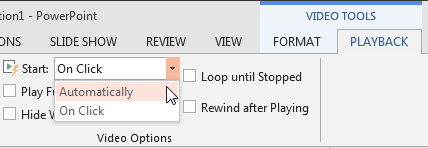
Figure 4: Video placed on slide - Click on the video to play in Slide Show view, or use the Play button on the Player Controls, shown below the video clip, as shown in Figure 4 above, to play in Normal view. You can also set the video to play automatically in Slide Show view. To do so, select the video so that the two Video Tool contextual tabs of the Ribbon are visible. Click the Video Tools Playback contextual tab of the Ribbon to activate it, as shown in Figure 5, below.

Figure 5: Video Tools Playback tab of the Ribbon
Contextual Tabs
- The Video Tools Options and Video Tools Playback tabs are contextual tabs. Contextual tabs are special tabs in the Ribbon that are not visible all the time. They only make an appearance when you are working with a particular slide object which can be edited using special options.
- This Playback tab offers you different options to control the playback of the video you have selected. Locate the Start drop-down list as shown in Figure 6, below, and select the Automatically option.

Figure 6: Option to start playing video automatically - Test if your video clip plays as expected. Make sure to save your presentation often.


