Learn about Ribbon and Tabs in PowerPoint 2013 for Windows. There are so many interface elements within the Ribbon and its Tabs.
Author: Geetesh Bajaj
Product/Version: PowerPoint 2013 for Windows
OS: Microsoft Windows 7 and higher
Introducing the Ribbon
Ribbon Contents
The Ribbon is the long strip comprising tabs with buttons across the top of the main window within the PowerPoint interface. Since PowerPoint 2007, the Ribbon has replaced all the menus and toolbars that were found in PowerPoint 2003 and older versions. The Ribbon contains almost all the commands you need to work with your slides, and is designed in a way that helps you quickly find the commands that you need to complete a task. You no longer have to search commands endlessly through many menus and sub-menus.
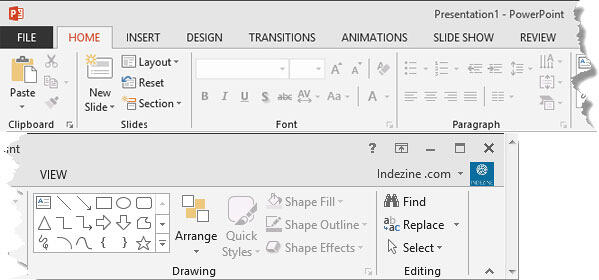
However, the File Menu still exists, as does a single toolbar called the Quick Access Toolbar. All the other commands are now found in the various tabs of the Ribbon within the interface. The Ribbon has several tabs, each named as you can see in Figure 1.

Figure 1: Ribbon and tabs within the PowerPoint 2013 interface
The Ribbon contains many interface elements that are explained below:


01 05 03 - Interface Overview: Ribbon and Tabs in PowerPoint (Glossary Page)
Ribbon and Tabs in PowerPoint 365 for Windows
Ribbon and Tabs in PowerPoint 365 for Mac
Ribbon and Tabs in PowerPoint 2019 for Windows
Ribbon and Tabs in PowerPoint 2016 for Windows
Ribbon and Tabs in PowerPoint 2016 for Mac
Ribbon and Tabs in PowerPoint 2011 for Mac
Ribbon and Tabs in PowerPoint 2010 for Windows
Ribbon and Tabs in PowerPoint 2007 for Windows
Ribbon and Tabs in PowerPoint for iOS – iPad
Ribbon and Tabs in PowerPoint for the Web
You May Also Like: Make Your Meetings Productive: Ask These 5 Questions | Text and Fonts in PowerPoint


Microsoft and the Office logo are trademarks or registered trademarks of Microsoft Corporation in the United States and/or other countries.