Indezine Logo


Reordering and Removing Ribbon Tabs in PowerPoint 365 for Windows

Learn how to reorder Ribbon tabs and remove the custom tabs in PowerPoint 365 for Windows. You will end up with a more streamlined Ribbon within PowerPoint.


Author:

Product/Version: PowerPoint 365 for Windows

OS: Microsoft Windows 10 and higher


Learn PowerPoint

Achieve an accurate Paste in Place in PowerPoint.


PowerPoint 365 for Windows' interface sports the Ribbon, which is tabbed. Each of these tabs contains a set of commands. By default, PowerPoint contains several such tabs, as shown highlighted in red within Figure 1, below.

Default Ribbon tabs within PowerPoint 365 interface
Figure 1: Default Ribbon tabs within the PowerPoint 365 interface

These Ribbon tabs can be customized, and you can ndeed add a new Ribbon tab as well. In fact, you may have more tabs in your PowerPoint 365 interface due to several reasons:

  1. You may have turned on the Developer tab. This tab is not displayed by default.
  2. You may have installed some PowerPoint add-ins, and these may show within an Add-Ins tab.
  3. You may have installed a PowerPoint add-in that created its own Ribbon tab.
  4. You may have selected a slide object that brings up a contextual tab. For example, you see extra Ribbon tabs when you select a chart on your slide.
  5. You may have created your own custom Ribbon tab.

All tabs can be reordered as required. However, the default Ribbon tabs, as shown in Figure 1, above, can only be reordered or hidden. They cannot be removed. Also, the Developer tab cannot be removed although it can also be hidden.

Follow these steps to explore more:
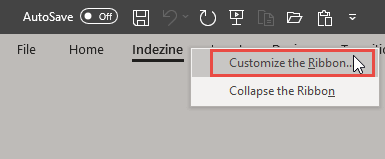
  1. You first need to bring up the PowerPoint Options dialog box. There are two ways to access this dialog box. The easier way is to right-click anywhere on the Ribbon and choose the Customize the Ribbon option, as shown highlighted in red within Figure 2, below.
  2. Customize the Ribbon option
    Figure 2: Customize the Ribbon option
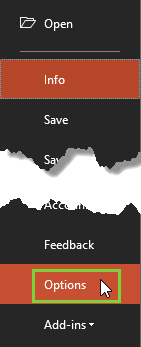
  3. Alternatively, choose the File menu to bring up Backstage view, as shown in Figure 3, below. Now, select Options, as shown highlighted in green within Figure 3.
  4. Options within File menu
    Figure 3: Options within File menu
  5. PowerPoint Options with a Keyboard Shortcut

  6. Also, if you are a keyboard aficionado, you can quickly press the Alt + F keys together and then press T.
  7. PowerPoint Keyboard Shortcuts

    PowerPoint Keyboard Shortcuts

    Do you want more keyboard shortcuts?

    Explore our PowerPoint Keyboard Shortcuts and Sequences Ebook that is updated for all PowerPoint versions.
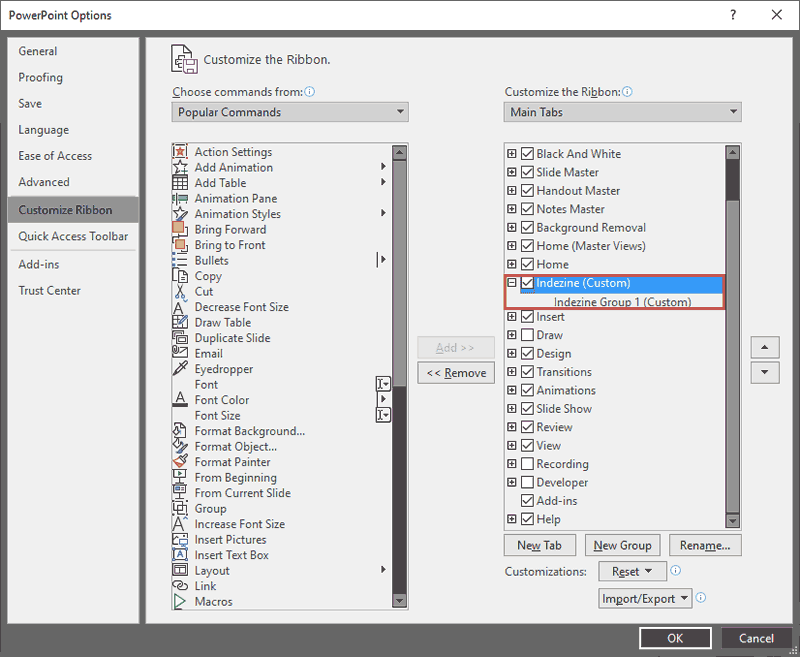
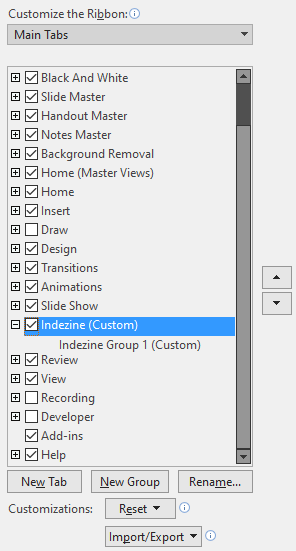
  8. Either way, you end up with the PowerPoint Options dialog box, as shown in Figure 4, below. Make sure you choose the Customize Ribbon option within the sidebar. Doing so shows the relevant options on the right side of the PowerPoint Options dialog box, as shown in Figure 4. Note that we added new Ribbon tab, as shown highlighted in red within Figure 4.
  9. PowerPoint Options dialog box
    Figure 4: PowerPoint Options dialog box
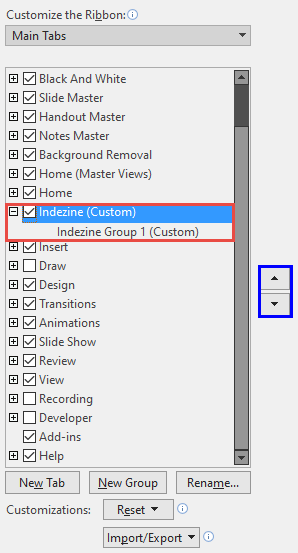
  10. Select the tab which you want to reorder within the PowerPoint Options dialog box. We selected our custom tab, as shown highlighted in red within Figure 5, below. Then, click the Move Up (to move the selected tab upwards) or Move Down (to move the selected tab downwards) buttons, as shown highlighted in blue within Figure 5.
  11. Select and reorder the Ribbon tab
    Figure 5: Select and reorder the Ribbon tab
  12. In Figure 6, below, you can see that the Indezine (Custom) tab is moved down from its original position.
  13. Ribbon tab moved down
    Figure 6: Ribbon tab moved down
  14. Figure 7, below, shows the reordered Ribbon tab is now placed after the Slide Show Ribbon tab. See the tabs that are highlighted in red, and compare them with Figure 1, shown previously on this page. Similarly, you can reorder any of the Ribbon tabs.
  15. Ribbon tab reordered
    Figure 7: Ribbon tab reordered
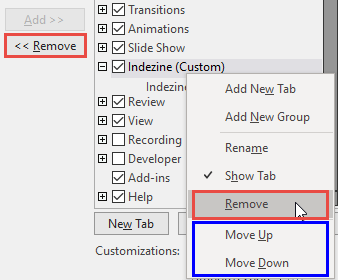
  16. To remove a custom tab, just select it within the Customize Ribbon tab of the PowerPoint Options dialog box. Then, right-click it to bring up a contextual menu, as shown in Figure 8, below. Then, select the Remove option, as shown highlighted in red within Figure 8. Alternatively, click the Remove button, as shown highlighted in red within Figure 8.
  17. Remove the selected tab
    Figure 8: Remove the selected tab
  18. Move Up and Move Down Options

  19. The right-click menu also contains the Move Up and Move Down options, as shown highlighted in blue within Figure 8, above.
  20. When done, click the OK button within the PowerPoint Options dialog box to get back to the PowerPoint 365 interface.

People Also Ask:

Can I remove default Ribbon tabs in PowerPoint?

Default tabs cannot be removed but can be hidden. Right-click on the Ribbon and choose "Customize the Ribbon..." In the ensuing dialog, uncheck the box next to the tab you want to hide. Click OK to confirm.

How can I remove custom Ribbon tabs?

To remove a custom tab, right-click on the Ribbon and select "Customize the Ribbon..." In the ensuing PowerPoint Options dialog, select the custom tab. Click the "Remove" button. Click OK to apply changes.

Are Ribbon customizations specific to PowerPoint or applied across all Office applications?

Customizations are application-specific; changes made in PowerPoint do not affect other Office applications.

See Also:

01 06 03 - Working with QAT and Ribbons: Reordering and Removing Ribbon Tabs in PowerPoint (Glossary Page)

Reordering and Removing Ribbon Tabs in PowerPoint 365 for Mac
Reordering and Removing Ribbon Tabs in PowerPoint 2019 for Windows
Reordering and Removing Ribbon Tabs in PowerPoint 2016 for Windows
Reordering and Removing Ribbon Tabs in PowerPoint 2016 for Mac
Reordering and Removing Ribbon Tabs in PowerPoint 2013 for Windows
Reordering and Removing Ribbon Tabs in PowerPoint 2011 for Mac
Reordering and Removing Ribbon Tabs in PowerPoint 2010 for Windows

You May Also Like: Using the Chains Feature in ToolsToo v10: Conversation with Gil Segal | Emotions PowerPoint Templates


Popular Posts

Set Minimum and Maximum Values on Value Axis in PowerPoint 2013 for Windows
Learn how to set the Minimum and Maximum values on Value Axis of Charts in PowerPoint 2013 for Windows.

Crop Pictures (Mask to Shape) in PowerPoint 2011 for Mac
Learn how to crop pictures using Mask to Shape option in PowerPoint 2011 for Mac.

Playing Video Across Slides in PowerPoint 2016 for Windows
Play a video clip across slides in PowerPoint 2016 for Windows.

Set Document Resolution in PowerPoint 2016 for Windows
Learn how to set document resolution in PowerPoint 2016 for Windows.


Jigsaw Graphics for PowerPoint

Here are 10 jigsaw graphics containing different shapes. These graphics are available in both black and white and are contained within separate sample presentations that you download. Additionally, these jigsaw graphics are vector shapes, so you can easily edit them within your Microsoft Office program by changing fills, lines, and effects or even applying Shape Styles.

Download and use these Jigsaw Graphics in your slides for just $4.99+


Microsoft and the Office logo are trademarks or registered trademarks of Microsoft Corporation in the United States and/or other countries.

Home | PowerPoint | Photoshop | PowerPoint Templates | PowerPoint Tutorials | Blog | Notes | Ezine | Media Kit | Feedback | Site Map | About Us | Contact Us

Link to Us | Privacy | Testimonials

PowerPoint Backgrounds | Christian PowerPoint Backgrounds | Business PowerPoint Presentation Templates

Plagiarism will be detected by Copyscape

©2000-2025, . All rights reserved.