Motion paths are paths (or lines) through which slide objects animate. These motion paths are just like any other line with curves, points, etc. If you are familiar with the Line, Curve, Scribble, and Freeform drawing tools in PowerPoint, you know that paths can be either open or closed. A circle is a good example of a closed path, whereas an arc is an open path. Look at Figures 1 and 2 to view some samples of closed and open paths respectively.
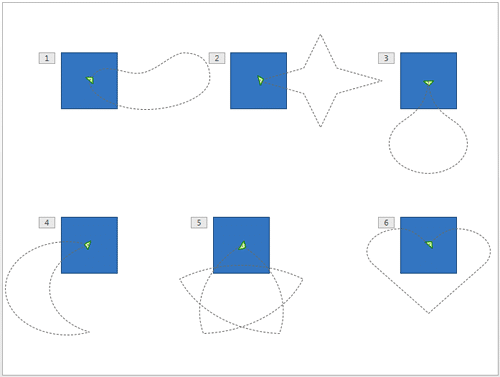
Figure 1: Closed Motion Paths
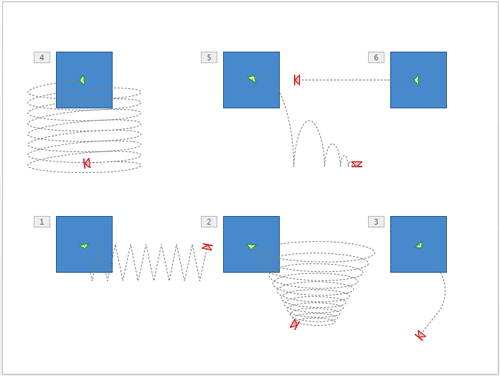
Figure 2: Open Motion Paths
So, how is the concept of open and closed paths relevant to Motion Path animations in PowerPoint?
Any animation that plays on a closed Motion Path gets back to the original starting point of the animation. Thus, the starting and ending points of such motion path animations are the same.
On the other hand, animations that play on open motion paths have distinctly different starting and closing points. Examples of these are animations that play on a line or a curved path from one part of the slide to another.
If you know how to edit points of paths using PowerPoint's capable drawing tools, you can easily convert open paths to closed, and vice-versa. Even if you are not too familiar with these drawing tools, you can quickly convert an open path to a closed one, or the other way around using options that we explore next.
Follow these steps to explore open and closed Motion Paths in PowerPoint 2013 for Windows:
- Select the slide object that you want to animate. You can select any object on your slide. We created and selected a shape.
- Alternatively, if you just want to follow this tutorial step-by-step, launch PowerPoint 2013 for Windows. Within the Presentation Gallery, select the Blank Presentation option. PowerPoint will open a new presentation with a Title slide. PowerPoint 2013 users can change the slide layout to Blank by selecting the Home tab | Layout | Blank option. Then, insert a shape and select it.
- Now, duplicate this existing shape so that you end up with two similar shapes.
- Apply Motion Path animations to both shapes. For the first shape, add a closed Motion Path such as a Circle; for the second shape, add an open Motion Path, such as a Decaying Wave, as shown in Figure 3, below. Press the Esc key on your keyboard to get back to Normal view.
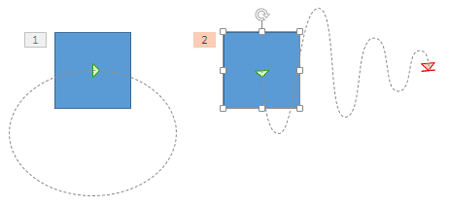
Figure 3: Shapes applied with open and closed motion paths - If you closely observe the two motion paths in Figure 3, above, you will find that the Circle has only one arrowhead (the green one), but the Decaying Wave has two arrowheads (green and red). This is PowerPoint's way of telling you that the first one is a closed motion path, and the other is an open path. Closed motion paths show only one green arrowhead whereas open motion paths show both red and green arrowheads.
- Select the shape that has the Circle Motion Path animation applied. Then select the motion path, and carefully right-click the dotted line and choose the Open Path option from the contextual menu, as shown in Figure 4, below. The immediate result of choosing this option is that you will now see both green and red arrowheads in this Motion Path, as shown in Figure 5, below. Additionally you will see a preview of the End Animation state of the Motion Path.

Figure 4: Open Path option to be selected 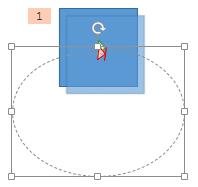
Figure 5: Both green and red arrowheads are visible - You can now right-click the Motion Path again, and choose the Edit Points option from the resultant contextual menu, as shown in Figure 4, previously on this page. You'll immediately see vertexes on the path, as shown in Figure 6, below. You can now select any of these vertex points and drag them around to create something that does not resemble a Circle anymore! We cover the editing of these vertex points in our Edit Points in Paths of Motion Path Animations in PowerPoint 2013 for Windows tutorial.

Figure 6: Vertexes on Motion Path - Click anywhere on the empty area of the slide to exit the Edit Points mode.
- Now, select the other shape on the slide, and then select its Decaying Wave Motion Path, as shown in Figure 7, below. Carefully right-click the dotted line and choose the Close Path option from the resultant contextual menu, as shown in Figure 7 again.

Figure 7: Close Path option to be selected - Doing so will result in a segment being added to your Motion Path that connects the closing point back to the starting point, as shown in Figure 8, below. Note that you no longer see two arrowheads, but just the green one (compare Figures 8 and 7).

Figure 8: Open path converted to closed path - If you don't like the plain straight line that PowerPoint adds to close the path, you can right-click the Motion Path and choose the Edit Points option in the resultant contextual menu. Thereafter, click anywhere in the line segment (make sure you don't click a vertex point). This adds a new vertex at the clicking position. Now, drag the new vertex down or up to create a curve in the line. Similarly, you can add more vertexes and bend the line segment to meet your requirement. In Figure 9, you can see the edited line segment that looks smoother and more organic. Compare Figures 8 and 9.
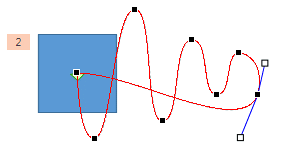
Figure 9: Curved Line - Save your presentation often.
Motion Paths Mean Endless Possibilities
There's no limit to what you can do with Motion Paths as long as you open and close paths, and edit points within the path. Combine this with the option to draw custom motion paths, and reversing them, and the possibilities are almost endless!
Edit Points Grayed?
Do some motion paths have the Open Path, Close Path, or Edit Points options grayed out? Yes, that can happen with paths that are essentially straight lines, as shown in Figure 10, below. Also the custom Motion Paths that are straight lines drawn using any of the Line drawing tools will have these options grayed out.

Figure 10: Grayed out options 


