 Shawn Toh started creating PowerPoint presentations since secondary school and his interest in PowerPoint animations kept growing. Shawn loves to do advanced animation tricks using PowerPoint.
Shawn was a Microsoft MVP (Most Valuable Professional) for PowerPoint, and is certified as a certified a Microsoft Office Specialist (MOS PowerPoint). He is an active member in the PowerPoint newsgroup communities (nickname: tohlz) and runs the PowerPoint Heaven site.
In this article, we'll show you how you can create a snowfall effect using nothing else apart from PowerPoint's own tools. Download the sample presentation here.
- To start off, you will need to make the snow.
- Even before that, the background must be adjusted. Create a new slide in a new or existing presentation, and choose Format | Background. Doing so brings up the Background dialog box, as shown in Figure 1, below.
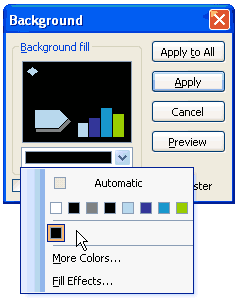
Figure 1: Background dialog box- Click on the dropdown menu and select a dark background, preferably black. If a black swatch is not available, click the More Colors options and choose a suitable color. Click the Apply button to get back to the slide.
- With the dark background ready, it's now time to create the snow. In PowerPoint's Drawing toolbar, select the Oval AutoShape.
No Drawing Toolbar?
- If the Drawing toolbar is not visible, choose View | Toolbars | Drawing.
- Hold down the Shift key and start drawing so that you end up with a perfect circle rather than an oval. Resize the circle as required, while making sure the circle is not too big, as shown in Figure 2, below.
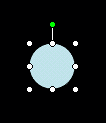
Figure 2: Perfect circle drawn on the slide- Double-click the circle to summon the Format AutoShape dialog box, as shown in Figure 3, below. In the Colors and Lines tab, under the Fill section, click on the Color dropdown menu and select Fill Effects.
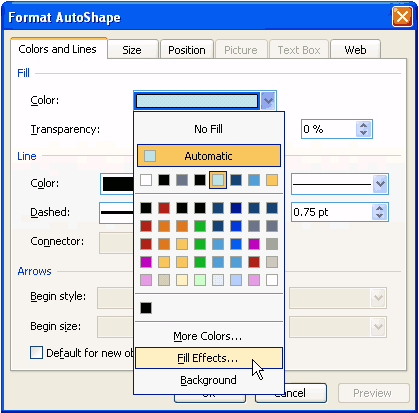
Figure 3: Fill Effects option within the Format AutoShape dialog box- Doing so brings up the Fill Effects dialog box. Make sure that you have selected the Gradient tab, as shown later on this page in Figure 4. Under Colors section, select One color option and change Color 1 to White.
- Under Shading Styles section, select From center. This action will change the light-blue circle into a white-gray gradient circle, as shown in Figure 4, further below, in the sample picture.
- But this is not what we want. We will need to remove the gray portion so that the gradient fades from white to transparent. To achieve that, adjust the To option under Transparency section as 100%. This action will make the gray completely transparent, as shown in Figure 4, below. Match settings as shown in Figure 4. Click the OK button to get back to your slide.
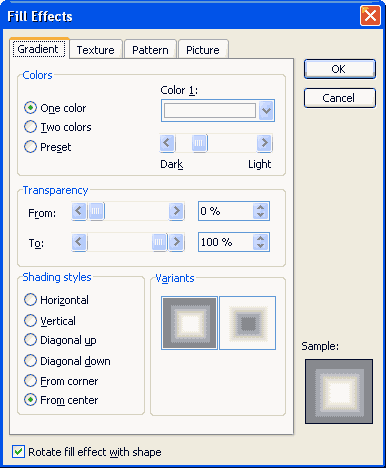
Figure 4: Gray color transparency set to 100%- Now, move over to the Line section in the Format AutoShape dialog box, as shown in Figure 5, below. Under Line Color dropdown menu, select No Line. Click the OK button, and your first drop of snow is ready!
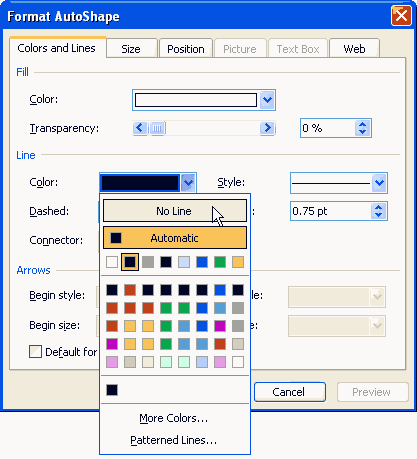
Figure 5: No Line option within the Format AutoShape dialog box- Next, select the snow and click Ctrl + D to duplicate it. Repeat this 20 or more times to create more instances of snow. Drag all the snow off to above the slide area and distribute them evenly, as shown in Figure 6, below. You do not need to align them horizontally.

Figure 6: Snow shape duplicates placed above the slide area- Now is the time to start with the animations. Select all the snow instances and choose Slide Show | Custom Animation. This will activate the Custom Animation Task Pane.
- Click Add Effect | Exit | Fly Out. If the Fly Out option is not available, click the More Effects option to bring up the Add Exit Effect dialog box. You'll find Fly Out in the Basic category.
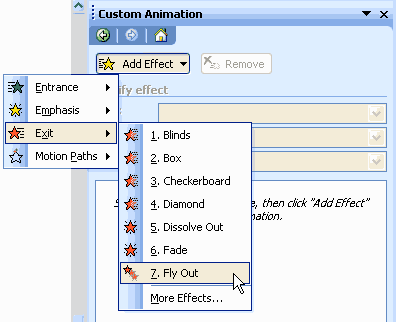
Figure 7: Custom Animation Task Pane- Ensure that the first effect has Start as On Click, and the rest of the effects have Start as With Previous. Also, check that the Fly Out direction for all the snow instances is set to To Bottom.
- Click on the first effect in the Custom Animation Task Pane. Hold down Shift key and scroll down to select the last effect. This action will allow you to highlight/select all the effects. Right-click on the effects and select Timing to bring up the Fly Out dialog box, as shown in Figure 8, below.
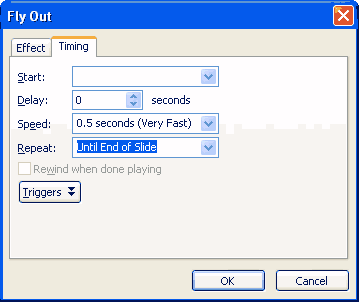
Figure 8: Fly Out dialog box- Set the Repeat to Until End of Slide. Click the OK button.
- You can now play around with the speed. Set the first effect to Very Slow, second to 6 Seconds, third to 7 seconds, fourth to 8 seconds and fifth to 9 seconds. Repeat the speed settings to rest of the effects. By doing so, the snow will not be falling at the same speed. This will also make the effect more realistic.
 Shawn Toh started creating PowerPoint presentations since secondary school and his interest in PowerPoint animations kept growing. Shawn loves to do advanced animation tricks using PowerPoint.


