After we did a tutorial on creating a graphic of a CD or DVD using PowerPoint
for Windows, there were many who asked for a similar tutorial using PowerPoint for Mac. So here it is -- a tutorial that shows you how to create the
image of the CD within PowerPoint 2011 for Mac -- of course although the finished graphic looks like
a CD, you can use it for a DVD or Blu-Ray disc as well! In this tutorial, you will also learn how a slide program like PowerPoint can be a very
capable drawing program. And creating a CD in PowerPoint 2011 is indeed a cakewalk!
After learning how to draw a tree, and
how to draw a shopping bag in PowerPoint 2011, you might have
realized how a slide program like PowerPoint can be used as a very capable drawing program. In this tutorial, let us learn to draw a CD in
PowerPoint 2011.
- Add a new slide to any existing presentation,
or just create a new presentation. Make sure that it uses either the Title Only or Blank slide layout (learn
how to change slide layouts in PowerPoint 2011).
Tip: Why do we suggest you use the Blank slide layout? That's because, having placeholders when drawing something
on a PowerPoint slide may make your job little difficult -- a blank slide does look very similar to the canvas you see in a drawing program.
- Within the Home tab of the Ribbon, click the
Shape button to open the Shape gallery that you
can see in Figure 1. In this gallery, select the Basic Shapes category, and from the sub-gallery that appears,
select the Donut shape (refer to Figure 1 again).
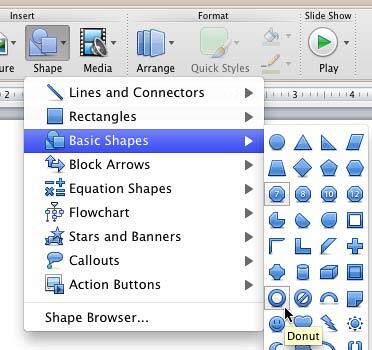
Figure 1: Donut shape selected within the Basic Shapes sub-gallery- Place the cursor on your slide and click once to insert
a Donut shape at the cursor position as shown in Figure 2.

Figure 2: Donut shape inserted on the slide- Now, resize the Donut so that it takes the size of a CD as
you can see in Figure 3.
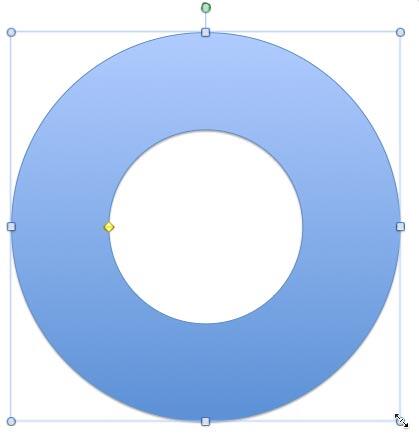
Figure 3: Donut shape resized to match the size of a CD- Note that the Donut shape has a yellow diamond lined to its inner perimeter -- select this yellow diamond and drag inside so that your Donut
shape looks more like a CD (see Figure 4). Learn to
Manipulate the Shapes by Dragging Diamonds in PowerPoint 2011.
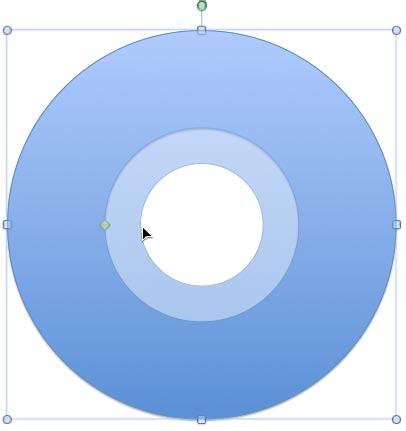
Figure 4: Donut shape looking like a CD- Now, remove the outline and also remove the
shadow effect from the Donut shape.
- To make the CD look real, you can add a
picture fill to your shape. You can see how the Donut shape with picture fill looks almost like a CD, as shown in Figure 5.

Figure 5: Donut shape with picture fill- Your CD still looks flat though -- to add some dimension to it, you must add a
shape effect.
Select your CD graphic -- this brings up the
Format contextual tab on the Ribbon, click this tab to
view shape format options. Within the Shape Styles group, click the Effects button to open a drop-down gallery that
you see in Figure 6, below. Within this gallery, choose the Bevel option -- from the Bevel
sub-gallery that appears, select the Cross bevel style (refer to Figure 6 again).
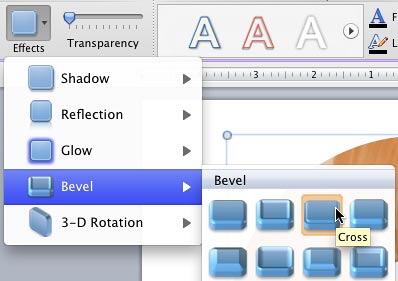
Figure 6: Applying Cross Bevel to the CD graphic- Figure 7 shows the completed CD graphic -- if you need to send this picture to someone for non-PowerPoint use, right-click the
CD graphic and choose the Save as Picture option from the resultant contextual menu (refer to Figure 7 again).
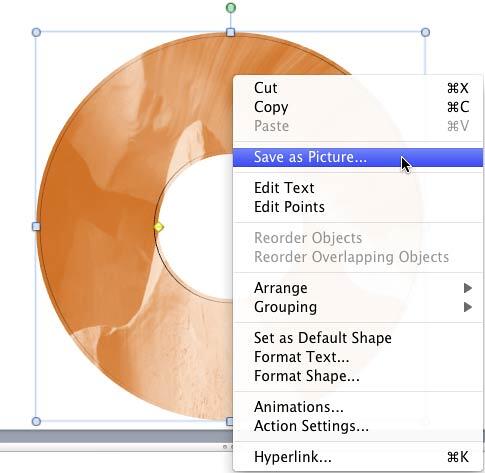
Figure 7: Save as Picture option to be selected- Save to a graphic image format such as PNG, GIF, or JPG. Make sure you save your presentation too -- it's easy to do that by using the
Command + S shortcut key.


