Indezine Logo


Create Photo Album in PowerPoint 2010 for Windows

Learn how to create a photo album in PowerPoint 2010 for Windows. PowerPoint can import pictures in several formats.


Author:

Product/Version: PowerPoint 2010 for Windows

OS: Microsoft Windows XP and higher


Learn PowerPoint

Explore keyboard shortcuts for PowerPoint views.


If you like to use many pictures in your PowerPoint presentations, then you'll be glad to know that PowerPoint can import pictures in several formats, from the ubiquitous JPG to the ancient BMP. Whichever file format you use, importing tens or even hundreds of pictures into consecutive PowerPoint slides can be a chore. Fortunately, the awesome Photo Album feature makes this task a simple affair.

Follow these steps to create a Photo Album in PowerPoint 2010 for Windows:
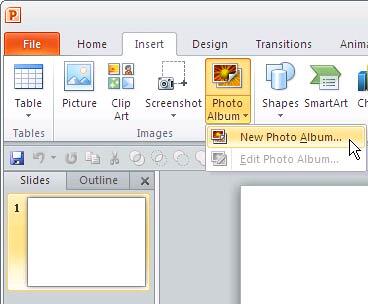
  1. It really does not matter if you use an existing presentation or even create a new one for a Photo Album since this feature always creates a new presentation anyway. So, access the Insert tab of the Ribbon, then locate the Images group where you will find the Photo Album button. Click the downward arrow on the bottom half of this button to bring up a small menu. Choose the New Photo Album option, as shown in Figure 1.
  2. New Photo Album
    Figure 1: New Photo Album
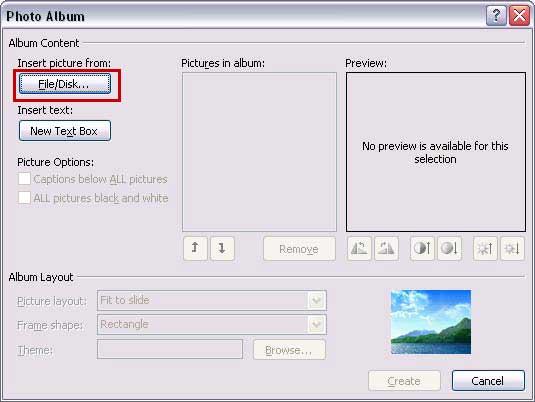
  3. This opens the Photo Album dialog box that you see in Figure 2.
  4. Photo Album dialog box
    Figure 2: Photo Album dialog box
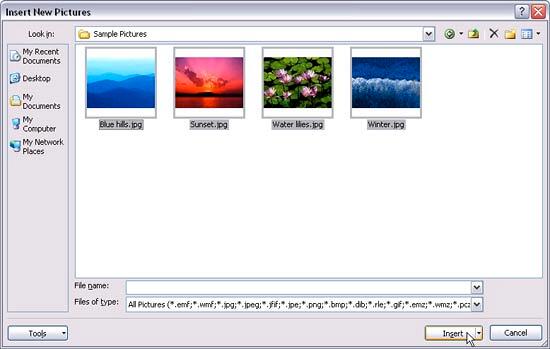
  5. Now click the File/Disk…. Button, highlighted in red in Figure 2 above. Doing so opens the Insert New Pictures dialog box, as shown in Figure 3.
  6. Photo Album dialog box
    Figure 3: Insert New Pictures dialog box
  7. Navigate to where your photos are, and select the desired pictures:
  8. To select all pictures in your folder, press the keyboard shortcut Ctrl + A.
  9. To select adjacent pictures, click on the first picture, then press and hold the Shift key and select the last picture in the sequence.
  10. To select multiple non-adjacent pictures, press and hold the Ctrl key while clicking on each picture you want to insert.
  11. When the selection is made, click the Insert button.
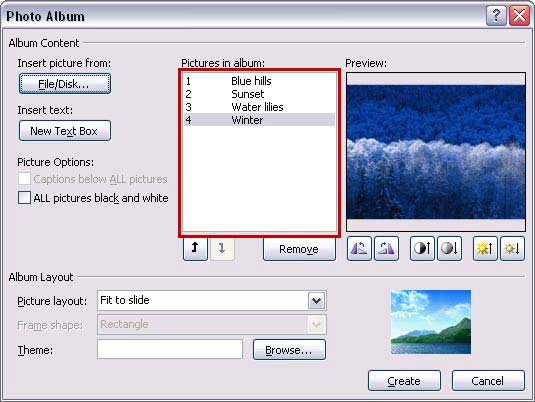
  12. Doing so will add the selected pictures in the Pictures in album list (highlighted in red in Figure 4) in the Photo Album dialog box.
  13. Pictures added in the Photo Album dialog box
    Figure 4: Pictures added in the Photo Album dialog box
  14. The Photo Album dialog box provides several options such as re-ordering the pictures, picture adjustments, picture layouts, and Themes. We cover all these aspects in separate tutorials (all linked from the bottom of this tutorial). For now, click the Create button to insert pictures.
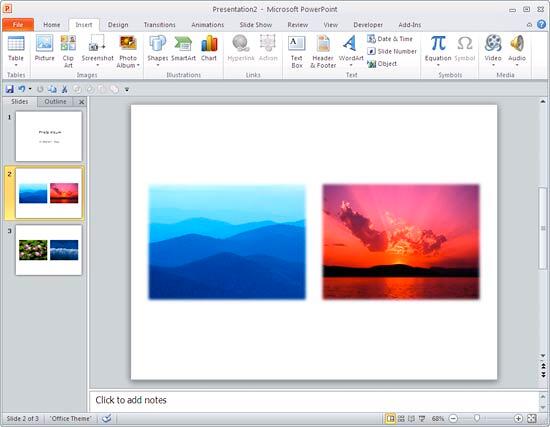
  15. A separate presentation will be created for the Photo Album, as you can see in Figure 5.
  16. Photo Album in PowerPoint 2010
    Figure 5: Photo Album in PowerPoint 2010
  17. Save your presentation.

More Photo Album Tutorials :

  1. Editing Your Photo Album in PowerPoint 2010 for Windows
  2. Reorder, Remove, and Edit Photos within Photo Album in PowerPoint 2010 for Windows
  3. Photo Album Picture Layouts in PowerPoint 2010 for Windows
  4. Using Captions in Photo Album Presentations in PowerPoint 2010 for Windows
  5. Black and White Options for Photo Album Presentations in PowerPoint 2010 for Windows
  6. Frame Shapes for Photo Album in PowerPoint 2010 for Windows
  7. Apply Theme to Photo Album Presentations in PowerPoint 2010 for Windows
  8. Photo Album Ideas and Samples in PowerPoint 2010 for Windows

See Also:

Photo Album: Create Photo Album (Glossary Page)

Create Photo Album in PowerPoint 2013 for Windows

You May Also Like: Writer’s Block: How to Break Through | United Nations Flags PowerPoint Templates


Popular Posts

Add Pattern Fills to Shapes in PowerPoint 2010 for Windows
Add pattern fills to shapes in PowerPoint 2010 for Windows.

Gradient Fills for Text in PowerPoint 2013
Learn how to add gradient fills to selected text in PowerPoint 2013.

Formatting Outlines for Shapes (Dashes) in PowerPoint 2013 for Windows
Learn how to apply the dash attribute to shape outlines in PowerPoint 2013 for Windows.

Change the Unit of Measurement in Windows 10
Learn how to change the unit of measurement from US to Metric, and vice versa in Windows 10.


Feature List 01 (Layout with Tabs)

The Feature List Layout comprises three sample PowerPoint presentations: one each to create a visual list for 4 features, 5 features, and 6 features. These work great when you have too much information to fit within one slide. This solution lets you use multiple slides, but the visual result is still that of one single slide!

Buy and Download Feature List 01 (Layout with Tabs) for $4.99+ (671 kb)


Microsoft and the Office logo are trademarks or registered trademarks of Microsoft Corporation in the United States and/or other countries.

Home | PowerPoint | Photoshop | PowerPoint Templates | PowerPoint Tutorials | Blog | Notes | Ezine | Media Kit | Feedback | Site Map | About Us | Contact Us

Link to Us | Privacy | Testimonials

PowerPoint Backgrounds | Christian PowerPoint Backgrounds | Business PowerPoint Presentation Templates

Plagiarism will be detected by Copyscape

©2000-2025, . All rights reserved.