Create Photo Album in PowerPoint 2013
Learn how to create a photo album in PowerPoint 2013.
Author: Geetesh Bajaj
Product/Version: Microsoft PowerPoint 2013
OS: Windows 7 and 8
PowerPoint can import pictures in several formats – from the ubiquitous JPG to the ancient BMP. Whichever file format you use, importing tens or even hundreds of pictures into consecutive PowerPoint slides can be a chore – fortunately, the awesome Photo Album feature makes this task a simple affair. When you use the Photo Album feature it always creates a new presentation. Follow these steps to create a Photo Album in PowerPoint 2013:
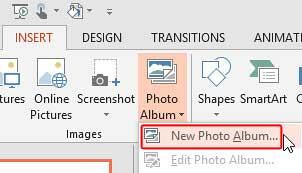
- Access the Insert tab of the
Ribbon, and click the down-arrow
within Photo Album button. This brings up a small menu -- choose the
New Photo Album option, as shown highlighted in red within
Figure 1.
Figure 1: New Photo Album option
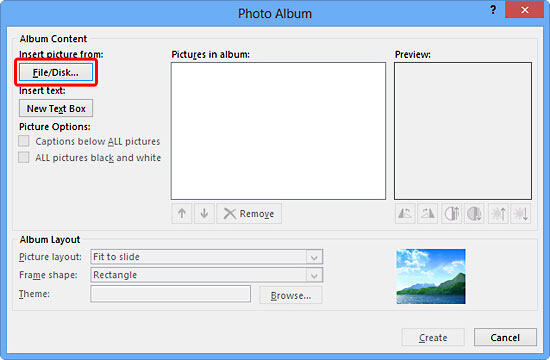
- This opens the Photo Album dialog box that you see in Figure 2.
Figure 2: Photo Album dialog box
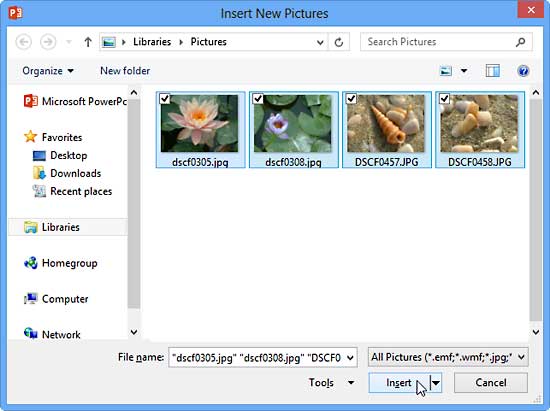
- Now click the ‘File/Disk….’ button (highlighted in red within Figure 2 above), which opens the Insert New Pictures dialog
box, as shown in Figure 3.
Figure 3: Insert New Pictures dialog box
Navigate to where your photos are, and select the desired pictures:
- To select all pictures in your folder, press the keyboard shortcut Ctrl + A.
- To select adjacent pictures, click on the first picture, then press and hold the Shift key and select the last picture in the sequence.
- To select multiple non-adjacent pictures, press and hold the Ctrl key while clicking on each picture you want to insert.
When the selection is made, click the Insert button.
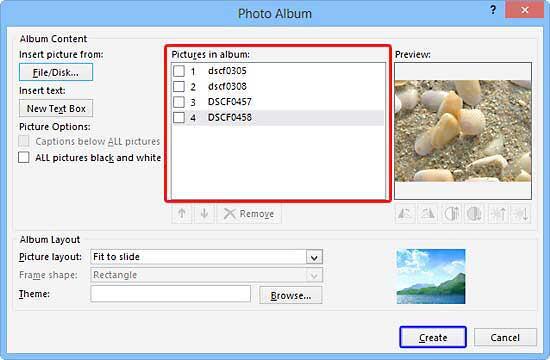
- This will add the selected pictures in the Pictures in album list (highlighted in red within Figure 4) in the Photo Album
dialog box.
Figure 4: Pictures added in the Photo Album dialog box
- To add more pictures from another folder, repeat steps 2 and 3
again.
- The Photo Album dialog box provides several options such as re-ordering the
pictures, making picture adjustments, changing picture layouts, and applying Themes. We cover all these aspects in separate
tutorials (all linked from the bottom of this tutorial) -- for now, click the Create
button, highlighted in blue within Figure 4, above to insert the pictures you have
selected.
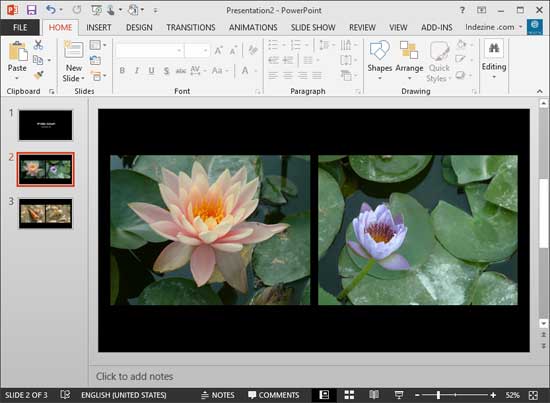
- A seperate presentation will be created for the Photo Album, as you can see in
Figure 5.
Figure 5: Photo Album in PowerPoint 2013
- Save your presentation.
More Photo Album Tutorials:
- Editing Your Photo Album
- Reorder, Remove, and Edit Photos within Photo Album
- Photo Album Picture Layouts
- Using Captions in Photo Album Presentations
-
Black and
White Options for Photo Album Presentations
- Frame Shapes for Photo Album in PowerPoint 2013
- Apply Theme to Photo Album Presentations in PowerPoint 2013
- Photo Album Ideas and Samples
PowerPoint Keyboard Shortcuts and Sequences:
PowerPoint 2013, 2011, 2010, 2007 and 2003
Have your ever used keyboard shortcuts and sequences in PowerPoint? Or are you a complete keyboard aficionado? Do you want to learn about some new shortcuts? Or do you want to know if your favorite keyboard shortcuts are documented?
Go and get a copy of our PowerPoint Keyboard Shortcuts and Sequences E-Book.
PowerPoint Keyboard Shortcuts and Sequences E-book