Introduction
Enable Slide Numbers in the Master
Troubleshooting Slide Numbers
Start Numbering from Zero
Start Slide Number from 31
Start on the Third, Fourth, or Another Slide
Introduction
If your presentation has many slides, you can typically see slide numbers while editing in the Slides Pane or in Slide Sorter view. However, if you run or deliver your presentation slides in Slide Show view, you may not be able to identify the slide number unless you have enable slide numbers on each slide. In PowerPoint, you need to make these slide numbers visible since they don't show by default.
Follow these steps to add slide numbers to your individual slides in PowerPoint 365 for Mac:
- Select the Insert tab of the Ribbon. Now, click either the Header & Footer button, as shown highlighted in red within Figure 1, below, or the Slide Number button, as shown highlighted in blue within Figure 1.

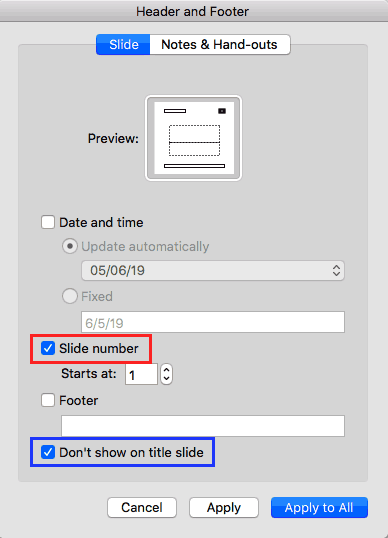
Figure 1: Header and Footer button- Clicking any of these buttons brings up the Header and Footer dialog box, as shown in Figure 2, below. Make sure that you access the Slide tab within this dialog box. Select the Slide number check-box, as shown highlighted in red within Figure 2.

Figure 2: Header and Footer dialog box- Now choose any of these options:
Apply to All
- This option will apply the slide number to all slides in the active presentation.
Apply
- This option will apply the slide number to the current slide only.
- You can also choose the Don't show on title slide check-box, as shown highlighted in blue within Figure 2, above, to disable the visibility of slide number on the Title Slide. Typically, the first slide in a presentation and all other slides based on the Title layout.
Back
Enable Slide Numbers in the Master
If the presentation has multiple Masters and/or Slide Layouts, you can enable slide numbers in Slide Master view on a particular Slide Master so that you can control which slides show the slide number and which don't.
Follow these steps to do so:
- Select the View tab of the Ribbon. Next, then click the Slide Master button, as shown highlighted in red within Figure 3, below.

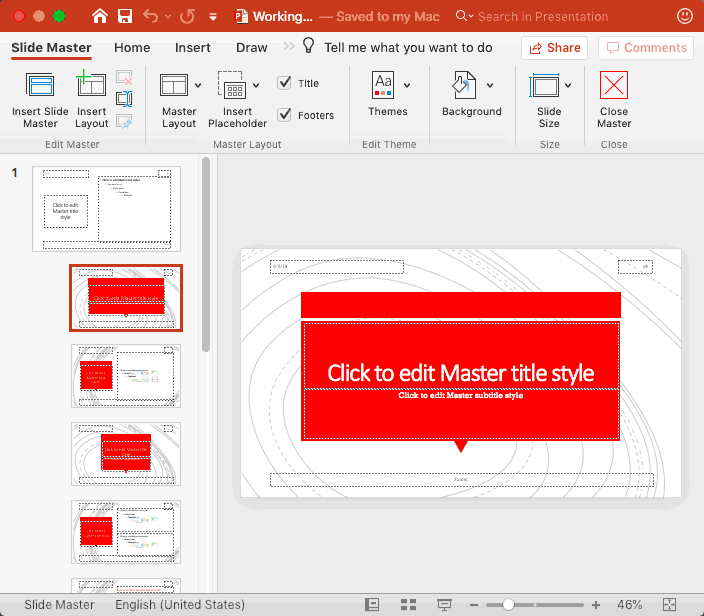
Figure 3: Slide Master button- Doing so opens Slide Master view, as shown in Figure 4, below.

Figure 4: Slide Master view- The Slides pane located on the left side of the Slide Master view has one large thumbnail that represents the Slide Master. All the smaller thumbnails represent individual Slide Layouts. Select the Master or the Layout on the left pane for which you want to enable slide numbers.
- Select the Insert tab of the Ribbon, and click the Header & Footer button to bring up the familiar dialog box, as shown in Figure 2, previously on this page. Select the option to enable slide numbers.
- Choose Apply to All button if you want to show slide numbers in all Masters and Layouts of the presentation. Choose Apply if you want the slide number to be visible on the current selection (Master or Layout).
- Make sure you are on the Slide Master tab of the Ribbon, and click the Close Master View button to go back to Normal view.
Back
Troubleshooting Slide Numbers
Even after applying slide numbers, they may not show up on your slides. In that case, follow this troubleshooting sequence:
- Check whether slide objects are overlapping slide numbers in both the Normal and Slide Master views.
- If this approach doesn't work, select the View tab on the Ribbon and click the Slide Master button, as shown in Figure 3, previously on this page.
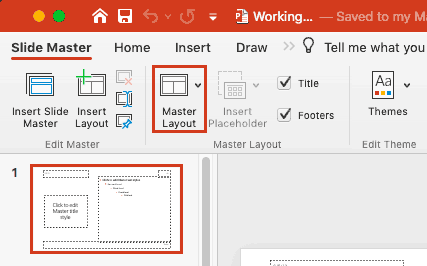
- This action will take you to Slide Master View. Select the Slide Master on the left pane (the larger thumbnail on the top of other smaller thumbnails). Now, click the Master Layout button, as shown highlighted in red within Figure 5, below.

Figure 5: Master Layout button- Doing so opens the Master Layout dropdown gallery, as shown in Figure 6, below.

Figure 6: Master Layout- Make sure that the Slide number check-box is selected, as shown in Figure 6, above. If it is not selected, select it and click the OK button. If you have Multiple Masters (more than one large thumbnail on the left pane), you'll want to check the Master Layout for all the masters.
- Go back to Normal view by clicking the Close Master View button in the Slide Master tab of the Ribbon.
Back
Start Numbering from Zero
Do you want to start the numbering on your slides from zero rather than one? Or do you want to start it from 6 or 101? You can do it, just follow these steps:
- Select the Insert tab of the Ribbon. Now, click either the Header & Footer button, as shown highlighted in red within Figure 1, previously on this page, or the Slide Number button, as shown highlighted in blue within Figure 1. Clicking any of these buttons brings up the Header and Footer dialog box, as shown in Figure 2, previously on this page. Make sure that you access the Slide tab within this dialog box.
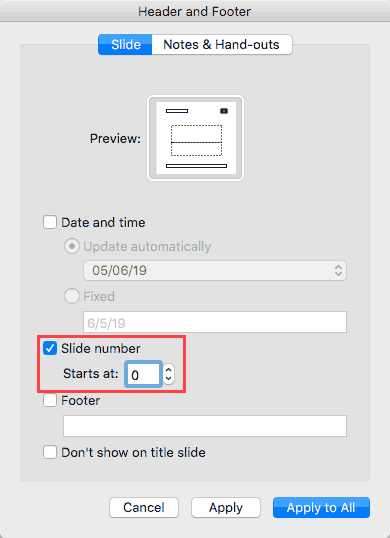
- Doing so opens the Header and Footer dialog box, as shown in Figure 7, below.

Figure 7: Start slide numbering from- Change the number in the Number slides from option, as shown highlighted in red within Figure 7, above.
- Click the OK button to get back to your slides.
Back
Start Slide Number from 31
When you put in the auto number thing so that you can see what slide number you are on, can you start that at any number? Why does it have to be zero or one? Can it be 31?
Yes, it can. Learn more in our Start Slide Number from 31 post.
Back
Start on the Third, Fourth, or Another Slide
Typically you can start your slide numbering with any number. So yes, your first slide can be numbered fourth. But what if you want the opposite? Maybe you want your fourth slide to be numbered first!
Read more about making your fourth behave like your first slide.
Back


