Indezine Logo


Distribute Shapes in PowerPoint 2010 for Windows

Learn how to distribute shapes on a slide in PowerPoint 2010 for Windows. You can space out your shapes horizontally and vertically.


Author:

Product/Version: PowerPoint 2010 for Windows

OS: Microsoft Windows XP and higher


Distributing shapes is a simple concept, it means that the space between consecutive shapes (or any other slide objects) should be the same so that they all appear evenly spaced out. Look at Figure 1, and you'll see that the shapes towards the left are not distributed whereas the shapes towards the right are.

The benefits of distribution
Figure 1: Distributing Shapes in PowerPoint

If you create many PowerPoint slides, it is very important to keep all your shapes cleanly positioned and spaced. You already explored aligning shapes in a previous tutorial. In this tutorial we'll look at how you can distribute shapes evenly in PowerPoint 2010. The Distribute option is a great way to position shapes equidistant from each other, either on a horizontal or vertical plane. Follow these steps to learn more in PowerPoint 2010 for Windows:

Distribute Shapes Horizontally

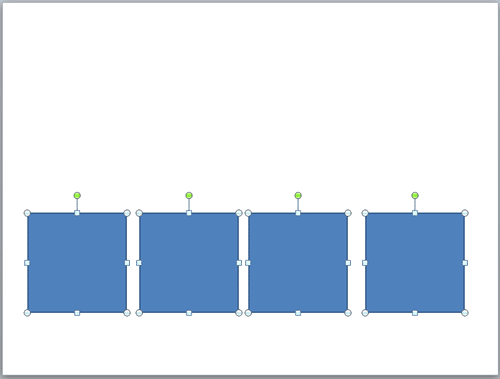
  1. Select all the shapes placed besides each other, as shown in Figure 2.
  2. Selected shapes, ready to be distributed horizontally
    Figure 2: Selected shapes, ready to be distributed horizontally
  3. As you can see in the Figure 2 above, the shapes are not equally spaced between each other. The distance between the third and the fourth shapes is considerably more than the distance between any other consecutive shapes.
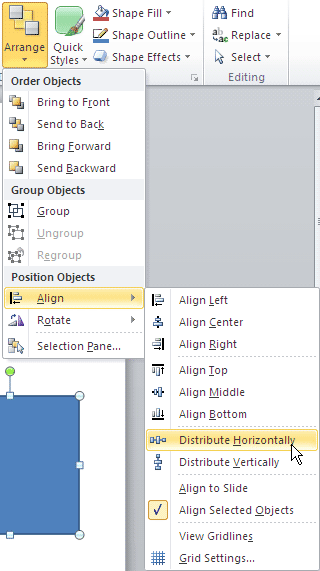
  4. Access the Home tab of the Ribbon, and within the Drawing group, click the Arrange button to bring up the gallery that you see in Figure 3. Click the Align option to bring up the Align sub-gallery (see Figure 3 again). Select the Distribute Horizontally option.
  5. Distribute Horizontally
    Figure 3: Distribute Horizontally option in PowerPoint
  6. Note: The Align gallery can also be accessed from Arrange group under Drawing Tools Format tab of the Ribbon.
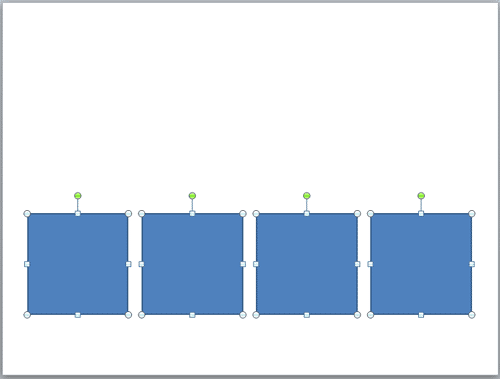
  7. This will distribute the selected shapes equally on a horizontal plane (see Figure 4).
  8. Shapes distributed equally, horizontally
    Figure 4: Shapes distributed equally, horizontally

Distribute Shapes Vertically

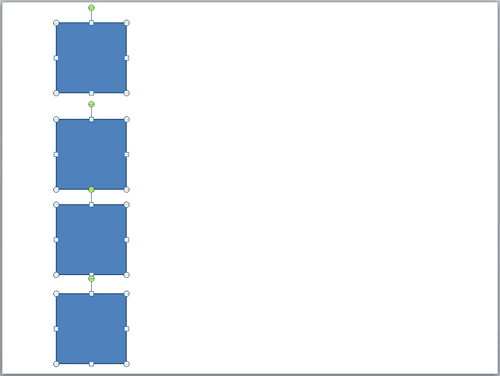
  1. Select all the shapes placed below each other, as shown in Figure 5.
  2. Selected shapes, ready to be distributed vertically
    Figure 5: Selected shapes, ready to be distributed vertically
  3. As you can see in the Figure 5 above, the shapes are not equally spaced between each other. The distance between the first and second shapes is considerably more than the distance between the second and third shapes.
  4. Access the Home tab of the Ribbon, and within the Drawing group, click the Arrange button to bring up the gallery that you see in Figure 6. Click the Align option to bring up the Align sub-gallery (see Figure 6 again). Select the Distribute Vertically option.
  5. Distribute Vertically
    Figure 6: Distribute Vertically option in PowerPoint
  6. This will distribute the selected shapes equally on a vertical plane (see Figure 7).
  7. Shapes distributed equally, vertically
    Figure 7: Shapes distributed equally, vertically

See Also:

Aligning and Distributing Shapes: Distribute Shapes (Glossary Page)

Distribute Shapes in PowerPoint 2013 for Windows
Distribute Shapes in PowerPoint 2011 for Mac

You May Also Like: Illuminate: Conversation with Patti Sanchez | Pets Dog PowerPoint Templates


Popular Posts

Copy and Remove Highlighting for Text in PowerPoint 2013
Learn how to copy and remove highlighting for text in PowerPoint 2013.

Add Headers and Footers to Slides in PowerPoint 2016 for Windows
Learn how to add Headers and Footers to slides in PowerPoint 2016 for Windows.

Text Box Autofit Options in PowerPoint 2016 for Windows
Learn about Text Box autofit options in PowerPoint 2016.

Paste in Place in PowerPoint
How can you place a copied or duplicated slide object right on top of the original object in PowerPoint?


Jigsaw Shapes for PowerPoint (Full Slide Jigsaws)

This entire kit contains 5 different styles of jigsaw pieces: typical jigsaws, arrows, hearts, ovals, and rounded squares. Each jigsaw shape is available in three counts: small, medium, and large. We made these available in two slide sizes for both standard (4:3) and widescreen (16:9) resolutions.

You can get this kit for only $9.99.

This is the original page. An AMP (Accelerated Mobile Page) version of this page is also available for those on mobile platforms, at Distribute Shapes in PowerPoint 2010 for Windows.


Microsoft and the Office logo are trademarks or registered trademarks of Microsoft Corporation in the United States and/or other countries.

Home | PowerPoint | Photoshop | PowerPoint Templates | PowerPoint Tutorials | Blog | Notes | Ezine | Media Kit | Feedback | Site Map | About Us | Contact Us

Link to Us | Privacy | Testimonials

PowerPoint Backgrounds | Christian PowerPoint Backgrounds | Business PowerPoint Presentation Templates

Plagiarism will be detected by Copyscape

©2000-2023, Geetesh Bajaj. All rights reserved.