Indezine Logo


Reuse Slides Through Drag and Drop in PowerPoint 2016 for Windows

Learn how to reuse slides through drag and drop in PowerPoint 2016 for Windows. Drag and drop lets you intuitively reuse your existing slides.


Author:

Product/Version: PowerPoint 2016 for Windows

OS: Microsoft Windows 7 and higher


As discussed earlier, reusing your existing slides can substantially improve efficiency by reducing the time required to recreate content. While the Reuse Slides task pane in Microsoft PowerPoint provides a structured way to insert selected slides into the active presentation, an alternative approach offers a more direct and intuitive workflow. Slides can be selected within the source presentation and then dragged and dropped directly into the destination presentation.

This tutorial demonstrates how to reuse slides in PowerPoint 2016 for Windows using the drag-and-drop method:

  1. Within Microsoft PowerPoint, open both the source presentation and the destination presentation. For greater clarity and ease of navigation during the process, ensure that no additional presentation files are open.
  2. Access the View tab of the Ribbon and then click the Arrange All button, highlighted in red within Figure 1, below.
  3. Arrange All button
    Figure 1: Arrange All button
  4. This action arranges the open presentation windows, so both presentations are visible simultaneously, as shown in Figure 2, below.
  5. Stacked presentation windows
    Figure 2: Stacked presentation windows
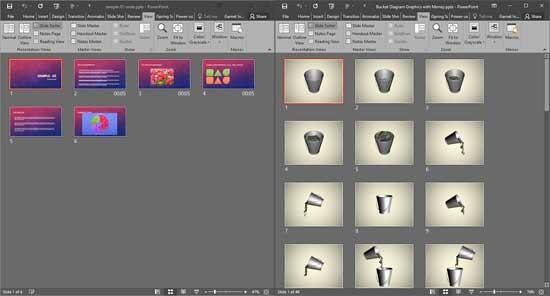
  6. Although slides can be dragged and dropped while working in Normal view, switching to Slide Sorter view, as shown in Figure 3, below, provides a more efficient and visually organized environment for managing and repositioning multiple slides.
  7. Both presentations in Slide Sorter view
    Figure 3: Both presentations in Slide Sorter view
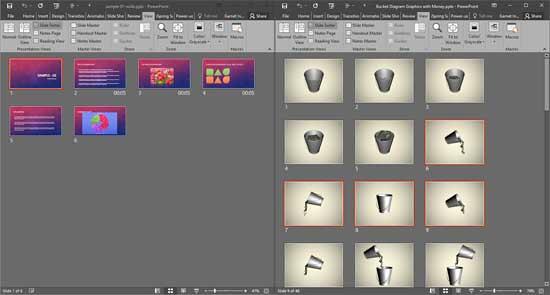
  8. With both presentations arranged as shown in Figure 3, above, the next step is to transfer slides from the source presentation to the destination presentation. Within the source presentation, select the slides to be copied, as shown on the right side of Figure 4, below.
  9. Slides to be copied selected
    Figure 4: Slides to be copied selected
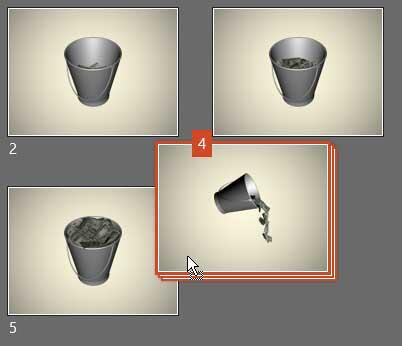
  10. Drag the selected slides toward the destination presentation. As the slides are moved, the cursor dynamically displays the number of slides being transferred, as shown Figure 5, below.
  11. Number of slides being dragged
    Figure 5: Number of slides being dragged
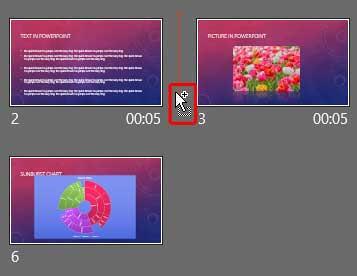
  12. Drag the selected slides to the desired location within the destination presentation. As the insertion point is approached, the cursor indicator changes. Instead of displaying the number of slides being transferred, it displays a plus icon, highlighted in red within Figure 6, below, indicating that the slides can now be inserted at that location.
  13. Dragged slides ready to be dropped
    Figure 6: Dragged slides ready to be dropped
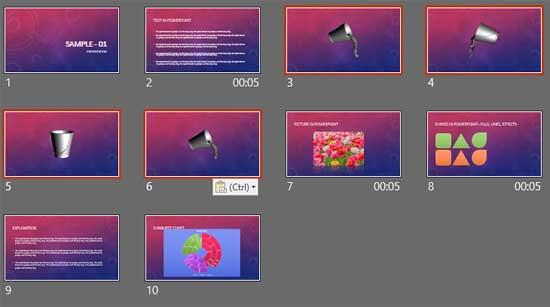
  14. To complete the insertion, release the mouse button. The selected slide(s) will then be added to the destination presentation, as shown in Figure 7, below.
  15. Slides placed within the destination presentation
    Figure 7: Slides placed within the destination presentation

    Keep Source Formatting

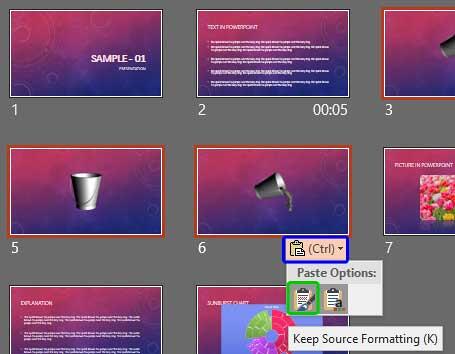
    By default, the copied slides will adopt the formatting and Theme of the destination presentation in Microsoft PowerPoint. To preserve the original formatting and Theme from the source presentation, click the Paste Options icon, highlighted in blue within Figure 8, below, which appears immediately after the slides are inserted. From the drop-down menu, select the Keep Source Formatting option, highlighted in green within Figure 8. While this option preserves the visual design of the original slides, it should be used selectively. Overreliance on source formatting can result in a presentation with inconsistent visual styles, reducing overall design cohesion and professional polish.
    Keep Source Formatting icon
    Figure 8: Keep Source Formatting icon

    Also note that if the source and destination presentations use different aspect ratios, the inserted slides will automatically adopt the aspect ratio of the destination presentation.

  16. Save your presentation often unless AutoSave is enabled.

Move Rather Than Copy Slides?

If the objective is to move slides rather than create copies through the drag-and-drop process, follow these steps:
  1. Proceed with steps 1 through 6, as described in the preceding section.
  2. Next, press and hold the secondary mouse button (the right-click equivalent). While keeping the button pressed, drag the selected slides to the desired location within the destination presentation and then release the button.
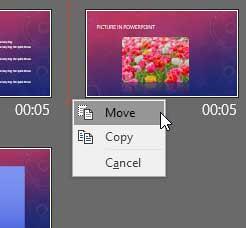
  3. A contextual menu will appear, as shown in Figure 9, below. From this menu, select the Move option.
  4. Move your slides
    Figure 9: Move your slides

See Also:

01 09 08 - Working with Slides: Reuse Slides Through Drag and Drop in PowerPoint (Glossary Page)

Reuse Slides Through Drag and Drop in PowerPoint 365 for Windows
Reuse Slides Through Drag and Drop in PowerPoint 2016 for Mac
Reuse Slides Through Drag and Drop in PowerPoint 2013 for Windows
Reuse Slides Through Drag and Drop in PowerPoint 2011 for Mac
Reuse Slides Through Drag and Drop in PowerPoint 2010 for Windows

You May Also Like: Can You Send Me the Deck? | Leadership Storytelling: Conversation with Ronan Dunne

Popular Posts

Pivot Tables in PowerPoint: by Kasper Langmann
One of the most commonly used features in Microsoft Excel is the Pivot Table. A Pivot Table simply allows you to make better sense of data by giving you different options of how to view that data.

Get More SmartArt Graphics
Learn how you can get more SmartArt graphic variants.

Character Spacing in PowerPoint 2013
Explore Character Spacing options in PowerPoint 2013.

Add Secondary Value Axis to Charts in PowerPoint 2013 for Windows
Learn how to add a Secondary Value axis to charts in PowerPoint 2013 for Windows.


Star Wars Style Credits Animation

The Star Wars Style Credits Animation presentation includes a sample slide in which the credits animate in the Star Wars style. You can download this presentation and change the text in the animated text boxes as required.

Download Star Wars Style Credits Animation Slides


Microsoft and the Office logo are trademarks or registered trademarks of Microsoft Corporation in the United States and/or other countries.

Home | PowerPoint | Photoshop | PowerPoint Templates | PowerPoint Tutorials | Blog | Notes | Ezine | Media Kit | Feedback | Site Map | About Us | Contact Us

Link to Us | Privacy | Testimonials

PowerPoint Backgrounds | Christian PowerPoint Backgrounds | Business PowerPoint Presentation Templates

Plagiarism will be detected by Copyscape

©2000-2026, . All rights reserved.