When you use the Pen and Highlighter tools to annotate, you are provided with an option to save those annotations when you exit Slide Show view. If you do opt to save them, then you will actually open doors to new capabilities that will allow you to edit these annotations. In fact, you can also change these annotations to shapes and work more with them.
Follow these steps to work with annotations in PowerPoint 2016 for Windows:
- Open a presentation which has saved annotations. Navigate to the slide that contains annotations, as shown in Figure 1, below.
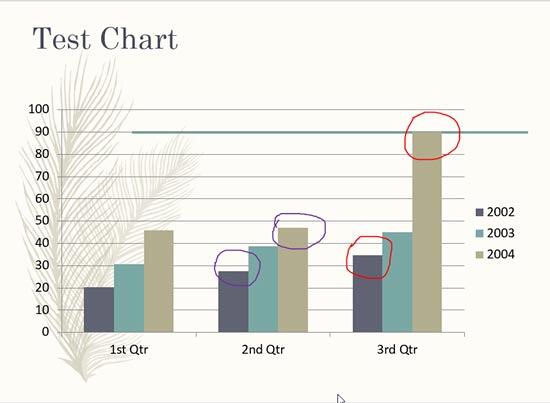
Figure 1: Slide with annotations- Now, select any of the annotations, and you will see the Ink Tools Pens contextual tab on the Ribbon, as shown in Figure 2, below. We selected annotations done with the Pen tool.
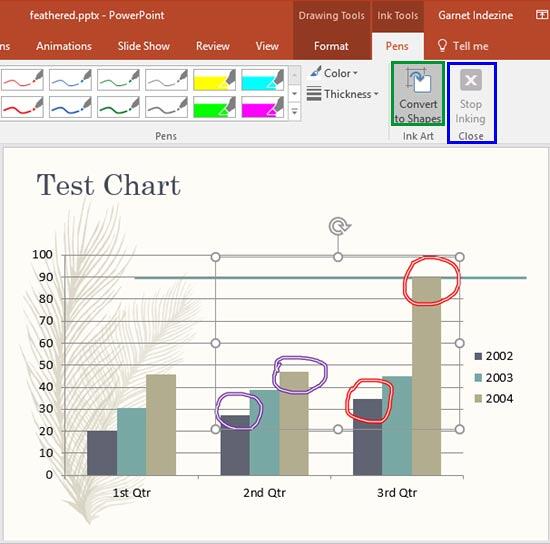
Figure 2: Ink Tools Pens contextual tab- When you select the Ink Tools Pens contextual tab, the cursor will change to the Pen tool and the annotations selected previously will get deselected. Click on the Stop Inking button, as shown highlighted in blue within Figure 2, above, or press the Esc key to come out of the Inking mode and then select the annotations again. Now we can change the color and thickness of the selected annotations. To change color, click the Color button shown in Figure 3, below, which brings up the Color drop-down gallery. You can choose any of the options here to select a color for the annotations.
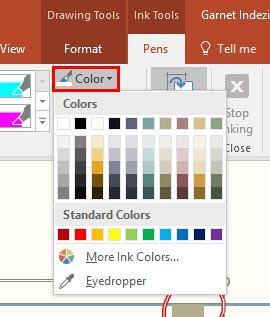
Figure 3: Change the color of your annotation- You can also change the thickness similarly by clicking the Thickness button, as shown highlighted in red within Figure 4, below. Doing so brings up the Thickness drop-down gallery where you can choose to make your annotation thicker or thinner. Learn more in our Formatting Line Weight and Thickness for Shapes in PowerPoint 2016 for Windows tutorial.
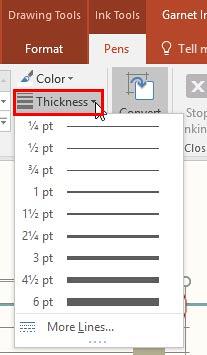
Figure 4: Change the annotation to be thicker or thinner- There is a perfectly useable Convert to Shapes button available within the Ink Tools Pens tab of the Ribbon, as shown highlighted in green within Figure 2, previously on this page, you will notice that clicking this button doesn't make any difference to the annotations. However, at times, this button may be greyed out.
- A workaround for this issue is to copy your selected annotation to the Clipboard by pressing the keyboard shortcut Ctrl + C. You can also access the Home tab of the Ribbon and click the Copy button.
- Preferably, navigate to another slide, or insert a new slide. Thereafter press the Ctrl + Alt + V keyboard shortcut, or access the Home tab of the Ribbon. Then, click the lower half of the Paste button, that looks like a down-arrow, as shown in Figure 5, below. Now, click the Paste Special option.
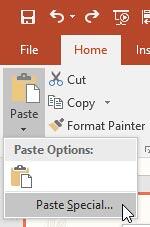
Figure 5: Paste Special option- Either way, this action will bring up the Paste Special dialog box, as shown in Figure 6, below. Scroll down to find the Picture (Enhanced Metafile) option, select it, then click the OK button.
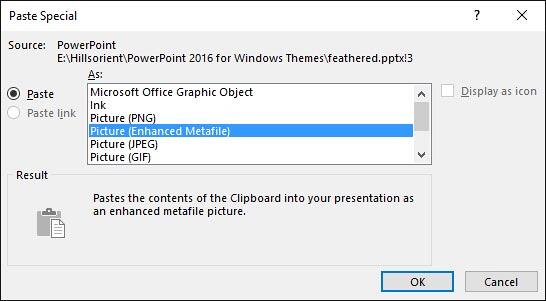
Figure 6: Paste as an Enhanced Metafile- Doing so will paste the copied object on the active slide, as shown in Figure 7, below. Note that this is no longer an annotation.
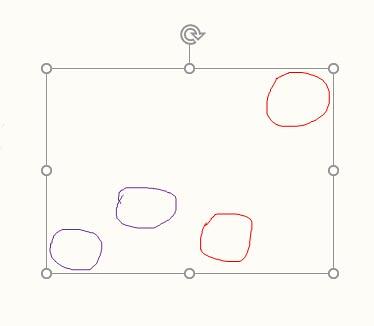
Figure 7: Object pasted is no longer an annotation- However, you cannot use this as a PowerPoint native shape. To do so, you will have to ungroup the object twice in succession, you can use the Ctrl + Shift + G keyboard shortcut to ungroup, as shown in Figure 8, below.
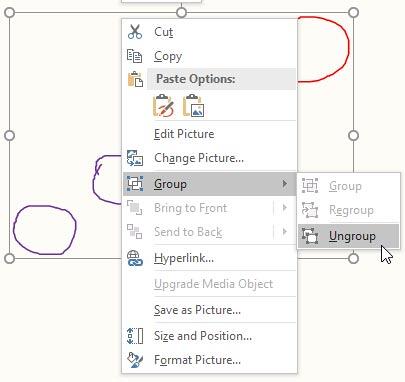
Figure 8: Ungroup option- The first time you ungroup, PowerPoint will ask you whether you want to convert it to a Microsoft Office drawing object, as shown in Figure 9, below. Accept by clicking the Yes button. Next, ungroup again for a second time.

Figure 9: Do you want to convert the picture?- Ungrouped objects will result into multiple shapes, as shown in Figure 10, below. However, the good news is that you can now use all Shape editing tools in PowerPoint to edit them.
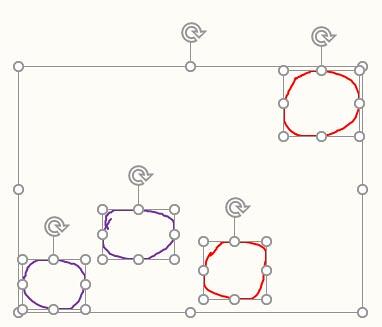
Figure 10: Ungrouped shapes- Save your presentation often.


