You have already seen how to apply different fill types for shapes and also how to format shape outlines in PowerPoint 2010. Now, let us move on to Shape Effects, the next option in Shape Styles group. Just like the Shape Effects PowerPoint 2007, there are six distinct Shape Effects available in PowerPoint 2010 for Windows as well:
- Shadow,
- Reflection,
- Glow,
- Soft Edges,
- Bevel, and
- 3-D Rotation.
Note: In addition to the six effects listed above, PowerPoint 2010 also provides an option to apply preset effects that are a combination of several effects applied to the same slide object.
We'll explain each of these effects in individual detailed pages within this series. In this first tutorial of the series, we'll explain the basics of applying effects.
Follow these steps to apply an effect to a shape in PowerPoint 2010 for Windows:
- Select the shape that you want to apply the effect to. Alternatively, if you just want to follow this tutorial step-by-step, launch PowerPoint 2010. Most of the time, PowerPoint will open with a new slide in a presentation, PowerPoint 2010 users can change the slide layout to Blank by selecting Home tab | Layout | Blank.
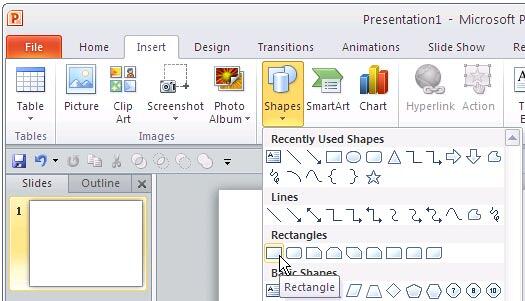
- Within the Home or Insert tab of the Ribbon, click the Shapes button to access the Shapes gallery that you can see in Figure 1. Select any shape, and then either drag and draw, or click once on the blank slide to place an instance of the shape.

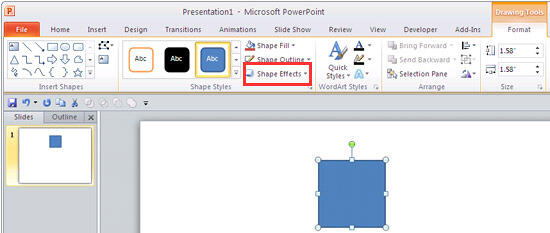
Figure 1: Shapes gallery - Select the shape so that the Ribbon area now shows the Drawing Tools Format tab, as shown in Figure 2. Activate this Ribbon tab by clicking on it.

Figure 2: Drawing Tools Format tab of the Ribbon Note: The
Drawing Tools Format tab is a
Contextual tab. These tabs are special tabs in the
Ribbon that are not visible all the time, they only make an appearance when you are working with a particular slide object which can be edited using special options.
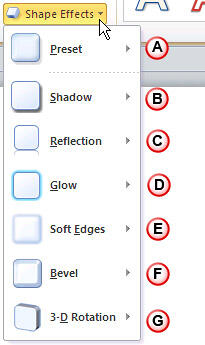
- From the Drawing Tools Format tab, locate the Shape Styles group, then click the Shape Effects button (highlighted in red in Figure 2 above) to view the Shape Effects drop-down gallery that you can see in Figure 3.

Figure 3: Shape Effects drop-down gallery - Let us explore these seven options (one preset and six effect types) one by one:
A. Preset
- This option provides some ready to use shape effects, which can be applied to any shape. More Information.
B. Shadow
- Applies shadow effects to the selected shape. PowerPoint provides three types of shadows: outer, inner and perspective, and you can apply any of these, or customize them to your requirement. More Information.
C. Reflection
- This option applies a reflection to the selected shape, and you can choose from several reflection styles. Remember you don't want to use shadow and reflection for the same slide object such as a shape. More Information.
D. Glow
- Glow adds a hazed, blurred color perimeter outside the shape area. PowerPoint provides several glow variations; the glow colors are based on the Theme colors, although you can also choose any other color you like. More Information.
E. Soft Edges
- This effect type makes the shape edges feathered. There are some soft edges variations available. More Information.
F. Bevel
- Apply bevel effects to the shape. You can also customize your own bevel. More Information.
G. 3-D Rotation
- With this effect type, you can apply parallel, perspective, and oblique 3-D effects to shape. More Information.
- Remember to save your presentation often.


