Indezine Logo


Creating PowerPoint Outlines in Microsoft Word 2011 for Mac

Learn how to create outlines for presentations in Microsoft Word 2011 for Mac. These are formatted for failsafe import into Microsoft PowerPoint.


Author:

Product/Version: PowerPoint

OS: Mac OS X


Learn PowerPoint

Learn about PowerPoint links and link problems


Typically, there are three common ways in which you can create slides in PowerPoint. All these three ways can be combined with each other but it is best to start with creating an outline for your presentation in another program. Mac users can create outlines in TextEdit. Alternatively, you can use Microsoft Word as well. In this tutorial, we'll show how you can use Word 2011 for Mac to create an outline for a PowerPoint presentation.

  1. Launch Finder (just click the Mac HD icon on your desktop) and go to your Applications folder, where you will find an icon for Word 2011. Double-click to run this application.
  2. Launch a new Word document, as shown in Figure 1, below.
  3. Word 2011 document
    Figure 1: Word 2011 document
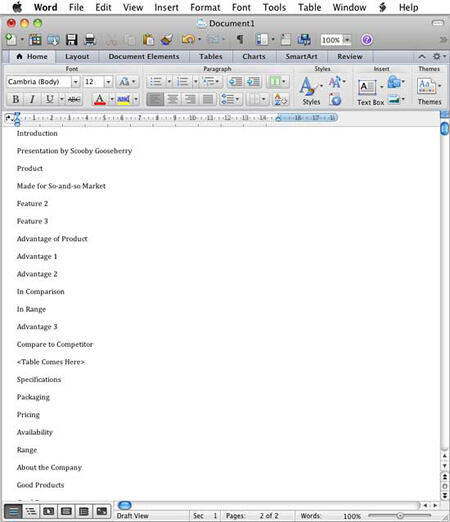
  4. Now, type in all the text content you want within your slide titles and text placeholders on separate lines, as shown in Figure 2, below. If you don't know what a text placeholder in PowerPoint is, look at our Text Placeholders vs. Text Boxes tutorial.
  5. Text content for your slides
    Figure 2: Text content for your slides
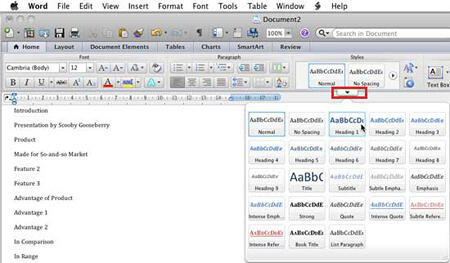
  6. Access the Home tab of the Ribbon. Within the Styles group, hover your cursor over any of the style thumbnails. To see all the styles at the same time, click the small, downward pointing triangle, as shown highlighted in red within Figure 3, below. This brings up the drop-down Styles gallery, as shown in Figure 3.
  7. Styles gallery
    Figure 3: Styles gallery
  8. Now, you can format the outline so that PowerPoint can understand which line of text is a slide title, the first level bullet, the second level bullet, etc. To do so, you need to follow these guidelines:
    1. For slide titles, select the text and choose Heading 1 style.
    2. For first level bullets (or subtitles in a title slide), select the text and choose Heading 2 style.
    3. For the second level bullets, select the text and choose Heading 3 style.
    4. For any subsequent levels of bullets (third, fourth, etc.), select the text that you want to format, and apply the Heading style of that level (Heading 4, Heading 5, etc).
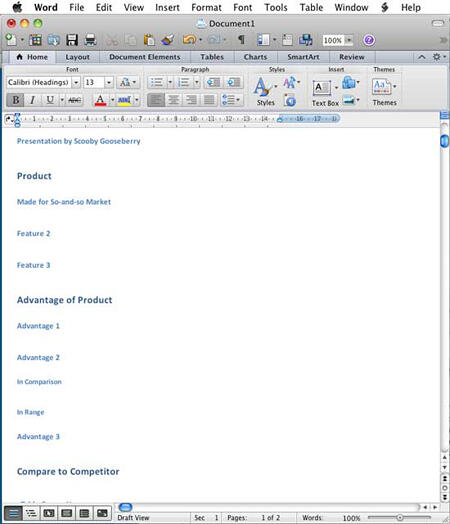
  9. Once you are done with adding styles, your outline may look like what you see in Figure 4, below. Compare with Figure 2.
  10. Text content for your slides after adding styles
    Figure 4: Text content for your slides after adding styles
  11. One aspect that we want to draw your attention to is that you can only add the text content for a presentation within an outline. However, at times, there may be some important, non-textual info in a presentation: this could be a picture, a chart, a table, or something else. In that case, you can indicate a reference within the outline. Make it stand out a little different, as shown in Figure 6, below. You'll notice that we added some text to indicate that a table has to be added to a particular slide, and it is within parentheses.
  12. Indicating non-textual content within parentheses
    Figure 5: Indicating non-textual content within parentheses
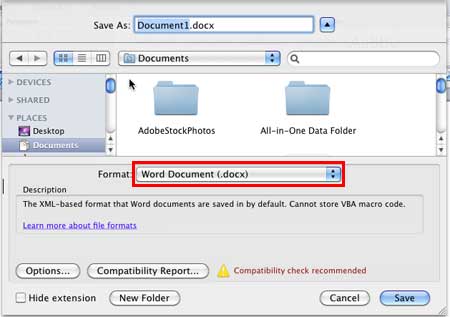
  13. Save your outline within Word as an RTF file. It is important that you save to an RTF (Rich Text Format) file rather than as a native Word document because PowerPoint for Mac can only import Word outlines saved as RTF files. To save as RTF, choose the File | Save As menu option to bring up the Save As dialog box, as shown in Figure 6, below.
  14. Save As dialog box
    Figure 6: Save As dialog box
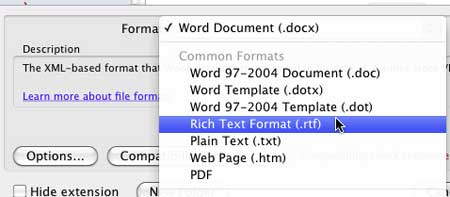
  15. In this dialog box, select the Format option, as shown highlighted in red within Figure 6, above, to bring up the drop-down menu that lets you choose between different file formats that Word can save to. In this drop-down menu, select the Rich Text Format (.rtf) option, as shown in Figure 7, below.
  16. Rich Text Format option selected
    Figure 7: Rich Text Format option selected
  17. This outline is now in a format that PowerPoint can import, and create new slides. To learn how to import this outline into PowerPoint 2011, look at our Import Outlines in PowerPoint 2011 for Mac tutorial. And, to learn how to import this outline into other versions of PowerPoint, look here: Outlines: Import.

See Also:

01 03 04 - Creating Slides: Creating PowerPoint Outlines in Microsoft Word 2011 for Mac (Glossary Page)

Creating PowerPoint Outlines in Microsoft Word 365 for Windows
Creating PowerPoint Outlines in Microsoft Word 365 for Mac
Creating PowerPoint Outlines in Microsoft Word 2019 for Windows
Creating PowerPoint Outlines in Microsoft Word 2019 for Mac
Creating PowerPoint Outlines in Microsoft Word 2016 for Windows
Creating PowerPoint Outlines in Microsoft Word 2016 for Mac
Creating PowerPoint Outlines in Microsoft Word 2013 for Windows
Creating PowerPoint Outlines in Microsoft Word 2010 for Windows
Creating PowerPoint Outlines in Microsoft Word 2008 for Mac
Creating PowerPoint Outlines in Microsoft Word 2007 for Windows
Creating PowerPoint Outlines in Microsoft Word 2003 for Windows
Creating PowerPoint Outlines in Microsoft Word for the Web

You May Also Like: Here’s How President Obama Gave Stellar Inspirational Speeches | Widescreen Implementations in PowerPoint


Popular Posts

Snow Effect in PowerPoint
Create a snow fall effect inside PowerPoint using animation techniques.

PowerPoint Transitions: Curtains
Explore the Curtains transition effect in PowerPoint.

Pivot Tables in PowerPoint: by Kasper Langmann
One of the most commonly used features in Microsoft Excel is the Pivot Table. A Pivot Table simply allows you to make better sense of data by giving you different options of how to view that data.

Get More SmartArt Graphics
Learn how you can get more SmartArt graphic variants.


Organic Shapes with Brush Edges

You get 8 shape types plus lines as part of this Organic Shapes collection. Each of these 8 shape types have 10 variants. So you end up with 80 hand-drawn shape options! Again each of these 80 shapes have 12 brush stroke styles! Plus you get the lines and arrows in 12 brush stroke styles too. Combine all variations to end up with more than 3000 possibilities.

Buy and Download for $99+ (83 MB)


Microsoft and the Office logo are trademarks or registered trademarks of Microsoft Corporation in the United States and/or other countries.

Home | PowerPoint | Photoshop | PowerPoint Templates | PowerPoint Tutorials | Blog | Notes | Ezine | Media Kit | Feedback | Site Map | About Us | Contact Us

Link to Us | Privacy | Testimonials

PowerPoint Backgrounds | Christian PowerPoint Backgrounds | Business PowerPoint Presentation Templates

Plagiarism will be detected by Copyscape

©2000-2025, . All rights reserved.