Do you want to show selected slides from your presentation to a particular audience? Yes, you could delete the extra slides and save as a new presentation altogether, but there is a better answer. You can create a custom slide show! So, what's a custom slide show? To use an analogy, if you think of your individual slides as songs, then a custom slide show is a playlist of those songs! Even better, since this is like a playlist, you do not have to delete slides that are not used. And it gets better, because just like playlist, you can create any number of custom slide shows!
Follow these steps to create a Custom Slide show in PowerPoint 2013 for Windows:
- Open the presentation within which you wish to create a Custom Slide show.
- Access the Slide Show tab of the Ribbon. Then, click the Custom Slide Show button, as shown highlighted in red within Figure 1, below. Within the drop-down menu that appears, click the Custom Shows option, as shown highlighted in blue within Figure 1.
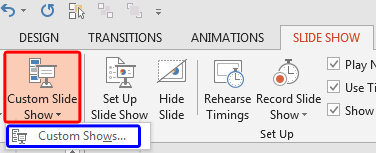
Figure 1: Custom Shows option- Doing so brings up the Custom Shows dialog box, as shown in Figure 2, below. Note that the area on the left, highlighted in blue is completely blank, that's because this particular presentation contains no custom slide show yet. Within this dialog box, now click the New button, as shown highlighted in red within Figure 2.
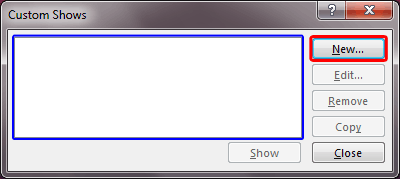
Figure 2: Custom Shows dialog box- This action will open the Define Custom Show dialog box, as shown in Figure 3, below.
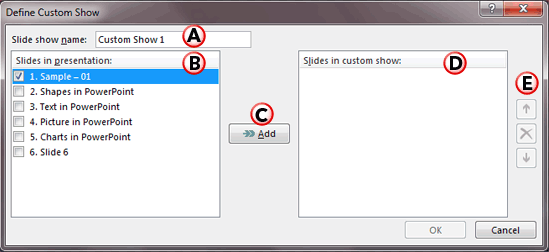
Figure 3: Define Custom Show dialog box- All the options within the Define Custom Show dialog box are explained below, as marked in Figure 3, above:
A. Slide show name
- Here you can provide a name for your Custom Slide Show. By default, PowerPoint may just call this Custom Show 1, but you can type in a new, more descriptive name.
B. Slides in presentation
- Shows a list of slides within the current presentation. To select slide(s), click within the check-box placed right in front of the slide(s) name.
C. Add
- This button adds the selected slides from the Slides in presentation area to the Slides in custom show area. Note that unless you select some slides within the Slides in presentation area, the Add button stays greyed out. Do note that you can also add the same slide more than once.
D. Slides in custom show
- Once you add the slides, this area shows the list of slides within the current custom show. Figure 4, below shows three slides added within Slides in custom show list, as shown highlighted in red.
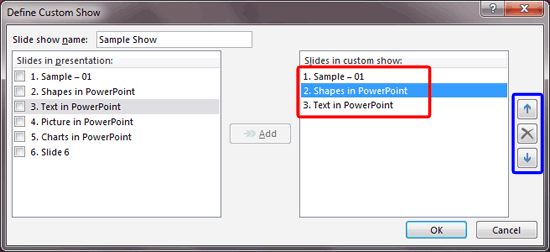
Figure 4: Slides added within Slides in custom show listE. Re-order / Remove
- The Up, Remove, and Down buttons, as shown highlighted in blue within Figure 4, above, are active only when there are slides added within Slides in custom show list. Use the Up and Down buttons to re-order the sequence of the slide, and use the Remove button to delete the slide from Slides in custom show list.
- Click the OK button to create the custom show.
- Doing so brings you back to the Custom Shows dialog box, as shown in Figure 5, below. The custom show created can be seen within this dialog box.
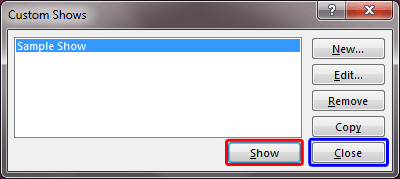
Figure 5: Custom Shows dialog box with the custom show listed- To preview the custom show, select it from the list and click the Show button, as shown highlighted in red within Figure 5, above.
- Within the Custom Shows dialog box, you will find other buttons such as:
- New, to create more custom shows
- Edit, to edit a selected custom show
- Remove, to delete an existing, selected custom show, and
- Copy, to create a duplicate copy of the selected custom show. This option is very useful if you want to create similar custom shows where only a few slides differ.
- Once you are happy with your custom show, click the Close button, as shown highlighted in blue within Figure 5.
- To play your custom show in PowerPoint, explore our Playing Custom Shows in PowerPoint 2013 tutorial.


