Has it ever happened that you wanted to include just a few slides in your slide show rather than displaying the entire presentation? Then you need not delete the slides that need not be shown, nor do you need to create a whole new presentation containing only the slides to be shown. All you need to do is to create a Custom Slide Show!
So, what's a custom slide show? Think of your individual slides as songs within a playlist, using the playlist analogy, your custom slide show is a playlist of those songs, you just substitute songs for slides! Even better, since this is like a playlist, you do not have to delete slides that are not used. And it gets better because just like a playlist, you can create any number of Custom Slide Shows from a single presentation!
Follow these steps to create a Custom Slide show in PowerPoint 2011 for Mac:
- Open the presentation within which you wish to create a Custom Slide show.
- Access the Slide Show tab on the Ribbon, as shown highlighted in red within Figure 1, below. Then, click the Custom Shows button, as shown highlighted in blue within Figure 1. Doing so brings up a drop-down menu, within this drop-down menu, click the Edit Custom Shows option, as shown in Figure 1.

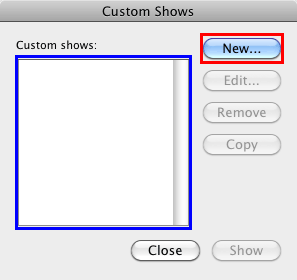
Figure 1: Edit Custom Shows option- Doing so brings up the Custom Shows dialog box, as shown in Figure 2, below. Note that the area on the left, highlighted in blue is completely blank, that's because this particular presentation contains no custom slide show yet. Within this dialog box, now click the New button, as shown highlighted in red within Figure 2.

Figure 2: Custom Shows dialog box- This action will open the Define Custom Show dialog box, as shown in Figure 3, below.

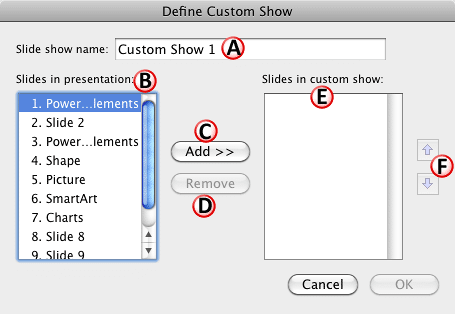
Figure 3: Define Custom Show dialog box- All the options within the Define Custom Show dialog box are explained below, as marked in Figure 3, above:
A. Slide show name
- Here you can provide a name for your Custom Slide Show. By default, PowerPoint may just call this Custom Show 1, but you can type in a new, more descriptive name.
B. Slides in presentation
- Shows a list of slides within the current presentation. To select slide(s), click the slide name. To select multiple slides, select the first slide, and then press the Shift or Command key to select more slides.
C. Add
- This button adds the selected slides from the Slides in presentation area to the Slides in custom show area. Note that unless you select some slides within the Slides in presentation area, the Add button stays greyed out. Do note that you can also add the same slide more than once.
D. Remove
- This button removes selected slides from the Slides in custom show area. Note that unless you select a slide within the Slides in custom show area, the Remove button stays greyed out.
E. Slides in custom show
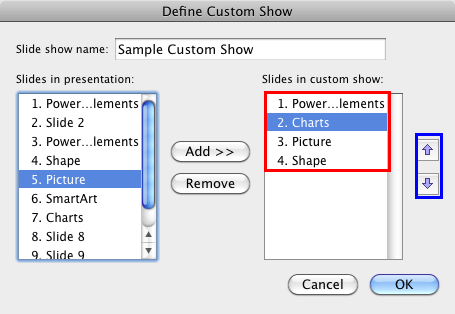
- Once you add the slides, this area shows the list of slides within the current custom show. Figure 4, below, shows four slides added within Slides in custom show list (highlighted in red).

Figure 4: Slides added within Slides in custom show listF. Re-order
- The Up and Down buttons, as shown highlighted in blue within Figure 4, above, are active only when there are slides added within Slides in custom show list. Use the Up and Down buttons to re-order the sequence of the selected slide(s).
- Click the OK button to create your custom show.
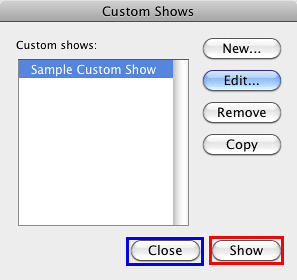
- Doing so brings you back to the Custom Shows dialog box, as shown in Figure 5, below. The custom show created can be seen within this dialog box (compare with the similar dialog box in Figure 2, shown previously on this page).

Figure 5: Custom Shows dialog box with the custom show listed- To preview the custom show, select it from the list and click the Show button, as shown highlighted in red within Figure 5, above.
- Within the Custom Shows dialog box, you will find a few other buttons also, as shown in Figure 5. They are:
- New: Creates new custom shows.
- Edit: Used to edit a selected custom show.
- Remove: Deletes an existing, selected custom show.
- Copy: Used to create a duplicate copy of the selected custom show. This option is very useful if you want to create similar custom shows where only a few slides differ.
- Once you are happy with your custom show, click the Close button, as shown highlighted in blue within Figure 5, above.
- To play your custom show in PowerPoint, explore our Playing Custom Shows in PowerPoint 2011 tutorial.


