
This is the print version of this page. All content is copyright Indezine.com 2000-2026.
Learn how gridlines snap and help you position slide objects in PowerPoint 365 for Windows. Also, learn how to control the grid spacing.
Author: Geetesh Bajaj
Product/Version: PowerPoint 365 for Windows
OS: Microsoft Windows 10 and higher
The Snap to Grid feature in PowerPoint helps you position objects with precision using invisible magnetic alignment. This guide explains how gridlines work, how to enable snapping, and how to customize grid spacing for cleaner, faster slide design.
Working with Snap to Grid
Change Snap to Grid Settings
Once you turn on Gridlines in PowerPoint, you might think they are nothing more than a set of faint lines spread across your slide. It’s almost like graph paper from your school math notebook, as shown in Figure 1, below. And honestly, that first impression is not entirely wrong. Gridlines do give you a visual framework that helps you place pictures, shapes, and text boxes more neatly.

Figure 1: Gridlines on a slide
But here’s where things get interesting. Imagine trying to park a car in a crowded parking lot without the painted parking lines. You could probably do it, but chances are the car would end up a little crooked. Gridlines work like those parking guides. However, the real magic happens when you enable PowerPoint’s Snap to Grid option. Suddenly, objects almost “lock” themselves into position as you move them around the slide. It’s like having tiny invisible magnets helping you align everything perfectly.
Many PowerPoint users never discover this incredible feature because Snap to Grid is not enabled by default. That’s a little like buying a smartphone and never realizing it has a camera! Once activated, though, it can make slide design faster, cleaner, and far less frustrating, especially when working with multiple objects that need to line up evenly.
The Snap to Grid option helps you better position your slide objects. Additionally, you can change the grid settings, such as changing the spacing between the gridlines.
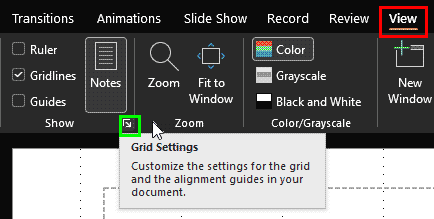
BackTo access the Snap to Grid option and to modify its settings, follow these steps in PowerPoint 365 for Windows:
Click the Shift+F9 shortcut key to toggle the visibility of gridlines in PowerPoint 365 for Windows.
Do you want more keyboard shortcuts?
Explore our PowerPoint Keyboard Shortcuts and Sequences Ebook that is updated for all PowerPoint versions.

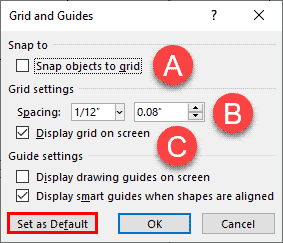
Enable this check-box if you want PowerPoint to automatically snap objects to nearby gridlines as you move them around the slide. Think of it like parking assistance in a modern car: once you get close enough, PowerPoint gently helps guide the object into the right position. This feature can save a surprising amount of time, especially when working with multiple shapes, pictures, or text boxes that need to line up neatly.
You can also turn this option on instantly without opening the Grid and Guides dialog box. Just press the keyboard shortcut Ctrl + Shift + F9. Press the same shortcut again whenever you want to turn the feature off.
Did you know that Professional designers often rely on snapping features because the human eye is extremely sensitive to alignment. Even objects that are just slightly off-position can make a slide feel visually “wrong,” even if viewers cannot immediately explain why!
Learn more about snapping objects to the grid.
Within the Grid settings section, click inside the Spacing box to open a drop-down list of preset spacing values, as shown in Figure 5, below. Choosing a smaller spacing value creates a tighter grid, while a larger value gives you more breathing room between gridlines.
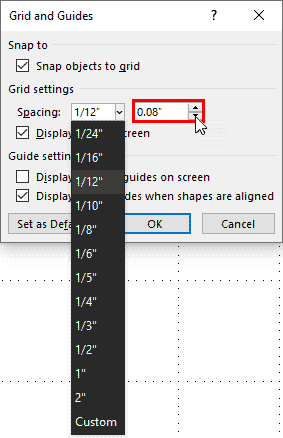
Figure 5: Spacing drop-down list
Think of it like choosing the size of tiles on a floor. Small tiles create a detailed pattern with lots of alignment points, while larger tiles make the layout feel more open and spacious. The same idea applies to PowerPoint slides: tighter grids help with precise placement, while wider grids work well for simpler layouts.
You are not limited to the preset values either. You can type your own custom spacing value or use the up and down arrows, highlighted in red within Figure 5, above, to fine-tune the distance between gridlines.
Designers often adjust grid spacing depending on the type of slide they are building. A data-heavy dashboard slide may benefit from a fine grid for precision, while a bold marketing slide with large visuals may work better with a wider grid spacing.
Select the Display grid on screen check box if you want the gridlines to appear on your slide while you work. Clear the same check box whenever you prefer a cleaner workspace without visible gridlines.
Think of gridlines like the ruled lines in a notebook. Some people find them incredibly helpful for keeping everything straight and organized, while others prefer a completely blank page once the layout is already in place. Fortunately, PowerPoint lets you switch between both views whenever needed.
You do not even need to open the Grids and Guides dialog box each time. Simply press Shift + F9 to quickly show or hide the gridlines. Pressing the same shortcut again toggles the option back.
Many designers temporarily hide gridlines before reviewing a finished slide because it helps them see the presentation the same way their audience will, that is, clean, distraction-free, and presentation-ready.
If you want PowerPoint to remember your updated grid and guide settings for all future presentations, click the Set as Default button, highlighted in red within Figure 4, earlier on this page.
Keep in mind, though, that these settings apply to your current presentation and to any new presentations you create from this point forward. They may not affect older presentations already stored on your system, and they usually will not carry over to presentations created by someone else on another installation of PowerPoint.
In other words, this is a setting tied to your particular installation of PowerPoint rather than to an individual presentation file. It is somewhat like customizing your workspace desk at the office: your setup stays the way you like it, but visiting someone else’s desk does not automatically rearrange itself to match your preferences!
Many advanced PowerPoint users spend time fine-tuning their default settings because even small adjustments can save hours of repetitive formatting work over the course of a year.
Yes. Hold Alt (Windows) or Option (Mac) while dragging to bypass snapping.
Grid spacing may be too small, or Snap to Grid may be disabled in settings.
Disable it when fine-tuning object placement or creating organic, free-form layouts.
01 09 11 - Working with Slides: Snap to Grid Settings in PowerPoint (Glossary Page)
Snap to Grid Settings in PowerPoint 2016 for Windows
Snap to Grid Settings in PowerPoint 2013 for Windows
Snap to Grid Settings in PowerPoint 2010 for Windows
You May Also Like: Pecha Kucha Questions | Is It, Like, OK To Say ‘Like’?


Microsoft and the Office logo are trademarks or registered trademarks of Microsoft Corporation in the United States and/or other countries.
