Learn how gridlines snap and help you position slide objects in PowerPoint 2016 for Windows. Also, learn how to control the grid spacing.
Author: Geetesh Bajaj
Product/Version: PowerPoint 2016 for Windows
OS: Microsoft Windows 7 and higher
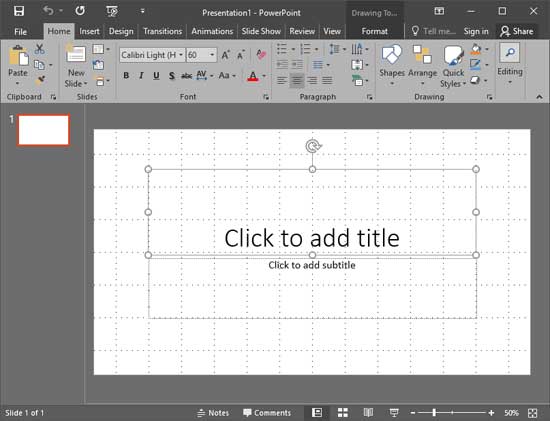
Once you make Gridlines visible on your slide in PowerPoint 2016 for Windows, you may wonder if there's any benefit in using the Gridlines other than the obvious benefit of possessing a visual grid that lets you place slide objects. The answer can be both Yes and No. Yes, because you may believe that is all that happens on the surface. Moreover, no, because unless you explore how the Snap to Grid option works, you will not realize the real benefit. Worse, this incredible option is not active by default!
The Snap to Grid option helps you better position your slide objects. Additionally, you can change the grid settings, such as changing the spacing between the gridlines.
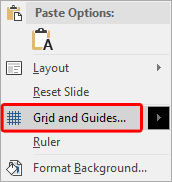
To access the Snap to Grid option and to make changes to the way it works, follow these steps:

Click the Shift+F9 shortcut key to toggle the visibility of gridlines in PowerPoint 2016 for Windows.

Do you want more keyboard shortcuts?
Explore our PowerPoint Keyboard Shortcuts and Sequences Ebook that is updated for all PowerPoint versions.


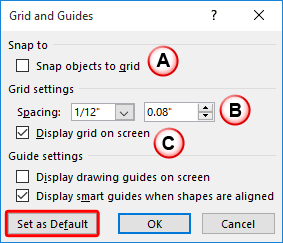
Select this check-box to snap objects to the gridlines as soon as they move fairly close to them. You can also turn on this option even without accessing the Grids and Guides dialog box by using the (Ctrl + Shift + F9) shortcut key. Turn off the option by pressing the same keyboard shortcut.
Learn more about snapping objects to the grid.
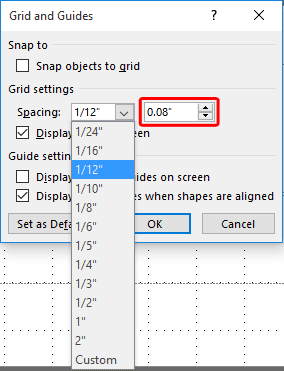
Under the Grid settings section, click within the Spacing selection box to get a drop-down list, as shown in Figure 5, below, and choose any of the default grid spacing values available. You can also type in the spacing value or use the up and down arrows to set the custom spacing for gridlines, as shown highlighted in red within Figure 5.

Figure 5: Spacing drop-down list
Select or deselect the Display grid on screen check-box to show/hide the gridlines on the slide. You can also turn on this option even without accessing the Grids and Guides dialog box by using the Shift + F9 shortcut key. Again, this keyboard shortcut is a toggle option.
If you want the settings you changed to be the default settings for all presentations you create from now onwards, click the Set as Default button, as shown highlighted in red within Figure 4, previously on this page. Do note that the changed settings will apply for your active, current presentation and for any other new presentations you create hereafter on your installed version of PowerPoint. All settings may not work for existing presentations created previously on the same system or for presentations you have received from others, which have been created on other installations of PowerPoint. This setting is therefore a PowerPoint installation-specific change and not a PowerPoint file-specific change.
Yes. Hold Alt (Windows) or Option (Mac) while dragging to bypass snapping.
Grid spacing may be too small, or Snap to Grid may be disabled in settings.
Disable it when fine-tuning object placement or creating organic, free-form layouts.
01 09 11 - Working with Slides: Snap to Grid Settings in PowerPoint (Glossary Page)
Snap to Grid Settings in PowerPoint 2013 for Windows
Snap to Grid Settings in PowerPoint 2010 for Windows
You May Also Like: Effective Ways to Use Presentation Tools for Teaching and Learning | South America PowerPoint Templates


Microsoft and the Office logo are trademarks or registered trademarks of Microsoft Corporation in the United States and/or other countries.