Indezine Logo


Smart Dynamic Guides in PowerPoint 2016 for Mac

Learn about Smart Dynamic Guides in PowerPoint 2016 for Mac. These guides are dynamic and snap as you move slide objects around.


Author:

Product/Version: PowerPoint 2016 for Mac

OS: Mac OS X


Learn PowerPoint

Do you face this issue? Numbering slides from 1, multiple times in PowerPoint.


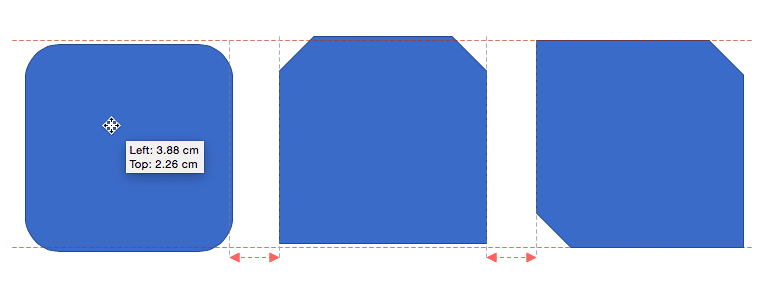
Do you notice that any object you move, resize, or align in PowerPoint snaps easily? Move it a little closer, resize a wee bit, or even try spacing slide objects and the screen shows all sorts of helpful indicators in the form of dashed lines, as shown in Figure 1, below.
Dashed lines appear while repositioning
Figure 1: Dashed lines appear while repositioning

The red and grey, dashed lines that show up and then disappear are Dynamic Guides. These made their debut in PowerPoint 2010 for Windows and allowed you to position objects easily. More improvements were added in PowerPoint 2013 for Windows that enabled you to see how much further you need to drag, so that one object on the slide is as wide as another adjacent object. In fact, you can also evenly space out objects without accessing any Ribbon tabs or typing a number within a dialog box!

By default, these Smart Guides are turned on. However, in case you don't find these working for you, or if you may have turned them off inadvertently, follow these steps to turn them on again in PowerPoint 2016 for Mac. Incidentally, you reverse the same steps to turn them off; deselect options that enabled them.
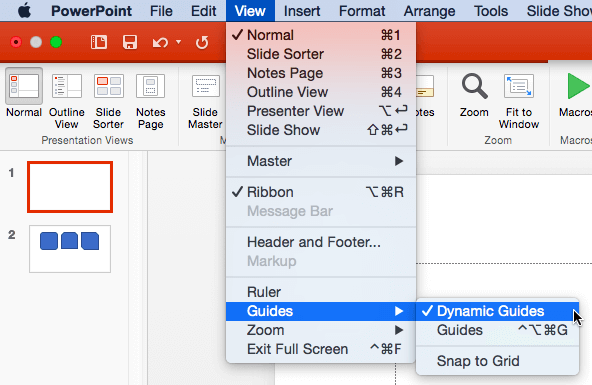
  1. Launch PowerPoint, and access the View | Guides | Dynamic Guides menu option, as shown in Figure 2, below.
  2. View | Guides | Dynamic Guides menu option
    Figure 2: View | Guides | Dynamic Guides menu option
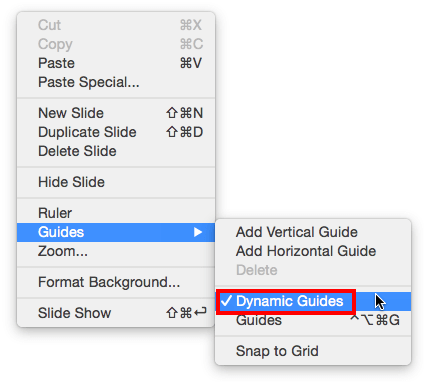
  3. Alternatively, right-click (or Ctrl+click) on an empty area of the blank slide to bring up a contextual menu, as shown in Figure 3, below. Within the contextual menu, select the Guides option to bring up another sub-menu, as shown in Figure 3. Within this sub-menu, the Dynamic Guides option may or may not be selected. This selection is indicated by a check mark in front of the option, as shown highlighted in red within Figure 3. If there's no check mark visible, click once to turn on this option.
  4. Guides | Dynamic Guides option
    Figure 3: Guides | Dynamic Guides option

Once you turn on the Dynamic Guides option, your Dynamic Guides start helping you reposition, resize, and align/distribute. Let's start with the shapes, as shown in Figure 4, below. We will manipulate these shapes to show you how various options influenced by Dynamic Guides work.

Two shapes on the slide
Figure 4: Two shapes on the slide

Reposition

See the example, as shown in Figure 4, above. What if you need to reposition so that the top of both the shapes match?

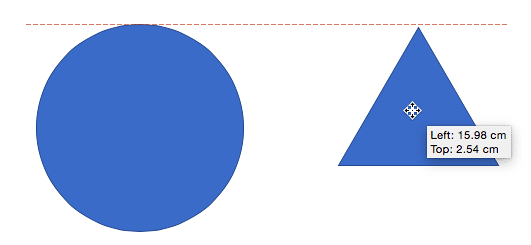
To do so, drag the triangle upwards until you see the Dynamic guides (red, dashed lines). In Figure 5, below, you can see that the Dynamic Guides have appeared once the top positions match.
Repositioning the shapes
Figure 5: Repositioning the shapes

Keyboard Shortcut

Press the Shift key on your keyboard while moving the shape upwards to move it in a straight line.

Keyboard Shortcuts for PowerPoint

PowerPoint Keyboard Shortcuts

Do you want more keyboard shortcuts?

Explore our PowerPoint Keyboard Shortcuts and Sequences Ebook that is updated for all PowerPoint versions.

Resize with Dynamic Guides

Dynamic Guides can help you resize your shapes as well. Let us continue with the example shown in Figure 5, above.
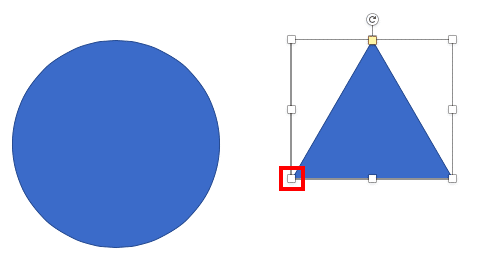
  1. Select one shape so that you can see the selection handles, as shown in Figure 6, below.
  2. Square with several handles
    Figure 6: Square with several handles
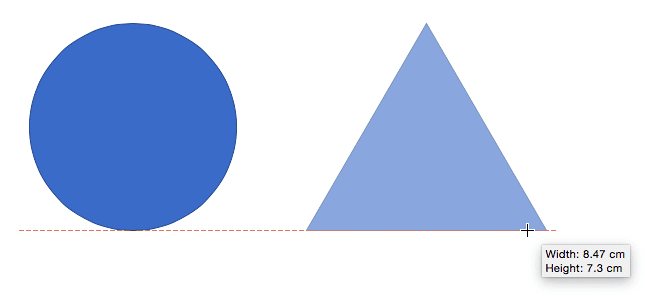
  3. Now, select the bottom left white handle, as shown highlighted in red within Figure 6, above. Hold down the Shift key and drag it downwards. As soon as the smaller shape is resized to match the size of the adjoining shape, you'll see that the Dynamic Guides make an appearance, as shown in Figure 7, below! Since both our shapes were already top-aligned, dragging downwards was all we needed to do to attain the same size for both shapes. If your shapes are not top-aligned, you may have to drag and resize from upwards as well.
  4. Resizing shapes is a snap
    Figure 7: Resizing shapes is a snap
  5. In our example shown in Figure 7, above, both shapes ended up with a similar width as well when we matched the height by resizing. That happened because our original shape was a circle with the same height:width ratios. If you work with adjacent shapes that are different, such as a rectangle and a square, or even a triangle and an oval, then you will end up with similar heights only at the end of such resizing.

Align/Distribute

In the preceding sections, you learned how to reposition and resize shapes. Such resizing even aligns the top and bottom (or even the left and right) edges of your shapes. Other than direct alignment, you can also use Dynamic Guides to influence consistent distribution (spacing) between shapes. However, for distribution to work, you need at least three or more shapes.

When you try to space three or more shapes to be equally apart, small arrows will appear to indicate when the spacing is identical, as shown in Figure 8, below.

Shapes distributed accurately
Figure 8: Shapes distributed accurately

Using Dynamic Guides is a matter or practice. The more you use them, the more intuitive you will feel working with them. Remember that you will feel the "snap" when shapes resize, position, or align identically to adjacent shapes.


See Also:

01 09 14 - Working with Slides: Smart Dynamic Guides in PowerPoint (Glossary Page)

Smart Dynamic Guides in PowerPoint 2016 for Windows
Smart Dynamic Guides in PowerPoint 2013 for Windows
Smart Dynamic Guides in PowerPoint 2010 for Windows

You May Also Like: Do You Buy Stock Photos for Clients? | Association of Southeast Asian Nations (ASEAN) PowerPoint Templates


Popular Posts

Shapes
Shapes
Learn how you can create and manipulate shapes in PowerPoint -- knowledge of working with shapes is significant because they are the building blocks of creativity in PowerPoint.

Insert Picture from the Office ClipArt Collection in PowerPoint 2013
Learn how to insert picture using Office ClipArt in PowerPoint 2013.

Snow Effect in PowerPoint
Create a snow fall effect inside PowerPoint using animation techniques.

PowerPoint Transitions: Curtains
Explore the Curtains transition effect in PowerPoint.


Polygon Center Circles for PowerPoint

These special circles have polygon centers: the centers are made of triangles, squares, pentagons, and hexagons! And based on the sides of the polygon, the rest of the circle has that many segments.

Download and use these Polygon Center Circles in your slides for just $4.99


Microsoft and the Office logo are trademarks or registered trademarks of Microsoft Corporation in the United States and/or other countries.

Home | PowerPoint | Photoshop | PowerPoint Templates | PowerPoint Tutorials | Blog | Notes | Ezine | Media Kit | Feedback | Site Map | About Us | Contact Us

Link to Us | Privacy | Testimonials

PowerPoint Backgrounds | Christian PowerPoint Backgrounds | Business PowerPoint Presentation Templates

Plagiarism will be detected by Copyscape

©2000-2025, . All rights reserved.