If you are working on a presentation with your clients or even a co-worker, then you might end up in a situation where you both did not work on the same copy, one after the other. Instead, you worked on two different copies. These copies may contain changes done by you both, some similar and some different. Now, you need to compare and merge these copies into a single, cohesive file without losing anything at all.
Yes, you can manually compare side by side, as explained in our Compare Presentations in PowerPoint 2013 tutorial. This option works great if there are very few changes. For anything more involved, you will want to use the Compare feature that combines two presentations provided by you, and then shows you differences between them. You can then decide which changes to include, or discard within the final version of your presentation.
Compare Two or More Presentations?
You can only compare and merge two copies of a presentation. However, the same presentations can have multiple authors and that's OK and PowerPoint has no problem comparing or merging in such cases.
Follow these steps to compare and merge presentations in PowerPoint 2013 for Windows:
- Before you start, you'll need to have one version of the presentation open. It does not matter which of the two you want to open first.
- Then, access the Review tab of the Ribbon, and click the Compare button, as shown highlighted in red within Figure 1, below.

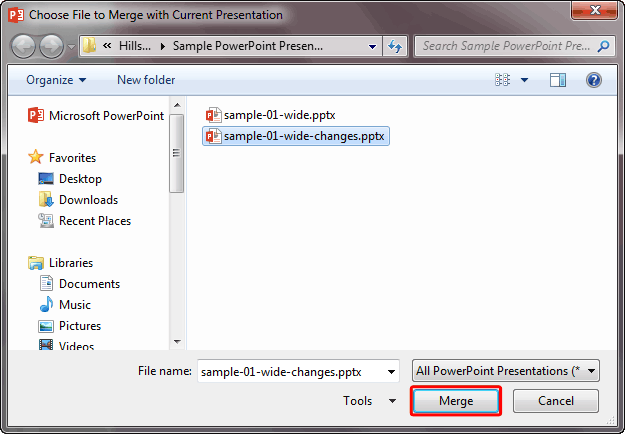
Figure 1: Compare button - Doing so opens the Choose File to Merge with Current Presentation dialog box, as shown in Figure 2, below.

Figure 2: Choose File to Merge with Current Presentation dialog box - Navigate to the other version of this presentation, select it and click the Merge button, as shown highlighted in red within Figure 2, above.
- This action will open the other version of the presentation and merge with the presentation you opened first. Along with this, the Revisions Task Pane will appear, as shown highlighted in red within Figure 3, below.
- Notice that this Revisions Task Pane displays two types of changes: Slide Changes and Presentation Changes. While the former relate to only the active slide, the latter pertains to the entire presentation. You'll see that the active slide, as shown in Figure 3, below, has no changes, but the overall presentation does have some changes. We will explore these changes later, on this page.

Figure 3: Revisions Task Pane
PowerPoint Tracks Everything
- PowerPoint automatically keeps track of differences between the original presentation and the revised version.
- Navigate from slide to slide. Notice that you see several changes in the slide, as shown in Figure 4, below.

Figure 4: Changes displayed on the Revisions Task Pane - As shown in Figure 4, above, note that these changes are listed in the Task Pane, as shown highlighted in red. Click on any of the changes within this list, and the concerned slide object gets highlighted, as shown in Figure 5, below. Additionally, each selected slide object has a comment placed next to it, along with a check-box.

Figure 5: Change highlighted - Now, select the check-box next to each revision you want to accept. In Figure 6, below, you can see that one of check-box is selected and the change is instantly displayed. To reject a change, simply leave the check-box unselected.

Figure 6: Select the check-box to accept the change - You can also click on the Slides tab of the Revisions Task Pane to see a more visual representation of the changes, as shown in Figure 7, below. Here, all changes on the slide are shown per reviewer. Thus, you can quickly accept or reject all changes by selecting the check-box, placed in front of the reviewer's name, as shown highlighted in red within Figure 7.

Figure 7: Accept all changes by a reviewer - Follow these steps on each slide to accept or reject the changes shown.
- Thereafter, visit the Presentation Changes area on the Revisions Task Pane. Similarly select any of the changes shown here, and a similar comment will show up on the Slides Pane (if there are new or deleted slides), as shown in Figure 8, below. Accept or reject changes as required.

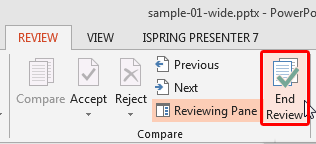
Figure 8: Changes for the Presentation - Once done with accepting and rejecting all changes, access navigate to the Review tab of the Ribbon, and then click the End Review button, as shown highlighted in red within Figure 9, below.

Figure 9: End Review button - This will apply all the accepted and rejected changes to the presentation.
- Save your presentation. Alternatively, save with a new name. To do so, choose the File | Save As menu option.
Compare More Than 2 Presentations?
What if you need to compare more than 2 presentations? PowerPoint only allows you to compare 2 presentations at a time, but if you have 3 or more presentations to compare, follow these steps:
- Compare the first and second presentations. Save changes as a new presentation file.
- Now compare this new presentation file with the third presentation.
- Repeat steps 1 and 2 mentioned above, for any further presentations.


