Indezine Logo


Stacked Waterfall Charts using think-cell add-in for PowerPoint

Create stacked waterfall charts using the think-cell add-in for PowerPoint. The think-cell add-in also creates simple waterfall charts, and many other chart types that are not available within PowerPoint.


Author:

Product/Version: PowerPoint

OS: Microsoft Windows and Mac OS X


Learn PowerPoint

Learn how to pause slides, sounds, and movies – and resume!


Stacked Waterfall charts are a little different than conventional waterfall charts, as explained in our Stacked Waterfall Charts in PowerPoint page. Such charts can be easily created using the think-cell add-in for PowerPoint.

To create a stacked waterfall chart using think-cell in PowerPoint, please follow these steps:

  1. Ensure that you have think-cell installed. If you do not have think-cell and want to try it out first, you can download a free 30-day trial version from the think-cell website.
  2. Thereafter, open PowerPoint. Add a new slide and access the Insert tab of the Ribbon, where you will find the think-cell group. Click on the Elements button, shown highlighted in red within Figure 1, below.
  3. think-cells' Elements button
    Figure 1: think-cells' Elements button
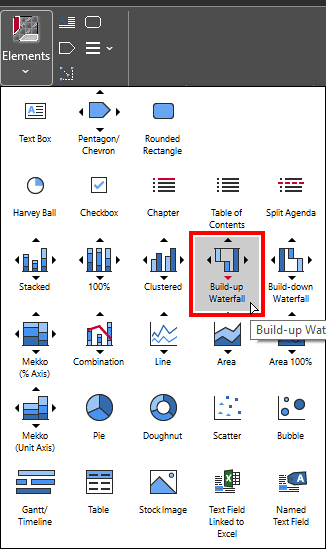
  4. Doing so brings up a drop-down menu, as shown in Figure 2, below. You will find two options to create a waterfall chart here: Build-up Waterfall and Build-down Waterfall. The Build-up option is like the conventional waterfall chart that ends up with the Total column on the far right. The Build-down option works similarly, but begins with the Total column in the first, leftmost position. We chose the Build-up Waterfall option, as shown highlighted in red within Figure 2.
  5. Build-up Waterfall
    Figure 2: Build-up Waterfall
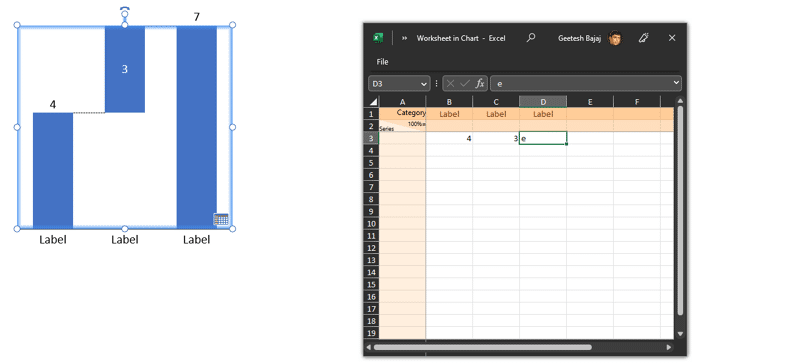
  6. think-cell is now active, and you need to click on the slide to insert a new waterfall chart. Once inserted, you'll see a sample chart and a data window, as shown in Figure 3, below. The data window is an instance of Excel.
  7. Dummy chart with data in think-cell
    Figure 3: Dummy chart with data in think-cell
  8. Now, in the data window, enter values for the different categories or subcategories that you want to include in your stacked waterfall chart. In the last column, type in the character e in the data cells for that column, as shown highlighted in red within Figure 4, below. think-cell will automatically calculate total values as needed.
  9. Data values added in PowerPoint
    Figure 4: Data values added
  10. You will now see the updated chart on your slide, as shown in Figure 5, below.
  11. Stacked waterfall chart using think-cell in PowerPoint
    Figure 5: Stacked waterfall chart using think-cell
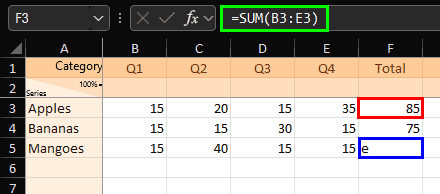
  12. Do you notice that there are no stacked total values in the last column in Figure 5, above? If you need stacked total values, you will need to add a formula for all cells in the total column. For example, you can see the cell highlighted in red within Figure 6, below is a formula, as shown highlighted in green within Figure 6. All but the last cell use the same formula. The last cell uses the character e for that category, as shown highlighted in blue within Figure 6.
  13. Formulas are used for all but the last cell in PowerPoint
    Figure 6: Formulas are used for all but the last cell
  14. You will end up with a stacked waterfall chart like what you see in Figure 7, below. Compare with the chart shown in Figure 5.
  15. Stacked total column in waterfall chart in PowerPoint
    Figure 7: Stacked total column in waterfall chart
  16. Save your presentation often.

Next, you can use the umpteen options within think-cell to customize your chart. You can add axis labels, legends, and other chart elements, and you can also adjust the color scheme and formatting options.


Viewing Chart without think-cell

What if I send a stacked waterfall chart created using think-cell to someone who does not have think-cell installed. Will they be able to view and edit the chart?

If you send a stacked waterfall chart, or any other chart created using think-cell to someone who does not have think-cell installed, then they will be able to view the chart in PowerPoint. They will also be able to edit partially.

Do remember that any chart created using think-cell is saved as a native PowerPoint object that can be edited and modified using the standard PowerPoint tools, even if the think-cell add-in is not installed. However, some of the advanced charting features and formatting options available in think-cell may not be available if the recipient does not have think-cell installed.

For example, if you use a custom color scheme or apply conditional formatting to your chart using think-cell, these formatting options may not be preserved when the chart is opened on a computer without think-cell.

To ensure that your chart is displayed correctly and consistently on different computers, it's a good idea to ensure that think-cell is installed on systems where chart editing may be needed.


See Also:

10 14 14 - PowerPoint Chart Types: Stacked Waterfall Charts using think-cell add-in for PowerPoint (Glossary Page)

Waterfall Charts in PowerPoint 365 for Windows
Waterfall Charts using think-cell add-in for PowerPoint
Waterfall Charts in PowerPoint
Stacked Waterfall Charts in PowerPoint

You May Also Like: The Single Most Important Factor For Persuasion | Nutrition PowerPoint Templates


Popular Posts

Shapes
Shapes
Learn how you can create and manipulate shapes in PowerPoint -- knowledge of working with shapes is significant because they are the building blocks of creativity in PowerPoint.

Insert Picture from the Office ClipArt Collection in PowerPoint 2013
Learn how to insert picture using Office ClipArt in PowerPoint 2013.

Snow Effect in PowerPoint
Create a snow fall effect inside PowerPoint using animation techniques.

PowerPoint Transitions: Curtains
Explore the Curtains transition effect in PowerPoint.


Handmade Slides: Pushpins for PowerPoint

These “pushpin” graphics are already placed in PowerPoint slides. Just copy them and paste within your slides to create a look that makes a picture, shape, or anything else appear as if it has been pushed onto a surface, board, or wall with a pin! These ready-made pushpins are already within PowerPoint slides, and have been provided in five colors. Just copy them and paste them on your slides.

Download these Pushpins for just $19.99


Microsoft and the Office logo are trademarks or registered trademarks of Microsoft Corporation in the United States and/or other countries.

Home | PowerPoint | Photoshop | PowerPoint Templates | PowerPoint Tutorials | Blog | Notes | Ezine | Media Kit | Feedback | Site Map | About Us | Contact Us

Link to Us | Privacy | Testimonials

PowerPoint Backgrounds | Christian PowerPoint Backgrounds | Business PowerPoint Presentation Templates

Plagiarism will be detected by Copyscape

©2000-2025, . All rights reserved.