Adobe Presenter enables you to
record audio for you
presentation. And for video recording, Adobe Presenter 10 includes Video Express, a tool
that lets you combine application or desktop capture and webcam video. With this tool you can easily
produce video tutorials -- and once recording is done, you can also further use the video edit options to
customize and fine-tune the video output.
The following are some of the revamped features within Video Express:
- Record HD videos, irrespective of the audio/video capabilities of your computer.
- You can export your closed captions as SRT files, suitable as subtitles almost anywhere.
- Include multiple lower third texts in presentations.
- An easy to use video trim option.
- No timelag in launching the record screen.
- Capture your screen at its full resolution without distortion or changes to onscreen elements.
- Use the enhanced pan-and-zoom scaling to edit videos.
- Publish to 1280x720 or 1280x800 resolution always in HD video.
Tip: Ensure that camera and microphone are plugged in to the computer and working.
You can capture a video from within PowerPoint. Doing so also records actions performed on your monitor
screen. Or use a webcam capture of the presenter who narrates while presenting or
demonstrating an application. The audio narration too is captured.
For this tutorial we'll show you how to record a video from within PowerPoint:
- If you are recording a PowerPoint presentation as a video, create a new presentation or open an
existing presentation. Then click the Record button (highlighted in
red within Figure 1) within the Adobe Presenter tab of
the Ribbon.
-
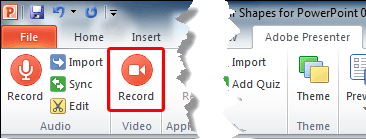
Figure 1: Record button
- This will launch the Adobe Presenter Video Express window, as shown in
Figure 2.
-
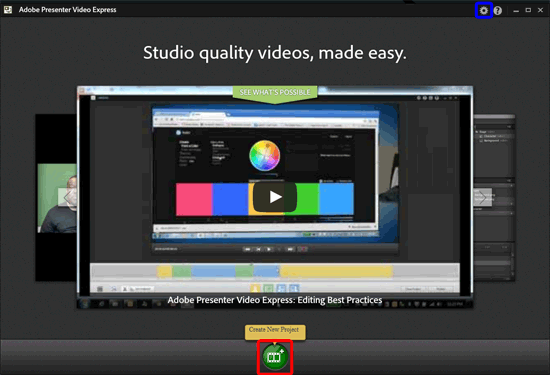
Figure 2: Adobe Presenter Video Express window
Tip: If you want to import existing projects. click the Settings
button(highlighted in blue within Figure 2, above) -- from
the drop-down list that appears choose the Import Project option.
- Within the Adobe Presenter Video Express window, click the
Create New Project button, as shown (highlighted in red
within Figure 2, above).
- The new project recording window appears, as shown in Figure 3.
-
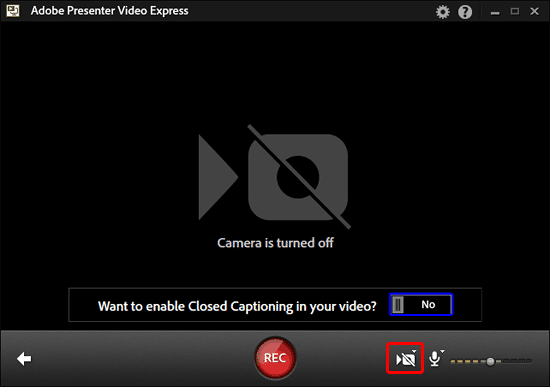
Figure 3: Recording window
- If you want to enable the Closed Captioning in your video click the button highlighted in
blue within Figure 3, above. This will pop-up the
Closed Captioning windows, as shown highlighted in red
within Figure 4. If you got the audio script you can paste it within this window before
you start recording.
-
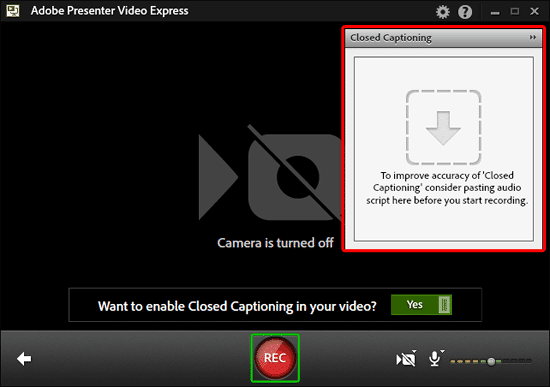
Figure 4: Recording window
- Within the recording window first set the recording preferences by selecting the camera. Click the
video camera icon at the bottom of the recording window as shown highlighted in
red within Figure 3, above. This brings up a drop-down list, as
shown in Figure 5 - within the drop-down list, names of the cameras currently connected to your computer
are displayed. Choose the camera attached to you system, as shown in Figure 5.
You can choose None if you do not want to use a camera in the video you want to record.
-

Figure 5: Choose a camera
- In the same way, you can select a microphone to record your narration's audio part -- this
could also be the built-in microphone within your webcam.
- After selecting the camera and the microphone, click the Rec button, as shown highlighted
in green within Figure 4, earlier in this page. And thereafter, press
the ESC key to get back to the PowerPoint interface.
- This will start the recording after a countdown of five seconds. Press the ESC key to
get to the PowerPoint interface. Perform steps on the computer while you narrate the script. Adobe Presenter Video
Express captures both you (the Presenter) and the full monitor screen simultaneously during recording. After
recording, you can choose to display the Presenter, the presentation, or both in different parts of the video -- this
is explained later in this tutorial.
Note: To end the recording, press the Shift + End shortcut key, or click
the Adobe Presenter Video Express icon in the system tray, and click End Recording option.
And to pause the recording, press the Pause key on the keyboard or right-click the Adobe
Presenter Video Express icon in the system tray, and click Pause Recording option.
- The recorded video will be opened within the editing interface, as shown in Figure 6.
As you can see, the Timeline within Figure 6 is represented by the yellow colored bar. It
may also be colored green or blue color depending upon the settings explained further in our
Adobe Presenter Video Express
Editing Options tutorial.
-
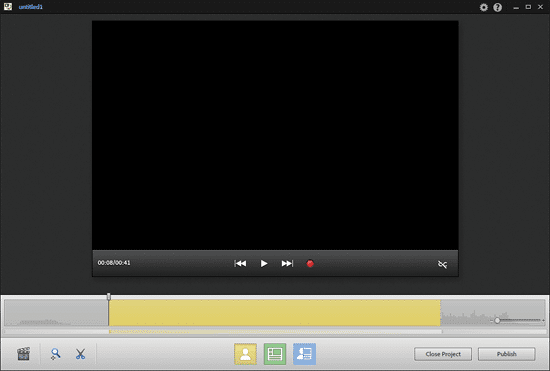
Figure 6: Editing interface


