Introduction
AKVIS SmartMask 4 is an Adobe Photoshop-compatible plug-in that provides efficient selection and masking tools. Use tools and options to remove backgrounds as well as for selecting specific area of an image, both with soft and sharp edges. The plug-in helps you to select complex objects such as: fluff, hair, fur, tree branches, glass, or a transparent veil. It also removes unwanted color shades left on the cutout object by the environment.
SmartMask 4 is from AKVIS, a company based in Russia that specializes in graphic programs. Apart from SmartMask 4, AKVIS also creates other Photoshop-compatible plug-ins like ArtWork, Refocus, Retoucher, Chameleon, MultiBrush, Sketch, Enhancer, Decorator 3, Coloriage, MakeUp, etc.
You can download a free 10-day trial version of SmartMask 4 from the AKVIS site.
My contact at AKVIS for this review was Kat Kharina. Thank you, Kat.
Back
How To Use
Follow these steps to use AKVIS SmartMask 4:
- Open the image you want to use inside Adobe Photoshop or a similar program. Make sure the image has distinct, yet challenging areas that you want to mask. Also the image needs to be on an unlocked layer in Photoshop. You can quickly unlock the layer by double-clicking it in the Layers palette, and clicking OK in the subsequent dialog box.
- Choose the Filter | AKVIS | SmartMask option, as shown in Figure 1, below.

Figure 1: AKVIS SmartMask plug-in within the Filter menu - Doing so opens the image within the AKVIS SmartMask 4 interface, as shown in Figure 2, below.

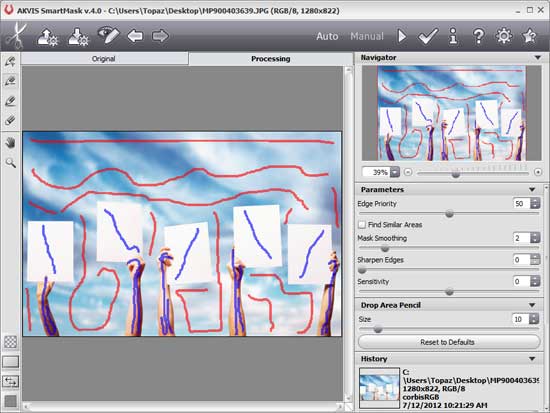
Figure 2: AKVIS SmartMask 4 interface - AKVIS SmartMask works with two modes: Auto and Manual. Auto is the default option, but you can turn on Manual mode by clicking the Manual button, as shown highlighted in red within Figure 2, above. First, let us explore the Auto option that magically creates masks. Figure 3, below, shows how we scribbled with blue lines to retain content and with red lines to remove.

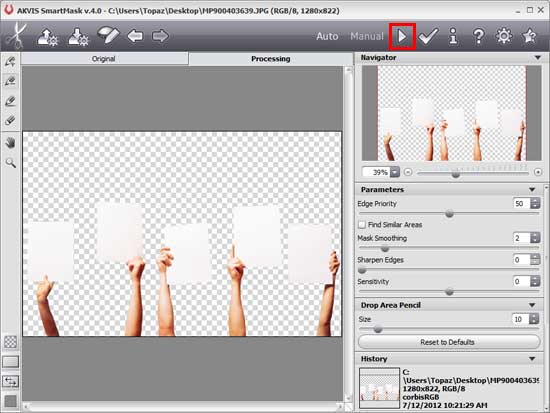
Figure 3: Scribble lines to indicate how you want to mask - Thereafter, clicking the Run button, highlighted in red within Figure 4, below, does the masking for you. Almost magically!

Figure 4: Post masking magic - Now, let us explore the Manual option. Clicking the Manual button, as shown highlighted in red within Figure 2, changes the interface options, as shown in Figure 5 (compare with Figure 2).

Figure 5: AKVIS SmartMask 4 interface with Manual button selected - Click the Magic Brush tool (keyboard shortcut W), highlighted in red within Figure 5, above. Now, click the Drop Color Picker (keyboard shortcut D), as shown highlighted in blue within Figure 5, above.
- Now, when you hover over the actual image preview area, the cursor will change to a color wheel, as shown in Figure 6, below.

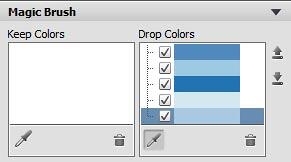
Figure 6: Color wheel cursor - Click on any area of the image to sample a color you want to remove. You can click and select 5 colors to remove from the image. The colors you select will show up in the Drop Colors palette, as shown in Figure 7, below.

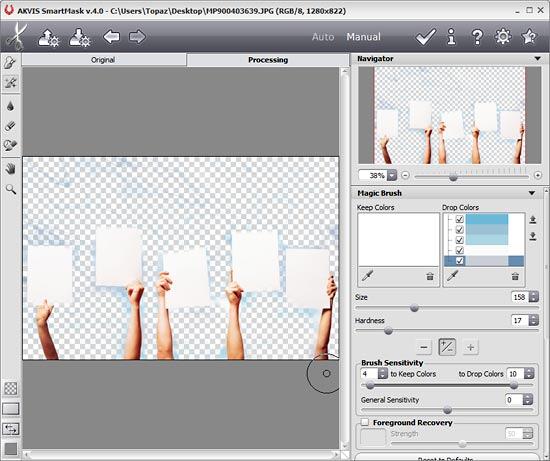
Figure 7: Drop Colors palette - Click on the Drop Color Picker again to change the cursor to the Magic Brush. Now, paint with this Magic Brush to remove the 5 colors you chose from the image, as shown in Figure 8, below.

Figure 8: Selected colors being removed - Similarly, you can select 5 more colors and continue cleaning the background to mask out the objects you want. We ended up with the image, as shown in Figure 9, below.

Figure 9: Image with SmartMask applied - Once you’re happy with the preview, apply the result to the image by pressing the Apply button (shown below) to return to the image editor.

Here are some Before and After samples created using SmartMask. Note that backgrounds have been changed:


Back
Specifications
| Photoshop Versions: |
Photoshop 6 and higher |
| Platforms: |
Windows, Mac |
| Site: |
AKVIS |
| Price: |
USD $90 and above |
| Trial Version: |
Available for 10 days |
Back

