Indezine Logo


AKVIS ArtWork

Learn how to apply painting styles to picture using AKVIS ArtWork.


Author:

Product/Version: PowerPoint


Introduction

AKVIS ArtWork, a Photoshop-compatible plug-in transforms your pictures by imparting professional painting styles to them. Change the default settings through convenient sliders, and you can end up with any number of painted styles. A special tool brush defines the guiding lines, and a virtual painter can convert any image into a painting directing the strokes to follow the lines within the actual picture. You can add an artist's signature, and there is a choice between a flat background and a rough surface (canvas, paper, etc.).

AKVIS ArtWork is from AKVIS, a company based in Russia that specializes in graphics programs. Apart from ArtWork, AKVIS also creates other Photoshop-compatible plug-ins like Retoucher, Chameleon, Stamp, Sketch, Enhancer, Decorator, Magnifier, Noise Buster, SmartMask, LightShop, ArtSuite and Coloriage.

You can download a free 10-day trial version of ArtWork from the AKVIS site.

My contact at AKVIS for this review was Kat Kharina. Thank you, Kat.

Back


How To Use

Follow the steps to use AKVIS ArtWork:
  1. Open any image in an image editor such as Adobe Photoshop.
  2. Choose the Filter | AKVIS | ArtWorks, as shown in Figure 1, below.
  3. AKVIS ArtWork
    Figure 1: AKVIS ArtWork
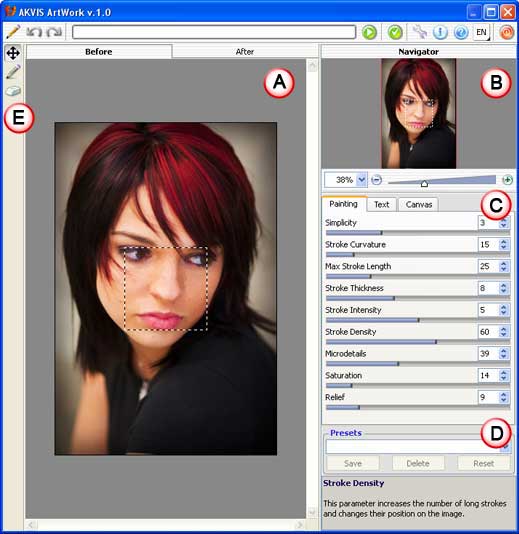
  4. Doing so opens the AKVIS ArtWork interface, that you can see in Figure 2, below.
  5. AKVIS ArtWork interface
    Figure 2: AKVIS ArtWork interface
  6. The interface is explained below:
  7. A. Preview

  8. It has two tabs: Before and After, which show the original and changed images.
  9. B. Navigator

  10. On the top right, you'll find the Navigator.
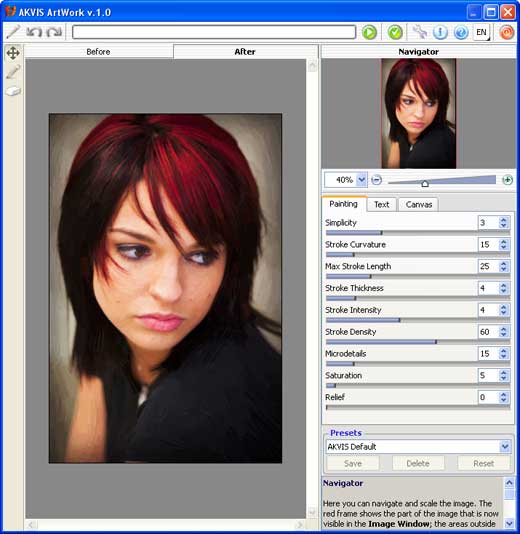
  11. C. Painting, Text, Canvas

  12. Here you can see three tabs which are explained below:
  13. Painting

  14. This allows to tweak photo-to-paint conversion parameters such as stroke length, stroke thickness, etc.
  15. Text

  16. Here you can add any text such as artists name.
  17. Canvas

  18. Choose between a flat background and a rough surface such as canvas, paper, etc. to give your painting a realistic effect.
  19. D. Presets

  20. This allows you to save the changes you made which can be used in future.
  21. E. Stroke Direction

  22. Here you can see Stroke Direction button which can activate the guiding lines drawing tool, and the Eraser tool used to erase the guiding lines, either partially or fully.
  23. Once done, apply the changes within the plug-in by clicking the Apply button.
  24. Apply button
  25. This applies and creates a preview of the image. If you want to make more changes, you can change the Painting settings. You can preview the changed image in the After tab, as shown in Figure 3, below.
  26. Preview the changes
    Figure 3: Preview the changes
  27. Once you’re done with playing with the effect, apply the result to the image by pressing the Apply icon (see icon below) to return to the image editor.
  28. Apply icon
Note: Although the instructions above showed how you can use AKVIS ArtWork as a Photoshop plug-in, the product also works in the same way in standalone mode. Just launch the application through its icon in the AKVIS ArtWork group in your Windows Start Menu.

Here are some before and after samples:

Before   After

Back


Specifications

Photoshop Versions: 5+
Platforms: Windows, Mac
Site: AKVIS
Price: USD $72 and above
Trial Version: 10 days

Back


Photoshop: AKVIS Plug-ins (Glossary Page)

You May Also Like: The Importance of Screen Calibration | European Union (EU) PowerPoint Templates


Popular Posts

Applying Slide Masters to Individual Slides in PowerPoint 2010
Learn how to apply Slide Masters to individual slides in PowerPoint 2010.

Copy and Remove Highlighting for Text in PowerPoint 2013
Learn how to copy and remove highlighting for text in PowerPoint 2013.

Add Headers and Footers to Slides in PowerPoint 2016 for Windows
Learn how to add Headers and Footers to slides in PowerPoint 2016 for Windows.

Text Box Autofit Options in PowerPoint 2016 for Windows
Learn about Text Box autofit options in PowerPoint 2016.


Jigsaw Shapes for PowerPoint (Full Slide Jigsaws)

This entire kit contains 5 different styles of jigsaw pieces: typical jigsaws, arrows, hearts, ovals, and rounded squares. Each jigsaw shape is available in three counts: small, medium, and large. We made these available in two slide sizes for both standard (4:3) and widescreen (16:9) resolutions.

You can get this kit for only $9.99.

This is the original page. An AMP (Accelerated Mobile Page) version of this page is also available for those on mobile platforms, at AKVIS ArtWork.


Microsoft and the Office logo are trademarks or registered trademarks of Microsoft Corporation in the United States and/or other countries.

Home | PowerPoint | Photoshop | PowerPoint Templates | PowerPoint Tutorials | Blog | Notes | Ezine | Media Kit | Feedback | Site Map | About Us | Contact Us

Link to Us | Privacy | Testimonials

PowerPoint Backgrounds | Christian PowerPoint Backgrounds | Business PowerPoint Presentation Templates

Plagiarism will be detected by Copyscape

©2000-2023, Geetesh Bajaj. All rights reserved.