Indezine Logo


Shape Intersect Command in PowerPoint 2011 for Mac

Learn how you can intersect shapes in PowerPoint 2011 for Mac. The Shape Intersect command combines selected shapes that overlap each other, and removes everything else.


Author:

Product/Version: PowerPoint 2011 for Mac

OS: Mac OS X


PowerPoint 2011 for Mac allows you to take any of the shapes you create. You can then, use Combine, Union, Intersect, or Subtract commands to create your own new shape out of them. Play around with these commands to indulge in endless hours of fun, but be careful not to be addictive. In this tutorial, you will see how you can take two or more shapes and intersect them to end up with interesting results. For example, we placed two basic shapes over a square (three shapes in all) as shown towards the left of Figure 1, below. With these shapes selected, we could use the Intersect command that is explained later in this tutorial to create a unified, intersected shape as shown towards the right in Figure 1. This new shape only retains those areas where all the three shapes were intersecting each other.

Sample showing the use of the Shape Intersect command
Figure 1: Sample showing the use of the Shape Intersect command

Once you finish reading this tutorial, do view the sample presentations embedded on the bottom of this page to see more samples of shapes created using the Intersect command:
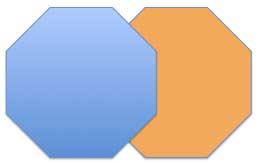
  1. Open your presentation and navigate to the slide which contains shapes to be intersected. In Figure 2 you can see that two Octagons have been placed overlapping each other.
  2. One octagon placed atop another octagon
    Figure 2: One octagon placed atop another octagon
  3. Select the shapes to be intersected (for this tutorial we have selected the two octagons that you saw in Figure 2), and right-click (or Ctrl + click) them carefully. From the contextual menu that appears, select the Grouping option. This opens another sub-menu in which you should select the Intersect command, as shown in Figure 3.
  4.  Intersect command selected within the Grouping sub-menu
    Figure 3: Intersect command selected within the Grouping sub-menu
  5. Tip: To use the Intersect command, you must select two or more shapes.
  6. This results in an intersected shape as shown in Figure 4. Compare Figure 2 and 4. You will notice that the new intersected shape only retains those areas where both the octagons were intersecting each other.
  7. Selected Octagons intersected into a single shape
    Figure 4: Selected Octagons intersected into a single shape

Here’s how the Intersect command behaves in various scenarios:

  • Works effectively when all selected shapes overlap each other
  • If any of the selected shapes do not overlap, Shape Intersect can cause complete deletion of all selected shapes
  • Removes non-overlapping areas of shapes
  • Retains overlapping areas of shapes
  • Retains formatting of first selected shape

You will see these guidelines in use within the embedded presentations below (scroll down this page).

Activity: Do experiment with various shapes that are formatted with fills of different colors. Select one of the shapes, and then individually select other shapes and click the Intersect command. You will notice that the resultant shape takes the formatting of the shape selected first.

The sample presentations below show how we used different shapes placed next to and above each other, and then intersected.

Click below to view this presentation on SlideShare

Click below to view this presentation on YouTube


See Also:

Merge Shapes: Shape Intersect Command in PowerPoint (Index Page)

Shape Intersect Command in PowerPoint 2016 for Windows
Shape Intersect Command in PowerPoint 2016 for Mac
Shape Intersect Command in PowerPoint 2013 for Windows
Shape Intersect Command in PowerPoint 2010 for Windows

You May Also Like: Pivot Tables in PowerPoint: by Kasper Langmann | Student PowerPoint Templates


Popular Posts

Set Minimum and Maximum Values on Value Axis in PowerPoint 2013 for Windows
Learn how to set the Minimum and Maximum values on Value Axis of Charts in PowerPoint 2013 for Windows.

Crop Pictures (Mask to Shape) in PowerPoint 2011 for Mac
Learn how to crop pictures using Mask to Shape option in PowerPoint 2011 for Mac.

Playing Video Across Slides in PowerPoint 2016 for Windows
Play a video clip across slides in PowerPoint 2016 for Windows.

Set Document Resolution in PowerPoint 2016 for Windows
Learn how to set document resolution in PowerPoint 2016 for Windows.


Handmade Slides: Pushpins for PowerPoint

These “pushpin” graphics are already placed in PowerPoint slides. Just copy them and paste within your slides to create a look that makes a picture, shape, or anything else appear as if it has been pushed onto a surface, board, or wall with a pin! These ready-made pushpins are already within PowerPoint slides, and have been provided in five colors. Just copy them and paste them on your slides.

Download these Pushpins for just $19.99

This is the original page. An AMP (Accelerated Mobile Page) version of this page is also available for those on mobile platforms, at Shape Intersect Command in PowerPoint 2011 for Mac.


Microsoft and the Office logo are trademarks or registered trademarks of Microsoft Corporation in the United States and/or other countries.

Home | PowerPoint | Photoshop | PowerPoint Templates | PowerPoint Tutorials | Blog | Notes | Ezine | Media Kit | Feedback | Site Map | About Us | Contact Us

Link to Us | Privacy | Testimonials

PowerPoint Backgrounds | Christian PowerPoint Backgrounds | Business PowerPoint Presentation Templates

Plagiarism will be detected by Copyscape

©2000-2023, Geetesh Bajaj. All rights reserved.