Indezine Logo


Shape Intersect Command in PowerPoint 2016 for Mac

Learn how you can intersect shapes in PowerPoint 2016 for Mac. The Shape Intersect command combines selected shapes that overlap each other, and removes everything else.


Author:

Product/Version: PowerPoint 2016 for Mac

OS: Mac OS X


Learn PowerPoint

Do you know how to cope with the Switch Row/Column option grayed out for a chart in PowerPoint?


PowerPoint 2016 for Mac lets you take a bunch of selected shapes and then apply one of the five Merge Shapes options to end up with some amazing results. However, the Intersect option that we are exploring within this tutorial works a little differently than the Combine, Fragment, Subtract, or Union options that we explore in other tutorials. Before we look at how the Intersect option is different, let us understand what it does.

You can see examples of the Intersect option in play within Figure 1, below. The three examples on the top area of the slide are separate shapes placed over each other. The shapes that you see at the bottom of the slide are the same shapes with the Intersect option applied, resulting in a single shape that essentially is a remnant of the area where all selected shapes intersected (overlapped).
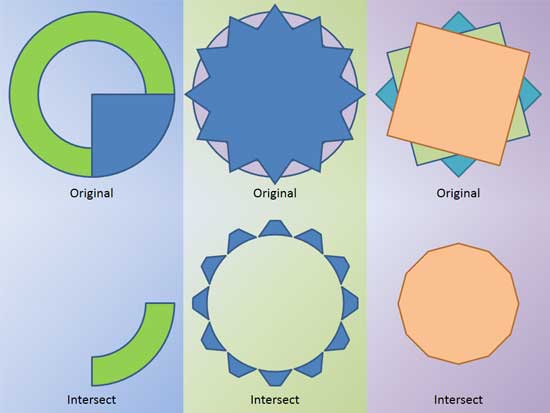
Samples showing use of the Intersect command
Figure 1: Samples showing use of the Intersect command

You will notice in all the sample shapes shown in Figure 1, above that all the shapes used are around the same size. This is especially true of the two shapes to the right, and this is helpful because we start with a selection of shapes that have large "intersecting" areas.

Let's explore another example, as shown in Figure 2, below:
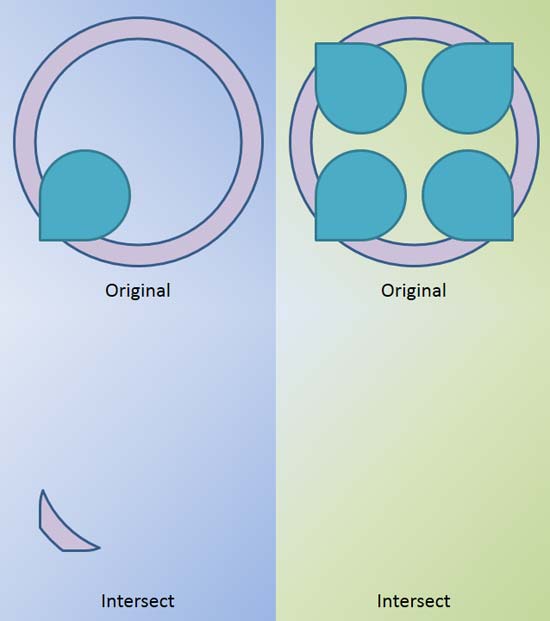
  • The leftmost shapes are varied in size. Above, there's a large doughnut shape with a small teardrop overlaid. Notice that the intersecting area is too small, and the resultant intersected shape below thus retains only that small intersecting area.
  • The rightmost shapes comprise the same single doughnut shape, but here you have 4 teardrop shapes above. When all these 5 shapes are selected together, there's no area where all 5 overlap or intersect. Thus, the result below is a shape that has no existence!

More Intersect samples
Figure 2: More Intersect samples

Once you finish reading this tutorial, do view the sample presentations embedded on the bottom of this page to see more samples of shapes that use the Intersect command.

Follow these steps to learn more about how to use the Intersect command:
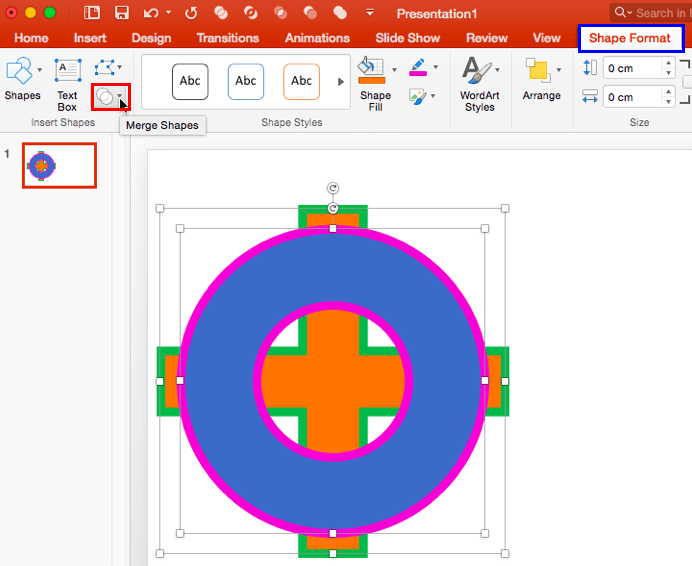
  1. Open a presentation in PowerPoint. Insert two or more shapes on your slide and select them as shown in Figure 3. With these shapes selected, click the Shape Format tab on the Ribbon (highlighted in blue within Figure 3).
  2. Shape Format tab
    Figure 3: Shape Format tab
  3. Note: The Shape Format tab is a Contextual tab. Contextual tabs are special tabs in the Ribbon that are not visible all the time. They only make an appearance when you are working with a particular slide object which can be edited using special options.
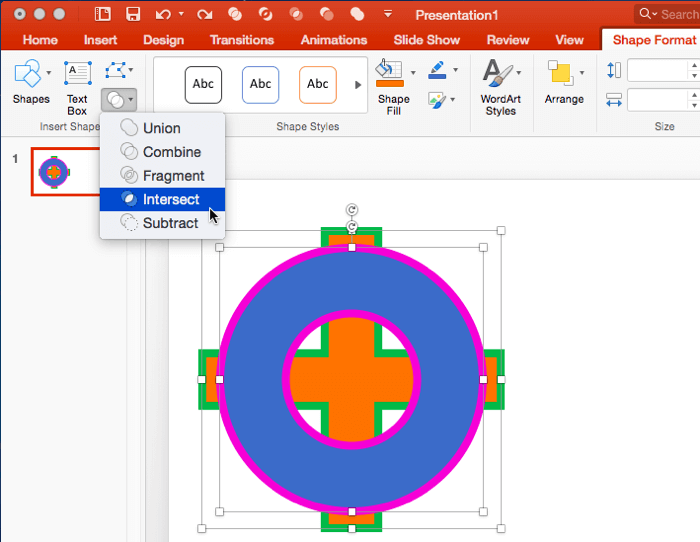
  4. Within the Shape Format tab, click the Merge Shapes button (highlighted in red within Figure 4). This brings up the Merge Shapes gallery as shown in Figure 4.
  5. Merge Shapes drop-down gallery
    Figure 4: Merge Shapes drop-down gallery
  6. Within the Merge Shapes drop-down gallery, click the Intersect option to intersect the selected shapes, as shown in Figure 5.
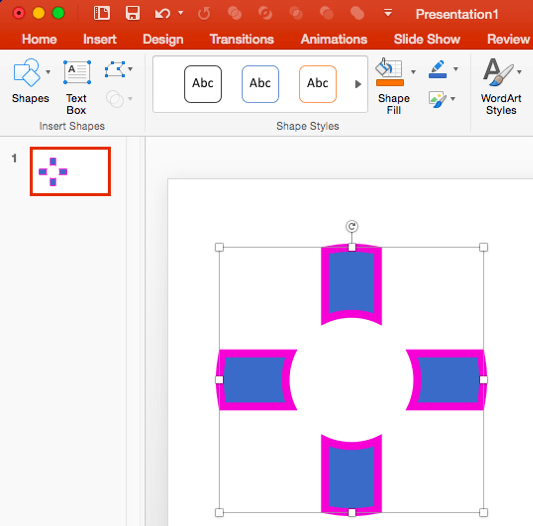
  7. Previously selected shapes are intersected
    Figure 5: Previously selected shapes are intersected
  8. Save your presentation often.

Do remember these guidelines for any tasks that involve the usage of this command. The Intersect command:

  • Works only when all selected shapes overlap each other
  • If any shapes do not overlap, Shape Intersect causes complete deletion of all shapes
  • Removes non-overlapping areas of all selected shapes
  • Retains overlapping areas of all selected shapes
  • Retains formatting of first selected shape
Tip: If you have a bunch of small shapes that you must use with the Intersect option, first select them all and use the Combine option on them. Thereafter select the combined shape and other large shapes you want to use. Now use the Intersect option.

You will see these guidelines in use within the embedded presentations below (scroll down this page).

Activity: Do experiment with various shapes that are formatted with fills of different colors. Select one of the shapes, and then individually select other shapes and click the Intersect command. You will notice that the intersected shape takes the formatting of the shape selected first.

The sample presentations below show how we used different shapes placed next to and above each other, and then intersected.

Click below to view this presentation on SlideShare

Click below to view this presentation on YouTube


See Also:

Merge Shapes: Shape Intersect Command in PowerPoint (Index Page)

Shape Intersect Command in PowerPoint 2016 for Windows
Shape Intersect Command in PowerPoint 2013 for Windows
Shape Intersect Command in PowerPoint 2011 for Mac
Shape Intersect Command in PowerPoint 2010 for Windows

You May Also Like: Improve Your Delegating With These Tips | Precious Stones PowerPoint Templates


Popular Posts

Set Minimum and Maximum Values on Value Axis in PowerPoint 2013 for Windows
Learn how to set the Minimum and Maximum values on Value Axis of Charts in PowerPoint 2013 for Windows.

Crop Pictures (Mask to Shape) in PowerPoint 2011 for Mac
Learn how to crop pictures using Mask to Shape option in PowerPoint 2011 for Mac.

Playing Video Across Slides in PowerPoint 2016 for Windows
Play a video clip across slides in PowerPoint 2016 for Windows.

Set Document Resolution in PowerPoint 2016 for Windows
Learn how to set document resolution in PowerPoint 2016 for Windows.


Handmade Slides: Pushpins for PowerPoint

These “pushpin” graphics are already placed in PowerPoint slides. Just copy them and paste within your slides to create a look that makes a picture, shape, or anything else appear as if it has been pushed onto a surface, board, or wall with a pin! These ready-made pushpins are already within PowerPoint slides, and have been provided in five colors. Just copy them and paste them on your slides.

Download these Pushpins for just $19.99


Microsoft and the Office logo are trademarks or registered trademarks of Microsoft Corporation in the United States and/or other countries.

Home | PowerPoint | Photoshop | PowerPoint Templates | PowerPoint Tutorials | Blog | Notes | Ezine | Media Kit | Feedback | Site Map | About Us | Contact Us

Link to Us | Privacy | Testimonials

PowerPoint Backgrounds | Christian PowerPoint Backgrounds | Business PowerPoint Presentation Templates

Plagiarism will be detected by Copyscape

©2000-2025, . All rights reserved.