Callouts are shapes that allow you to do numerous tasks:
you can add text indications, create pointers, and also create comic-book style speech and thought balloons. You can
create something that will attract the attention of your audience by combining the callouts with illustrations or photos of
characters (both human and animal). All of the 16 Callout
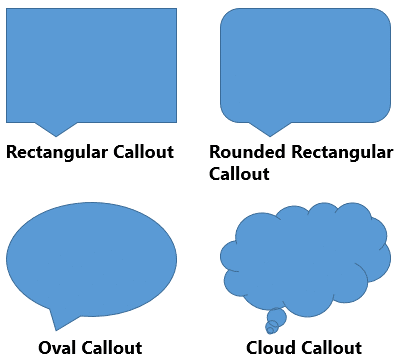
shapes available in PowerPoint cannot be used for text and thought balloons—mostly you can use 4 of these shapes. While
Rectangular Callout, Rounded Rectangular Callout, and Oval Callout shapes are
speech balloons, the Cloud Callout is essentially a thought balloon. You can see all of these in
Figure 1, below.

Figure 1: Callouts suitable for speech and thought balloons
While it is important that you choose a Callout shape that's suitable for your intended use, what's even more important
is how you attribute a callout to various characters and position it. Follow these steps to learn more in
PowerPoint 2013 for Windows:
- Open your presentation and navigate to the slide which includes a picture or drawing for which you want to add
a Callout shape. Alternatively insert
a new, suitable picture on your slide.
- Access the Insert tab of the
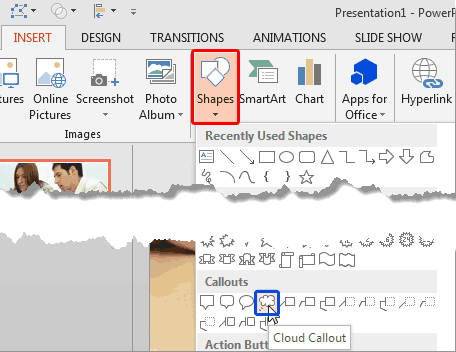
Ribbon and click the Shapes button
(highlighted in red within Figure 2) to bring up the Shapes
drop-down gallery as shown in Figure 2. Within this drop-down gallery, navigate to the
Callouts category—choose any suitable Callout. We have selected the Cloud Callout shape
(shown highlighted in blue within Figure 2) since we need to visualize some
thoughts of the characters in our picture.
-

Figure 2: Callouts category within the Shapes drop-down gallery
- Insert this selected Callout on the slide in the same way as you would
insert a shape. Your slide may now look like what
you see in Figure 3.
-

Figure 3: Callout inserted shows a yellow square
- Now, reposition the inserted Callout
as required. Thereafter, look out for the
yellow square handle on the
Callout shape (highlighted in red within Figure 3, above). You need to drag this
yellow square handle towards the character to which you want to attribute this Callout, as shown in Figure 4.
-

Figure 4: Callout attributed to a person in the picture
- Now, type some text within the Callout
shape and format the text as
required to make it easily readable, as shown in Figure 5.
-

Figure 5: Text added within the Callout and formatted
- Similarly, you can add one more Callout to the picture as shown in Figure 6. We used the
same Cloud Callout shape again because we are again depicting some thoughts. You can use another Callout
shape if that suits your requirement better.
-

Figure 6: Another Callout added to the picture
- Again, attribute this new Callout to the required person by dragging the yellow square to end up with the
results shown in Figure 7.
-

Figure 7: New Callout attributed to another person in the picture
- Add the required text within the new Callout as shown in Figure 8.
-

Figure 8: Text added within the new Callout
- Format this added text to possess the same
color, font, and size of the text within
the first Callout, as shown in Figure 9.
-

Figure 9: Text should look the same within all Callouts added to a picture
- Tip: Notice that the callout on the left within Figure 9 does
not overlap the character it's attributed to whereas the callout on the right actually does overlap its attributed
character. Choose whatever option works best for you!
- Once you have attributed your callout to a character on your slide, the next step is to make your
callouts look better. You can learn more in our
Formatting Callouts in PowerPoint 2013 for
Windows tutorial.
- Save your presentation often.


