Yes, undoubtedly a presentation with relevant pictures is more effective than plain text slides. However, even if pictures enhance appearances, they can also phenomenally increase the size of your presentation file. Picture compression can help.
Recent versions of PowerPoint do some automatic picture compression, even if you are not aware. There are options to make any such compression even more effective.
The Compress Pictures feature reduces the size of all inserted pictures in the presentation in a single step. It does so by reducing the picture resolution to the amount needed for the type of output you specify (E-mail, Screen, or Print). Picture resolution is measured in PowerPoint in pixels per inch, or ppi. This roughly translates to dots per inch (dpi) on a printout. A computer screen shows 96 pixels per inch, so you do not need higher resolution than that if you are only showing your presentation on-screen. However, if you are distributing the presentation in other forms, a higher resolution might be appropriate.
To reduce the resolution and compress images within PowerPoint 2016 for Windows, follow these steps:
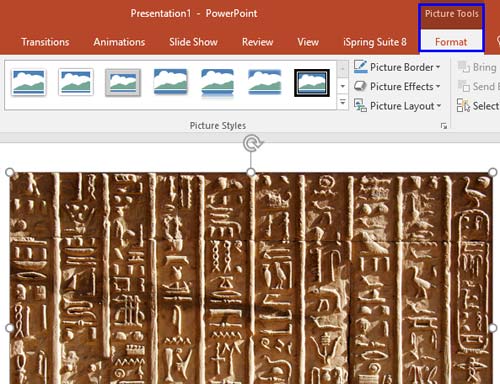
- Open the presentation, navigate to any slide that contains a picture and select it. This brings up the Picture Tools Format contextual tab on the Ribbon as shown in Figure 1 (highlighted in blue).

Figure 1: Picture Tools Format tab Note: The
Picture Tools Format tab is a
Contextual tab. Contextual tabs are special tabs in the
Ribbon that are not visible all the time. They make an appearance only when you are working with a particular slide object which can be edited using the options within these tabs.
- Within the Picture Tools Format tab, click the Compress Pictures button, as shown highlighted in red within Figure 2.

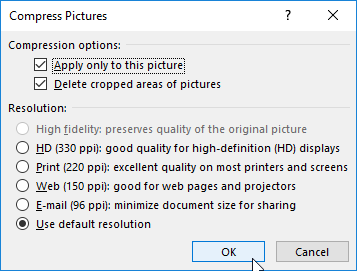
Figure 2: Compress Pictures button - Doing so opens the Compress Pictures dialog box, as you can see in Figure 3.

Figure 3: Compress Pictures dialog box - The Compress Pictures dialog box is divided into two sections: Compression options and Resolution. Note that some options within the Resolution section might not be available for selection (greyed out); this is because the inserted picture has already been compressed. Options within both of these sections are explained below:
Apply only to this picture
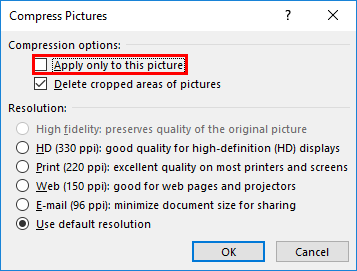
- This check-box, when selected enables you to compress just the selected picture. If you want to compress all the pictures in the presentation, make sure you deselect this check-box, as you can see highlighted in red within Figure 4.

Figure 4: Apply only to this picture check-box deselected Delete cropped areas of pictures
- If you have cropped pictures and you want to delete the cropped-out areas of pictures to save additional space, select the Delete cropped areas of pictures check-box (see Figure 4, above).
High fidelity
- This is the default option for picture compression in PowerPoint 2016, and you may see it always greyed out. This option preserves the quality of the original picture unless it exceeds the size of the document canvas.
HD (330 ppi)
- Choosing this radio button will enable compression for Screen resolution to display the presentation on high-definition displays. Some projectors have a higher resolution than a monitor.
Print (220 ppi)
- Select this radio button if you are printing the presentation on paper; it keeps the photos at resolution where they will look crisp on a printout.
Web (150 ppi)
- Choosing this radio button will enable compression for Screen resolution to display the presentation using a projector or distributing via Internet.
E-mail (96 ppi)
- Select this radio button if you are e-mailing the presentation to others, because this lower setting results in a smaller file that will transmit more easily via e-mail.
Note: Some e-mail servers have limits on the file sizes they accept, so keeping the PowerPoint file as small as possible when distributing via e-mail is a good idea. If you send someone an e-mail with a large file attached, the server may reject the message, but you might not get an error message back from the server at all, or you might not get one for several days.
Use default resolution
- Select this radio button to select the default output target for picture resolution. You can find default picture resolution within the PowerPoint Options dialog box. Explore our Set Document Resolution in PowerPoint 2016 tutorial to learn more.
- Choose the options based on your requirement, and click the OK button to apply the changes.
- Make sure you save your presentation.


