Explore the Format Ribbon tab for audio clips in PowerPoint 2016 for Windows. These options relate to the visual format of the sound icon.
Author: Geetesh Bajaj
Product/Version: PowerPoint 2016 for Windows
OS: Microsoft Windows 7 and higher
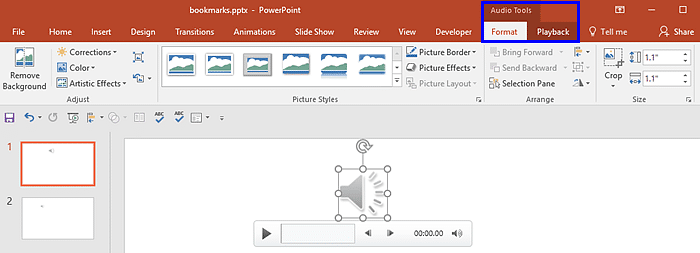
Insert an audio clip in your PowerPoint slide, and you see two contextual Audio Tools tabs on the Ribbon. These are the Format and Playback tabs, as shown highlighted in blue within Figure 1, below.

Figure 1: Audio Tools contextual tabs for an audio clip
The Audio Tools Format and Audio Tools Playback tabs are Contextual tabs. Contextual tabs are special tabs in the Ribbon that are not visible all the time. They only make an appearance when you are working with a particular slide object which can be edited using special options.
In this tutorial, we will explore the Format tab. Once you explore options within the Format tab, you'll wonder why there are options to adjust, arrange, resize, and apply picture styles. Also, why does PowerPoint provide picture format options for an audio clip? That's because the audio clip is represented by a sound icon as shown in Figure 1, previously on this page.
By default, PowerPoint provides a sound icon for the audio clip. You can select this sound icon and use the picture format options provided within the Audio Tools Format tab. One feature though has been deprecated in PowerPoint 2016; this is the Change Picture option for sound icons. In PowerPoint 2013 and previous versions, you could change the sound icon to any other picture. To do so, you right-clicked the sound icon in PowerPoint 2013. From the resultant contextual menu, you could choose the Change Picture option. Thereafter, you could choose any picture of your choice.
If this option to change the picture of an icon is important for you, you can still use the Change Picture option in PowerPoint 2010 or 2013, and you will find that PowerPoint 2016 respects this change.
Follow these steps to understand options within the Audio Tools Format tab in PowerPoint 2016 for Windows:
14 11 04 - Audio in PowerPoint - Advanced: Format Tab for Audio Clips in PowerPoint (Glossary Page)
Format Tab for Audio Clips in PowerPoint 2013 for Windows
Format Tab for Audio Clips in PowerPoint 2010 for Windows
You May Also Like: How to Build Digital Signage Information Screens | Pest PowerPoint Templates


Microsoft and the Office logo are trademarks or registered trademarks of Microsoft Corporation in the United States and/or other countries.