If your presentation has a number of sections, you may find it little difficult to reorder your sections by dragging and dropping. Or you may even find it difficult to see all sections at the same time. This happens because there may be many slides within each of these sections. So, when you see slides within a single section, you may not be able to see anything within another section, as shown in Figure 1, below. And if you want to drag a slide from one section to another, you may be at a loss to do so, or even comprehend what you will end up with.

Figure 1: Sections with plenty of slides visible within Slide Sorter view
So, how can you counter this problem? You can collapse and expand single and multiple sections in PowerPoint 2011 for Mac, as explained in this tutorial.
- First open your presentation within which you have already added sections. Change to Slide Sorter view, as shown in Figure 1, above, so that you can easily access the sections.
- Thereafter, collapse your sections so that you only see the section names without any slides, are visible. This step makes it possible to easily drag the section to the required position.
There are two ways to collapse and expand sections in PowerPoint, as explained in this tutorial:
Collapse/Expand a Single Section
- To collapse a particular section, first click on its name. We clicked on the section called Introduction, as shown in Figure 2, below. Then, click the small downward pointing arrow that you can see in front of its name, as shown highlighted in red within Figure 2.

Figure 2: Downward pointing arrow in front of the section name - Either way, you collapse all slides within that particular section, and you will see only the name of the section and no slides at all, as shown highlighted in red within Figure 3, below. Compare with Figure 2, above, and you will notice that the arrow now points rightwards.

Figure 3: Selected section collapsed - Now, to expand the selected section, click the same rightward pointing arrow in front of its name, as shown highlighted in red within Figure 4, below.

Figure 4: Rightward pointing arrow in front of the section name - Alternatively, double-click on the already collapsed section's name to expand it.
- This action will expand that particular section making all the slides contained within visible, as shown in Figure 5, below.

Figure 5: Selected section expanded
Collapse/Expand All Sections in a Presentation
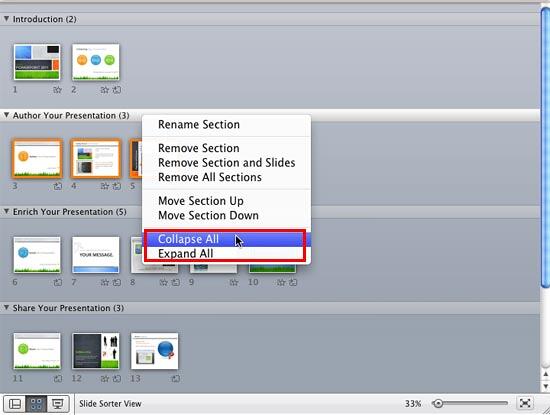
- To collapse/expand all sections within a presentation in one go, first right-click (or Ctrl + click) on the name of any section. A contextual menu appears, as shown in Figure 6, below.

Figure 6: Options to collapse/expand all slides in the presentation - Within this contextual menu, you will find two options for collapsing/expanding the sections: Collapse All and Expand All, as shown highlighted in red within Figure 6, above.
- Let us now explore both of these options:
Collapse All
- This option collapses all Sections in the entire presentation, and you will see only the names of the sections and no slides, as shown in Figure 7, below.

Figure 7: Result of selecting Collapse All option Expand All
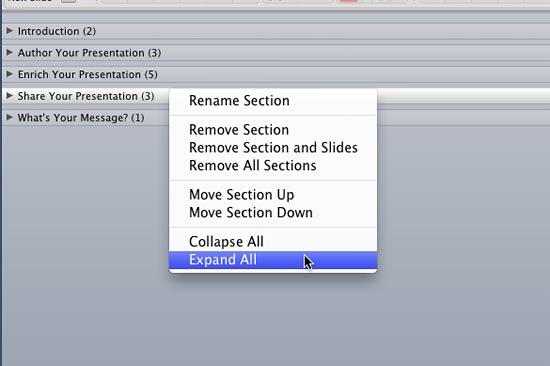
- This option expands all sections in the entire presentation. Select a section and right-click (or Ctrl + click) on the name of any section. A contextual menu appears, as shown in Figure 8, below. Within this contextual menu, select the Expand All option, as shown in Figure 8.

Figure 8: Expand All option selected - This action expands all sections in the entire presentation, as shown in Figure 9, below.

Figure 9: Result of selecting Expand All option - Select any option to collapse/expand the section(s) as required.
- Save your presentation often.


