Indezine Logo


Apply Soft Edges to Shapes in PowerPoint 2011 for Mac

Learn how to apply soft edge effects to shapes in PowerPoint 2011 for Mac. Soft Edges adds a natural-looking moth-eaten, feathered edge to selected shapes.


Author:

Product/Version: PowerPoint 2011 for Mac

OS: Microsoft Windows and Mac OS X


Learn PowerPoint

Explore and understand Microsoft Locale IDs.


We already explored all Shape Effects that show up in the Shape Effects gallery of PowerPoint 2011 for Mac. In addition, PowerPoint 2011 also provides you with an extra effect called Soft Edges that is not directly accessible from the Shape Effects gallery. To get to Soft Edges, you will have to choose the Glow effects options as we will show you later in this tutorial.

The Soft Edges effect adds an eaten-up, feathered edge to any selected shape. Soft Edges work best with larger shapes, especially if you use some of the larger Soft Edge variations available. To see a sample presentation containing shapes with Soft Edges applied in PowerPoint, scroll down to the bottom of this page.

Follow these steps to apply Soft Edges to a shape in PowerPoint 2011:
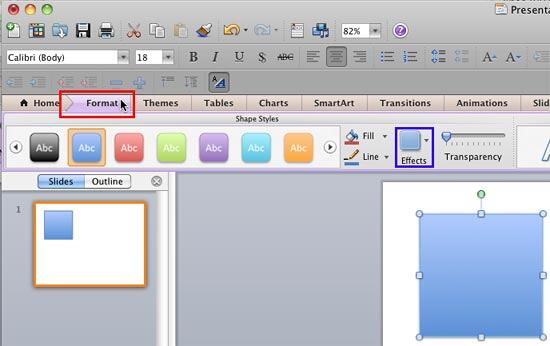
  1. Select the shape you want to apply the Soft Edges to (if there's no shape on your slide, insert a new shape). Double-click the selected shape to activate the Format tab of the Ribbon (highlighted in red within Figure 1). Within this tab, locate the Shape Styles group and click the Effects button that you can see in Figure 1 (highlighted in blue).
  2. Format tab of the Ribbon
    Figure 1: Format tab of the Ribbon
  3. Note: Format tab is a Contextual tab. Contextual tabs are special tabs in the Ribbon that are not visible all the time. They only make an appearance when you are working with a particular slide object which can be edited using special options.
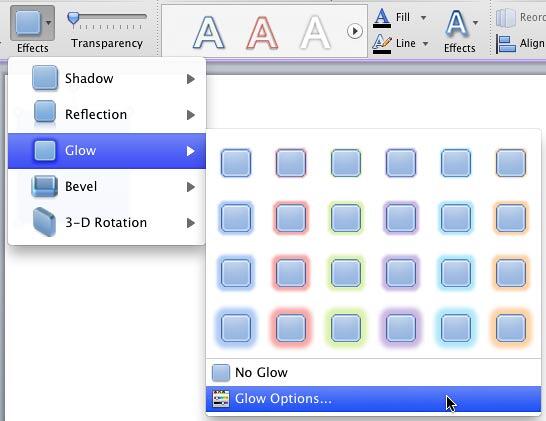
  4. This brings up the Effects drop-down gallery, as you can see in Figure 2. Choose Glow | Glow Options in the Effects drop-down gallery as shown in Figure 2. This will bring up the Format Shape dialog box.
  5. Glow Options selected within the Glow sub-gallery
    Figure 2: Glow Options selected within the Glow sub-gallery
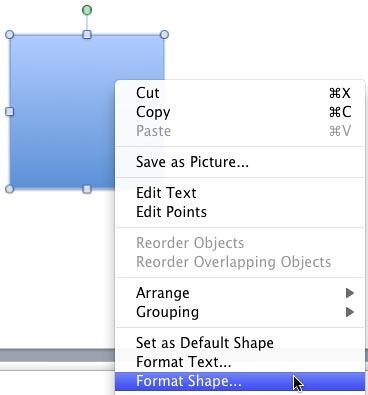
  6. Alternatively, you can right-click the selected shape and from the context menu, choose Format Shape option as shown in Figure 3.
  7. Format Shape option selected
    Figure 3: Format Shape option selected
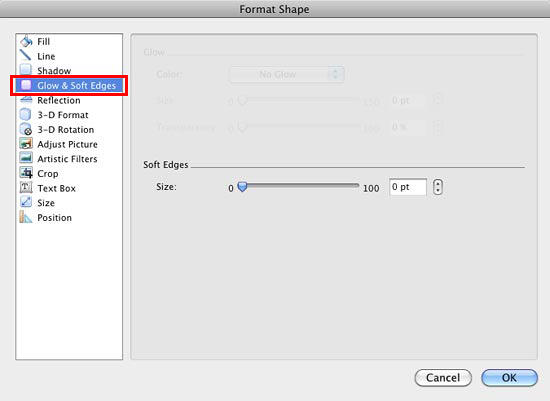
  8. Either way, you will summon the Format Shape dialog box. Make sure that the Glow & Soft Edges option is selected in the sidebar, as shown highlighted in red within Figure 4. The options here pertain to both the Glow and Soft Edges effects. For reasons of clarity, the Glow options have faded out in Figure 4. Glow options have already been discussed in our Advanced Glow Options In PowerPoint 2011 for Mac tutorial.
  9. Soft Edges option within Format Shape dialog box
    Figure 4: Soft Edges option within Format Shape dialog box
  10. There is only one attribute that Soft Edges have, and that is the Size. Use the Size slider that you can see in Figure 4, or enter the soft edges size value in points to increase or decrease the size (spread) of the Soft Edge.
  11. Note: When you are making changes to the shape attributes from within Format Shape dialog box, you can see the Live Preview of the changes in the selected shape. So, always make sure that the Format Shape dialog box is not covering the selected shape.
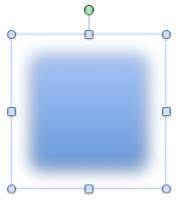
  12. Click OK when you are done. In Figure 5, you can see Soft Edges applied to the selected Rectangle shape (compare it with Figure 1 to see the difference).
  13. Soft Edges applied to the Rectangle shape
    Figure 5: Soft Edges applied to the Rectangle shape
  14. Soft Edge effects applied to shapes with picture fills provide a cool effect.
  15. Remember to save your presentation often.

Sample Presentation:

Click below to view on SlideShare

Click below to view on YouTube


See Also:

Shape Effects: Apply Soft Edges to Shapes (Glossary Page)

Apply Soft Edges to Shapes in PowerPoint 2016 for Windows
Apply Soft Edges to Shapes in PowerPoint 2013 for Windows
Apply Soft Edges to Shapes in PowerPoint 2010 for Windows
Apply Soft Edges to Shapes in PowerPoint 2007 for Windows

You May Also Like: 5 Ideas to Help You Remember Your Speech | Flags and Maps - A PowerPoint Templates


Popular Posts

Pivot Tables in PowerPoint: by Kasper Langmann
One of the most commonly used features in Microsoft Excel is the Pivot Table. A Pivot Table simply allows you to make better sense of data by giving you different options of how to view that data.

Get More SmartArt Graphics
Learn how you can get more SmartArt graphic variants.

Character Spacing in PowerPoint 2013
Explore Character Spacing options in PowerPoint 2013.

Add Secondary Value Axis to Charts in PowerPoint 2013 for Windows
Learn how to add a Secondary Value axis to charts in PowerPoint 2013 for Windows.


Star Wars Style Credits Animation

The Star Wars Style Credits Animation presentation includes a sample slide in which the credits animate in the Star Wars style. You can download this presentation and change the text in the animated text boxes as required.

Download Star Wars Style Credits Animation Slides

This is the original page. An AMP (Accelerated Mobile Page) version of this page is also available for those on mobile platforms, at Apply Soft Edges to Shapes in PowerPoint 2011 for Mac.


Microsoft and the Office logo are trademarks or registered trademarks of Microsoft Corporation in the United States and/or other countries.

Home | PowerPoint | Photoshop | PowerPoint Templates | PowerPoint Tutorials | Blog | Notes | Ezine | Media Kit | Feedback | Site Map | About Us | Contact Us

Link to Us | Privacy | Testimonials

PowerPoint Backgrounds | Christian PowerPoint Backgrounds | Business PowerPoint Presentation Templates

Plagiarism will be detected by Copyscape

©2000-2023, Geetesh Bajaj. All rights reserved.