Indezine Logo


Transparency for Shape Lines in PowerPoint 2013 for Windows

Learn how to apply transparency for shape lines PowerPoint 2013 for Windows. Transparency for lines works differently for solid color and gradient lines.


Author:

Product/Version: PowerPoint 2013 for Windows

OS: Microsoft Windows 7 and higher


Learn PowerPoint

Save a Custom Theme in PowerPoint


Shape Outlines such as solid colors and gradients have a transparency attribute that lets you reduce the opacity of the outline so that the slide object or background behind shows through. Transparency is calculated in percentages and you can change its value all the way from 0 to 100%. Look at Figure 1 below, and you will see the original outlines (Line shapes) on the left with their semi-transparent (50%) counterparts on the right.

Solid and gradient outlines (lines) with their semi-transparent counterparts
Figure 1: Solid and gradient outlines (lines) with their semi-transparent counterparts

To set a transparency value for your shape outline in PowerPoint 2013 for Windows, follow these steps:

  1. Select the shape for which you want to change the transparency of the outline, we selected a solid colored Line shape. Right-click the shape to bring up the contextual menu that you can see in Figure 2. Within this menu, choose the Format Shape option.
  2. Format Shape option selected
    Figure 2: Format Shape option selected
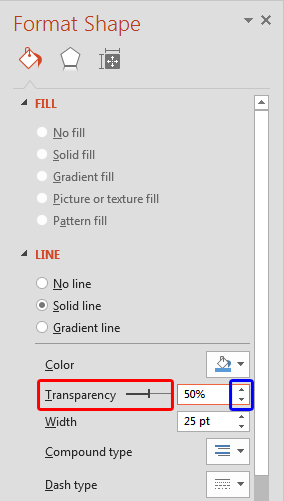
  3. This brings up the Format Shape Task Pane that you see in Figure 3, options may differ depending upon the original fill of your selected shape, in this instance, we have selected a Solid Line shape. Also notice that, all Fill options are greyed out, and only Line options are accessible. That is because our selected line is an open shape, if you had selected a closed shape like a circle or rectangle, the Fill options would be available. In that case make sure to consider only Line options. Drag the Transparency slider within the Line section, highlighted in red within Figure 3 to change the transparency value.
  4. Set transparency for solid line
    Figure 3: Set transparency for solid line
  5. Tip: You can even use the Up or Down arrow buttons towards the right (highlighted in blue within Figure 3, above) to increase or decrease the transparency, also you can directly type in the transparency percentage value within the box placed next to Transparency slider.
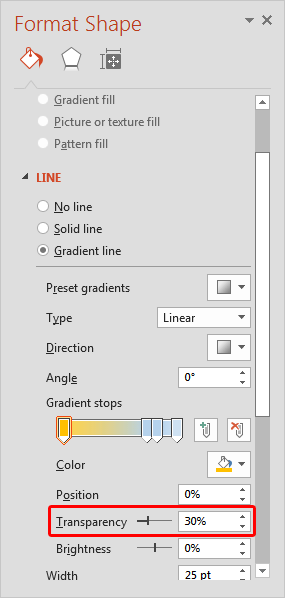
  6. Gradient Outlines work a little differently as far as transparency is concerned, you need to adjust the transparency value of every single color stop comprised within the gradient fill you choose. To do that, select each stop of your gradient individually, and change its transparency, as shown highlighted in red within Figure 4, below.
  7. Set transparency for gradient stops
    Figure 4: Set transparency for gradient stops
  8. Tip: To learn more about gradient stops, explore our Gradient Stops in PowerPoint 2013 for Windows tutorial.
  9. Save your presentation often.
Tip: You have learned how to change the transparency of shape outlines. Similarly, you can also change the transparency for shape fills of closed shapes, as explained in our Transparency for Shape Fills in PowerPoint 2013 for Windows for Windows tutorial.

See Also:

Shape Lines: Transparency for Shape Lines (Glossary Page)

Transparency for Shape Lines in PowerPoint 2016 for Windows
Transparency for Shape Lines in PowerPoint 2011 for Mac
Transparency for Shape Lines in PowerPoint 2010 for Windows

You May Also Like: DataPoint, iPoint, and SignageTube: Conversation with Kurt Dupont | Andorra Flags and Maps PowerPoint Templates


Popular Posts

Playing Video Across Slides in PowerPoint 2016 for Windows
Play a video clip across slides in PowerPoint 2016 for Windows.

Set Document Resolution in PowerPoint 2016 for Windows
Learn how to set document resolution in PowerPoint 2016 for Windows.

Creating Anchor Points for Connectors in PowerPoint 2010 for Windows
Learn how to create Anchor Points for connectors in PowerPoint 2010.

Working With Slide Numbers in PowerPoint 2016 for Windows
Learn how to add Slide Numbers on slides and Masters and more tricks on making them work to your will in PowerPoint 2016 for Windows.


Feature List 01 (Layout with Tabs)

The Feature List Layout comprises three sample PowerPoint presentations: one each to create a visual list for 4 features, 5 features, and 6 features. These work great when you have too much information to fit within one slide. This solution lets you use multiple slides, but the visual result is still that of one single slide!

Buy and Download Feature List 01 (Layout with Tabs) for $4.99+ (671 kb)


Microsoft and the Office logo are trademarks or registered trademarks of Microsoft Corporation in the United States and/or other countries.

Home | PowerPoint | Photoshop | PowerPoint Templates | PowerPoint Tutorials | Blog | Notes | Ezine | Media Kit | Feedback | Site Map | About Us | Contact Us

Link to Us | Privacy | Testimonials

PowerPoint Backgrounds | Christian PowerPoint Backgrounds | Business PowerPoint Presentation Templates

Plagiarism will be detected by Copyscape

©2000-2025, . All rights reserved.