Before You Remove Animations
You may want to remove the animation applied to a slide object for several reasons. First, you may have animated the wrong slide object, added animation by mistake, or you probably overdid your animations and ended up with a chaotic slide! Whatever your reasons may be, removing an animation in PowerPoint is a simple select-and-delete task. However, before you remove any animation, do ascertain why you want to remove it. Do remember that some animations can take hours to fine-tune and perfect. Here are some obvious questions to consider before removing animations:
- Do you want to remove both the animation and the slide object that is animated?
- Do you want to just remove the animation, and let the slide object be?
- Or maybe, you don't want to remove the animation or the slide object. Do you want to change the animation to another suitable animation effect?
- Finally, do you want to just disable animations without removing them?
If you want to remove animation from a particular slide, but still need it to use elsewhere, make a duplicated copy of the slide and save it to use as needed in the future.
Here are the solutions:
- For the first scenario you need not read the rest of this tutorial, just select and delete the slide object such as a shape, and any animation added to that object is gone too.
- For the second scenario, you need to read the rest of this page.
- For the third scenario, look at our Change Animations in PowerPoint 2011 for Mac tutorial.
- If you chose 4, please look at our Enable or Disable PowerPoint Animations in Slide Show View page.
Now that we have established what you want to do, removing an animation is very easy. Follow these steps to remove any existing animation in PowerPoint 2011 for Mac:
- Select the slide object that has an animation applied which you want to remove.
- With the slide object still selected, choose any of the following options to remove the animation:
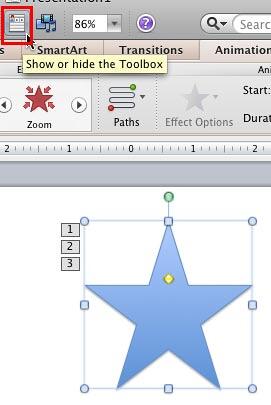
- If there is only one animation applied to the selected slide object. Then, click on the digit representing the animation that you can see along with the slide object on the Slide Area, as shown highlighted in red within Figure 1, below. This selects only the animation, not the slide object.

Figure 1: Click digit to select just the animation - Now, press the Delete key on your keyboard to remove the selected animation from the slide object.
- Do you have more than one animation added to the selected slide object? Refer to the sample shape with multiple animations in Figure 2, below. When there are multiple animations, you can select a particular animation within the Custom Animation tab of the Toolbox. To bring up the Toolbox, click the Toolbox icon on the Standard Toolbar, as shown highlighted in red within Figure 2.

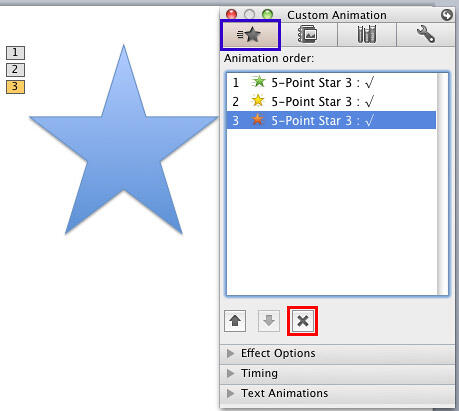
Figure 2: Shape applied with multiple animations - Doing so opens the Toolbox. Make sure that the Custom Animation tab of the Toolbox is active, as shown highlighted in blue within Figure 3, below. Within this tab, locate the Animation order section, and select the animation which you want to remove. In Figure 3, you can see that we have selected the last animation within the Animation order section.

Figure 3: Animation selected within the Custom Animation tab of the Toolbox - Now, you have three options to remove the selected animation:
- Press the Delete key on your keyboard.
- Click on the cross mark below the Animation order section, as shown highlighted in red within Figure 3, above.
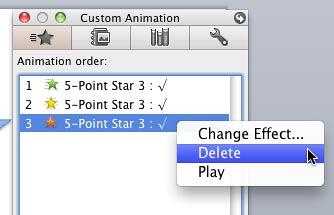
- Right-click (or Ctrl-click) the selected animation. From the resultant contextual menu, select the Delete option as shown in Figure 4, below.

Figure 4: Delete option to be selected
- This removes the selected animation from the slide object. If you removed the wrong animation by mistake, quickly press the Command+Z shortcut key to undo the removal.
- Save your presentation.


