In previous tutorials, we showed how you can add a basic Motion Path animation to any object on a PowerPoint slide. Now, we'll show how you can use PowerPoint's drawing tools to create a motion path.
Follow these steps to access this option, and to create your own motion path in PowerPoint 2007 for Windows:
- Select the object that you want to animate. You can select any object on your slide. We created and selected a shape. Alternatively, if you just want to follow this tutorial step-by-step, launch PowerPoint. Most of the time, PowerPoint will open with a new slide in a presentation. PowerPoint 2007 for Windows users can change the slide layout to Blank by selecting the Home tab | Layout | Blank option. Users of previous PowerPoint versions can choose the Format | Slide Layout option, and choose the Blank layout option in the resultant Task Pane.
- PowerPoint 2007 users can choose the Home tab, and access the Shapes gallery, and then choose any shape. Click once on the blank slide to place a shape.
- Users of earlier versions will find the Rectangle shape option in the Drawing toolbar located below the PowerPoint interface. Select this option, and click once on the blank slide to place a shape.
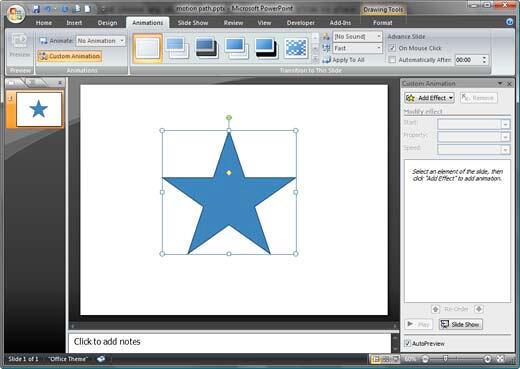
- For PowerPoint 2007 users, make sure that the shape is still selected. Then activate the Animations tab of the Ribbon. Next, click the Custom Animation button to bring up a Task Pane of the same name, as shown in Figure 1, below.
- Users of earlier PowerPoint versions can again make sure that the shape is selected. Then, they should choose the Slide Show | Custom Animation option to access a similar Task Pane.

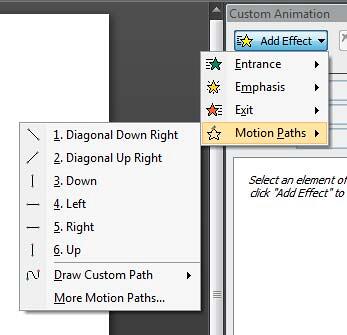
Figure 1: Custom Animation Task Pane - Click the Add Effect button in the Task Pane to bring up a flyout menu that lists animation types available in PowerPoint. Choose the Motion Paths option, as shown in Figure 2, below.

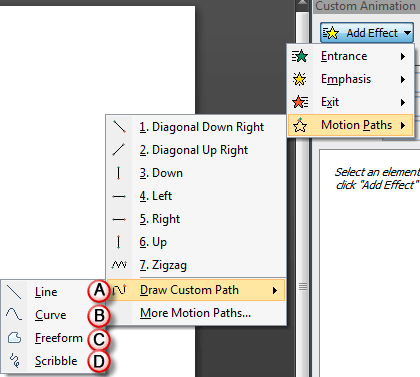
Figure 2: Motion Paths - Doing so brings up another flyout menu. Choose the Draw Custom Path option so that you end up with four path (line) drawing options, as shown in Figure 3, below. We'll explain each of these 4 line drawing options individually.

Figure 3: Draw Custom Path A. Line
- This option allows you to create a straight line. Click anywhere within the object to establish a starting point for the motion path, and then drag and let go of your cursor where you want the motion path to end.
Draw Lines in 15-Degree Increments
- To draw a line segment in 15-degree increments, hold the Shift key while you drag.
B. Curve
- This option works very differently than a line. Click anywhere within the object to establish a starting point for the motion path, and then drag and let go of your cursor where you want the motion path to curve. Keep clicking wherever you want to create curves. To end the path, click the Esc key or just double-click. This sort of drawing a path requires some practice. So, set aside around 15-20 minutes to get the feel of this technique.
C. Freeform
- This options works two ways. To start, click anywhere within the object to establish a starting point for the motion path, and then just drag around like a pencil on paper to create a freeform path. You can also create straight lines by clicking to create line segments. You can also use a combination of drawing freeform and clicking to create a combination path. To end the path, click the Esc key on your keyboard, or just double-click.
D. Scribble
- This one works just like a pencil on paper. Click anywhere within the object to establish a starting point for the motion path, and then just drag around like a pencil on paper to create a freeform path. You don't have to press the Esc key on your keyboard, or double-click to end the path. It just ends when you stop drawing.


