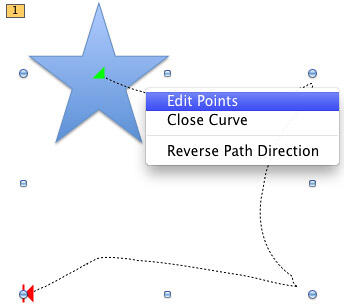
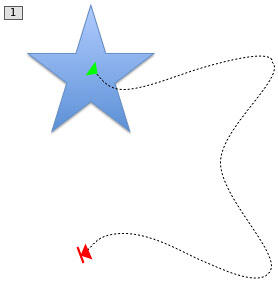
While working with Motion Paths, especially after drawing a Custom Motion Path to animate your slide object, you may feel that the path drawn is not very smooth. Or you may have used one of the Preset Motion Paths to animate your slide object, and now you want to make some changes. Maybe you want to extend the path or use smoother corners rather than the default pointed ones. In Figure 1, below, you can see that a custom Motion Path was drawn to animate a Star shape. Drawing with a mouse can results in paths that look more segmented han curved!

Figure 1: Custom Motion Path applied to a Star shape needs to be edited
Since Motion Paths are essentially lines drawn in PowerPoint, you can always edit them using the Edit Points option, and reorient them as required.
Follow these steps to edit points in Motion Path animations in PowerPoint 2011 for Mac:
- Open your presentation in PowerPoint and select the shape, or any other slide object that has already been applied with a Motion Path that you want to fine tune.
- Alternatively, if you want to start from the beginning, open a presentation and add a shape or any other slide object to a Blank slide. Now, apply a Motion Path animation to it—refer to our Adding a Motion Path or Drawing a Custom Motion Path tutorials to get started.
- At this time, the Animations tab of the Ribbon should be active. On the slide itself, you'll see the Motion Path, represented by a dashed line. You can now select the motion path by clicking on this dashed line. Once selected, you will see selection handles on Motion Path, as clearly visible in Figure 2, below. A straight line Motion Path may show just two selection handles, while any other Motion Path will show eight selection handles. For the rest of this tutorial, you must have a Motion Path that shows eight handles when selected. Otherwise any of the options we explain hereafter will not work for you.
- Right-click (or Ctrl + click) the selected Motion Path carefully to bring up a contextual menu with three options, as shown in Figure 2, below. Choose the Edit Points option.

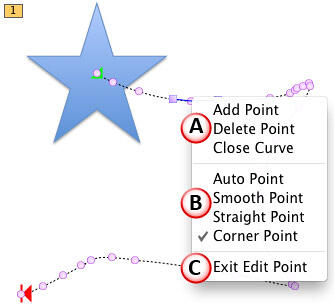
Figure 2: Edit Points option selected - Doing so activates Edit Points mode, showing several vertexes (small pink circles) along the motion path, as shown in Figure 3, below.

Figure 3: Motion Path in Edit Points mode, with point editing options - Let us first explore how you will edit any of these vertexes. We will thereafter explore how you edit segments, the line area between two vertexes.
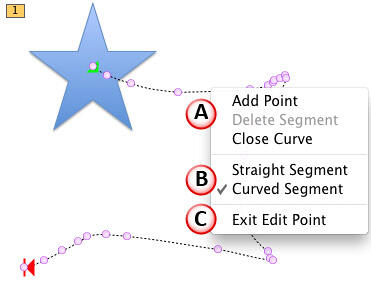
- Click on any vertex to select it. Then, right-click (or Ctrl+click) to bring a contextual menu with options categorized into three sections. Let us explore the options within these sections, as marked in Figure 3, above.
A. Add Point, Delete Point, Close Curve, and Open Curve
- The Add Point option adds a new point (vertex) at the cursor position, and the Delete Point option deletes the selected point. To learn more about these options explore our Add or Delete Points (Vertexes) in PowerPoint 2011 for Mac tutorial. While the linked tutorial discusses editing vertexes on shapes, a Motion Path is also essentially a shape that you can edit the same way. Do note though that vertexes in shapes are black squares whereas vertexes in Motion Paths are pink circles.
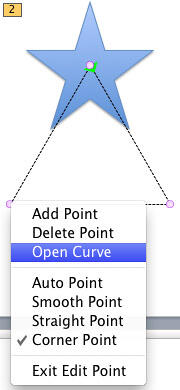
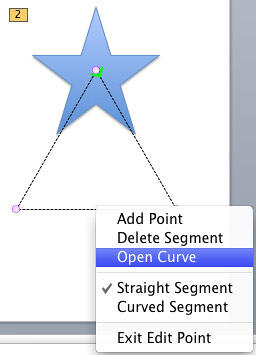
- The Close Curve option closes any open Motion Path by connecting its start and end points with a new line segment. However, if your Motion Path is already closed, you will see the Open Curve option instead of the Close Curve option, as shown in Figure 4, below.

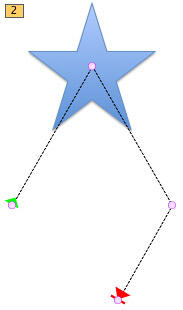
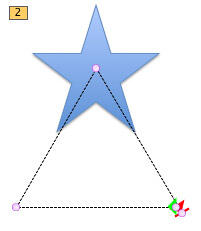
Figure 4: Open Curve option to be selected - Selecting the Open Curve option will result in your closed motion path being opened at the exact point you clicked. Notice that the same motion path you last saw in Figure 4 now has both green and red arrowheads, as you can see in Figure 5, below.

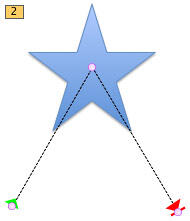
Figure 5: Closed Motion Path changed into an open Motion Path - You can select any of the ends and drag them off to another location, as shown in Figure 6, below.

Figure 6: Start and End points of the opened motion path repositioned - You can learn more about Open Curve and Close Curve options in our Edit Points: Open and Close Paths in PowerPoint 2011 for Mac tutorial.
B. Auto Point, Smooth Point, Straight Point and Corner Point
- Auto Point, Smooth Point, Straight Point, and Corner Point are the various types of vertexes that help you to change the look of your Motion Paths. You can learn more about these various points in our Types of Points (Vertexes) in PowerPoint 2011 for Mac tutorial.
C. Exit Edit Point
- Click the Exit Edit Point option to leave the Edit Points mode.
- In Edit Points mode, you can also edit line segments (a line connecting two vertexes) in your Motion Path. To do so, make sure you are in Edit Points mode, and right-click (or Ctrl + click) on any line segment to bring up a contextual menu with line segment editing options, as shown in Figure 7, below.

Figure 7: Motion Path in Edit Points mode with line segment editing options - Let us explore these line segment editing options as marked in Figure 7, above:
A. Add Point, Delete Segment, Close Curve, and Open Curve
- Add Point option adds a new vertex at the cursor position on the line segment. Close Curve option closes the open Motion Paths by joining its starting and end point with a line segment. However, if your Motion Path is already closed, you will see the Open Curve option in the place of Close Curve option as shown in Figure 8, below.

Figure 8: Line segment editing options - At this point, if you select the Open Curve option, your closed motion path will be opened at the vertex which is located just before this selected line segment in the motion path. Notice that the same motion path you last saw in Figure 8 now has both green and red arrowheads, as shown in Figure 9, below.

Figure 9: Motion Path opened - On the other hand, you can get rid of the segment altogether as well. In the same contextual menu, that you saw in Figure 8, you will also find the Delete Segment option. Notice that this option is grayed out for an Open Motion Path, as can be seen in Figure 7, previously on this page. Choosing the Delete Segment option removes the segment entirely, and thus results in a path that no longer includes the deleted segment, as shown in Figure 10, below.

Figure 10: Selected segment deleted from the Motion Path B. Straight Segment and Curved Segment
- Straight Segment and Curved Segment options change the look of the selected line segment making it straight or curvy. To learn more about these options, read our Edit Points: Curved and Straight Line Segments tutorial.
C. Exit Edit Point
- Click the Exit Edit Point option to leave the Edit Points mode.
- Edit the vertexes and line segments as required to fine-tune the Motion Path. In Figure 11, below, you can see our motion path, after we fine-tuned it. Compare Figures 1 and 11 to see the difference.

Figure 11: Custom Motion Path fine-tuned in Edit Points mode - Once you are happy with the results, save your presentation.

