After adding a quiz and
customizing quiz options in
Adobe Presenter, you still need to add the actual
questions to your quiz! You can add different types of questions -- and depending upon the type of question you
choose, that particular type of question will contain different options. You can add graded questions, survey
questions, or a combination of both to each quiz.
Following are the types of questions that Adobe Presenter allows you to add:
- Multiple choice
- True or false
- Fill in the blank
- Short answer
- Matching
- Rating scale
- Sequence
- Hot spot
Remember to save your presentation once before using this option. Thereafter, access the Quiz Manager
dialog box where you have already added a quiz.
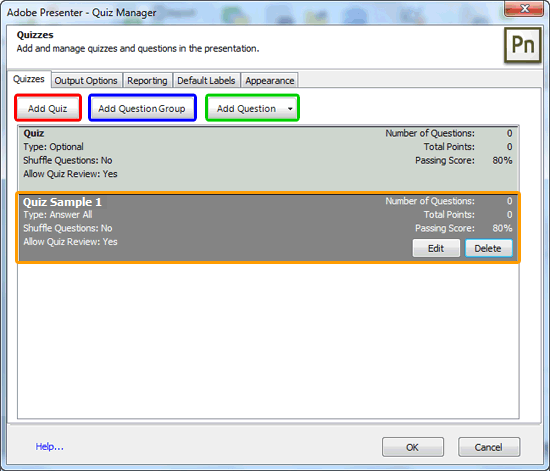
Figure 1, below shows you a new quiz added (highlighted in orange
within Figure 1).

Figure 1: New quiz added
Within the Quiz Manager dialog box, you will find three buttons:
- Add Quiz (highlighted in red within Figure 1,
above) - click this button to add a new quiz -- this brings up options explained in our
Add Quiz using Adobe Presenter tutorial.
- Add Question Group (highlighted in blue within
Figure 1, above) - this enables you to add a set of 10 questions. You can then decide how many
of the questions are formed into a subset when the quiz containing the questions appears in the presentation. For
example, five out of the 10 questions may appear. Question groups are one method you can use to ensure two people
taking the same quiz do not see the same questions in the same order.
- Add Question (highlighted in green within
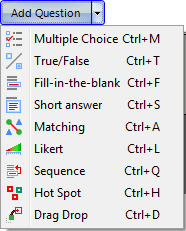
Figure 1, above) - this option allows you to add questions in two ways. First of all you can
click the down-arrow within the Add Question button. This brings up a drop-down menu, as shown
Figure 2, below.
-

Figure 2: Add Question drop-down list
- Alternatively, you click this button rather than the down-arrow to open the
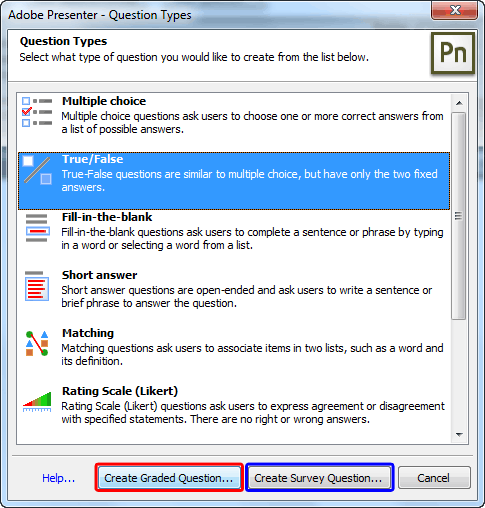
Question Types dialog box, as shown in Figure 3.
-

Figure 3: Question Types dialog box
- You can select the question type you want in either location -- for this tutorial we have
selected the True/False question type. Then, we clicked the Create Graded
Question button (highlighted in red within Figure 3, above). The
other button is Create Survey Question (highlighted in blue within
Figure 2, above) -- this creates a non- graded question.
- This brings up the New true/false question dialog box with Question
tab selected, as shown in Figure 4. The name of this dialog box and the options available within will
differ, depending upon the type of the question you selected.
-

Figure 4: New true/false question dialog box
- Options within the Question tab of New true/false question
dialog box are explained below, as marked in Figure 4, above:
A. Name
- Accept the default text for the name or type in a new name. The name appears on the question
slide in the presentation.
B. Question
- Type the true-or-false question exactly as you want it to appear on the slide.
C. Score
- Type, or use the up and down arrows to specify the number of points allocated to this question. You
can assign different point values to different questions also.
D. Answers
- Here establish which answer is correct by selecting either
True or False radio button.
E. Type
- This brings up a drop-down menu, where you can choose in-between
True/False or Yes/No.
F. Numbering
- Click to bring a drop-down menu to select an option for how answers are listed
on the quiz slide. You can choose from uppercase letters, lowercase letters, or numbers.
Additionally there are two more tabs within the New true/false question dialog box:
Options tab: Here you can customize the setting of correct and wrong answers, control the
feedback message, etc.
Reporting tab: Here you can establish how the presentation will report question result.
When you finish, click the OK button, as shown highlighted in red
within Figure 4, earlier on this page.
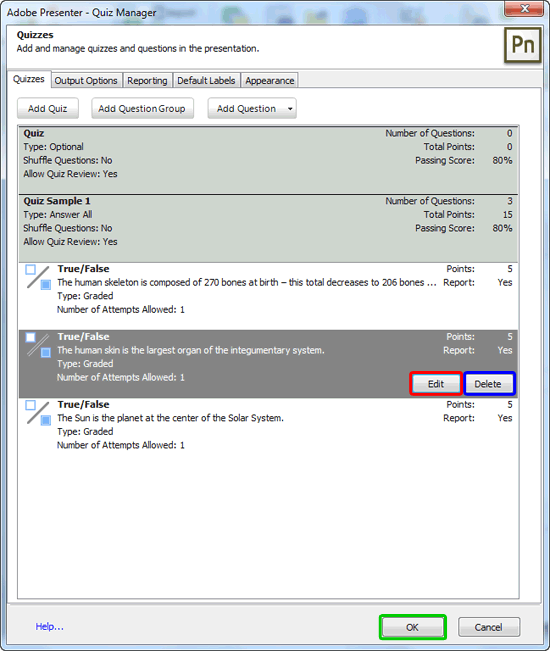
- Similarly you can add more questions. We added three true/false questions, as shown in
Figure 5, below.
-

Figure 5: True/false questions added
- You can edit the true/false question by click the Edit button (highlighted
in red within Figure 5, above) and to delete the question altogether click
the Delete button, as shown highlighted in blue within
Figure 5, above. Once done, click the OK button, as shown highlighted in
green within Figure 5, above.
- Save your presentation and preview the quiz, by using the
Adobe Presenter's Preview options.


