Microsoft has been providing a permissions system based on their Information Rights Management (IRM) concept for several years now, but with Office 2010 (including PowerPoint 2010), this whole concept has been implemented so intuitively that almost anyone can use IRM for their PowerPoint presentations and any other Office documents. Depending upon which version of Windows you use, you may need to download and install a Windows Rights Management module unless you use Windows 7. If you use the latter configuration, the entire IRM implementation process is painless. If you use an earlier version of Windows, such as XP or Vista, then you might have to download and install a small WRM client which takes a minute or two.
With WRM, you can prevent unauthorized forwarding, copying, editing, printing, or faxing of your presentation and specify file expiration dates for presentations you no longer want anyone to view after a certain date. WRM requires a Microsoft account, and PowerPoint will prompt you to sign in with your Microsoft account or create one when you use WRM for the first time. WRM lets you grant access permissions to your presentations at typically three levels:
- Unrestricted Access (Owner),
- Restricted Access (Read), and
- Restricted Access (Change).
Before you can access the permission levels, follow these steps to first sign up for Microsoft's free trial service for Windows Rights Management. As of now, Microsoft does not charge for this service but they may add a fee for continued use in the future:
- Launch PowerPoint 2010 for Windows, and create a new presentation or open any existing presentation. Save your presentation at least once.
- Access the File menu, and choose the Info option to get to Backstage view, as shown in Figure 1, below. As you can see, we clicked the Protect Presentation option to bring up a small drop-down menu, as shown in Figure 1, below.
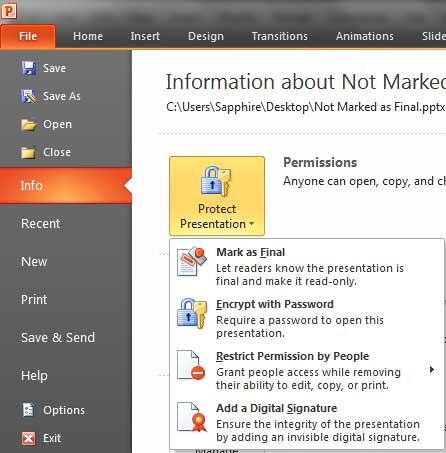
Figure 1: Protect Presentation drop-down menu within Info panel- Now, click the Restrict Permission by People option to bring up a sub-menu, as shown in Figure 2, below. Click the Manage Credentials option.

Figure 2: Manage Credentials option selected- Doing so brings up the Service Sign-Up dialog box, as shown in Figure 3, below. Assuming you have not signed up for this service, select the Yes, I want to sign up for this free service from Microsoft option, as shown highlighted in red within Figure 3, and click the Next button.
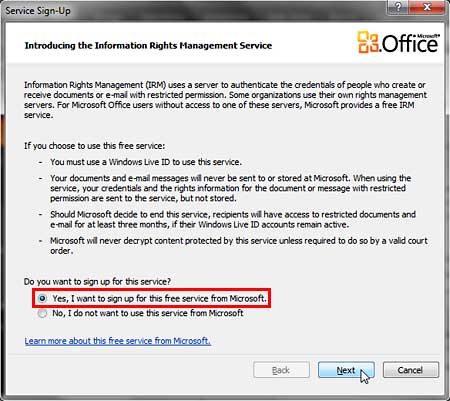
Figure 3: Service Sign-Up dialog box
No Service Sign-Up Dialog?
- Don't see the Service Sign-Up dialog, as shown in Figure 3, above? You might see a message box that asks you to download a Windows Rights Management client instead, as shown in Figure 4, below. Go ahead, download and install the client and follow the steps on this page again. Once you have the WRM client installed, you will see the Service Sign-Up dialog, as shown in Figure 3.

Figure 4: Message box asking to download Windows Rights Management
- This action summons the Windows Rights Management dialog box, as shown in Figure 5, below. If you do not have a Microsoft account, check the No, I want to register for a Windows Live ID now option, and click the Next button. Doing so will open your default web browser and bring up the Windows Live ID sign-up page.
- Assuming you already have a Microsoft account, just check the Yes, I have a Windows Live ID option and click the Next button, this is the option we chose.
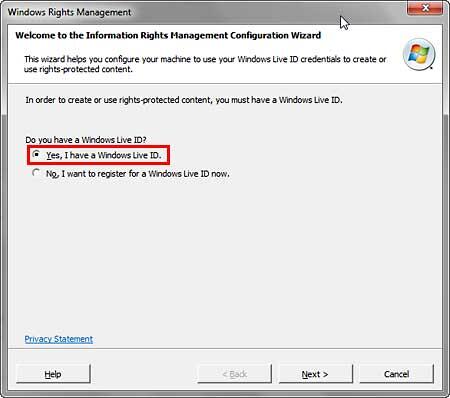
Figure 5: Windows Rights Management dialog box
Microsoft Account
- If you have a Hotmail account, or even a Passport, Live, Zune, or XBox account, then you already have a Microsoft account, and you can use the same credentials to sign into the Windows Right Management service.
- Type in your Microsoft account username and password, and click the Sign in button, as shown in Figure 6, below.
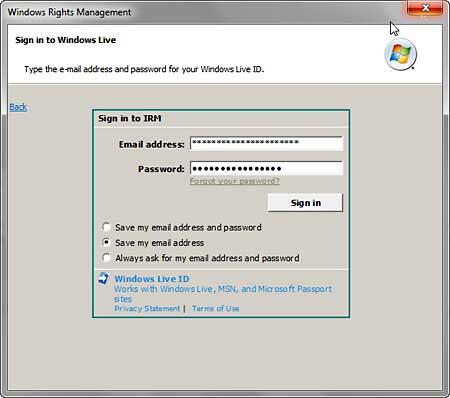
Figure 6: Enter Microsoft account username and password- You are next prompted to choose the type of computer you are using. You can choose between a private and a public or shared computer, as shown in Figure 7, below. Make your choice and click the I accept button.
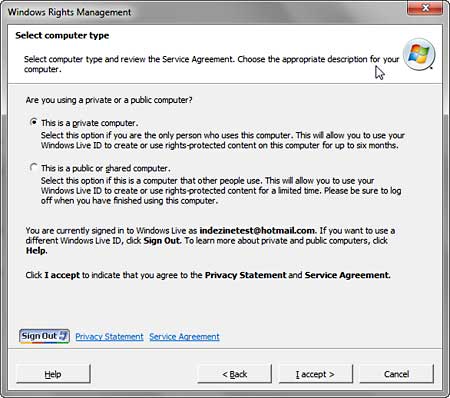
Figure 7: Choose between private, public, or shared computer option- You might see a quick Signing into Account process, and thereafter you will see the dialog, as shown in Figure 8, below. This dialog confirms that your Windows Rights Management service has been set up. Click the Finish button to complete the process.
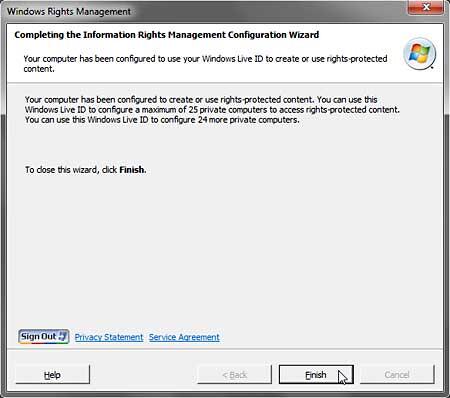
Figure 8: Windows Rights Management service activation completed- Back within PowerPoint, you will see your Live ID added to the Select User dialog box, as shown in Figure 9, below. If you always plan to use this Windows Live ID to manage your rights management, then go ahead and select the check-box that says Always use this account, as shown highlighted in red within Figure 9. Click the OK button.
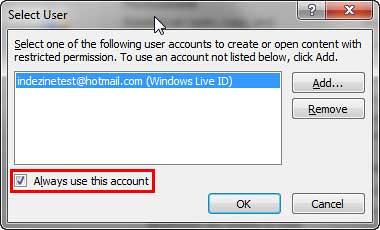
Figure 9: Select User dialog box- Doing so brings up the Permission dialog box, as shown in Figure 10, below. We will explore the options in this dialog box in a subsequent tutorial.
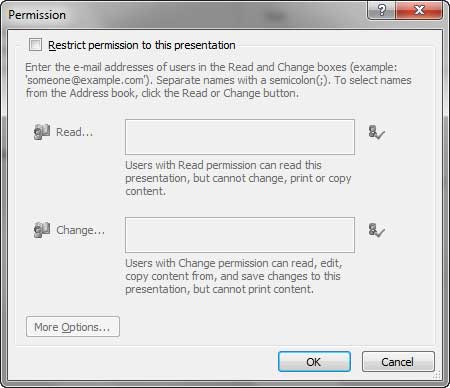
Figure 10: Permission dialog box
WRM Works Office-wide
Once you sign up for WRM from within PowerPoint 2010, the service is active thereafter for all Office 2010 applications including Word and Excel.


