You have learned to sign up for Windows Rights Management (WRM) in a previous tutorial. Once you are signed up, you can provide permissions using WRM from within PowerPoint 2010. In this tutorial, you will learn how to revoke permissions, add new permissions, and also create custom permission levels. For any of the permissions to work, users need to be connected online so that the WRM servers can be accessed for authentication. So, make sure you are connected online.
Thereafter, follow these steps to explore advanced Windows Rights Management permissions in PowerPoint 2010 for Windows:
- We assume you have already set permissions for any presentation that needs to have permissions altered. If you have not set basic permissions, do explore our Using Windows Rights Management in PowerPoint 2010 tutorial.
- With your presentation open in PowerPoint, you are now set to alter permissions. Access the File menu, and choose the Info option to get to Backstage view, as shown in Figure 1, below. Thereafter, select the Protect Presentation option to bring up a small drop-down menu, as shown in Figure 1.
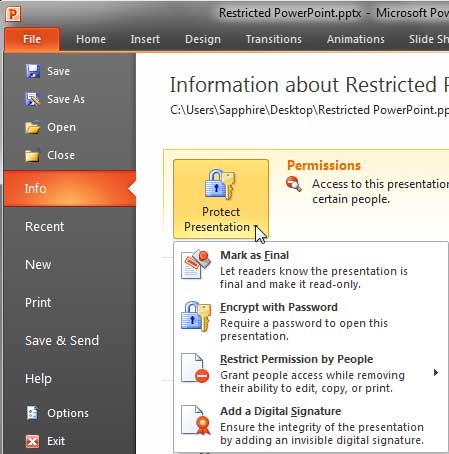
Figure 1: Protect Presentation drop-down menu- Now, click the Restrict Permission by People option to bring up a sub-menu, as shown in Figure 2, below. Select the Restricted Access option.

Figure 2: Restricted Access option selected- Doing so brings up the Permission dialog box with permissions provided to the Microsoft account (email addresses) specified in the Read and Change boxes. To alter, revoke, or customize permissions, click the More Options button, which has been highlighted in red within Figure 3, below.

Figure 3: More Options button within the Permission dialog box- This action provides advance permission options within the Permission dialog box, as shown in Figure 4, below.
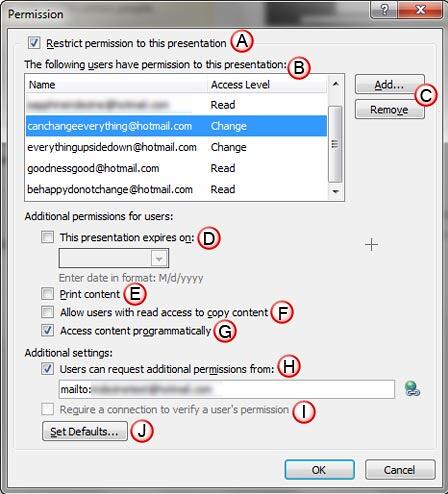
Figure 4: Advance permission options within the Permission dialog box- All advanced options within the Permission dialog box, as marked in Figure 4, above, are explained below. Note that options D through I are valid for the users selected in the Users box (see option B):
A. Restrict permission to the presentation
- This check-box should be always selected as it enables you to change the permission options. Deselecting this option disables all permissions for the active presentation.
B. The following users have permission to this presentation
- Here you can see a list of users and their access levels for the presentation. You have to first select the user in this list for whom you want to change the permissions.
C. Add/Remove buttons
- Click the Add button to bring up the Add Users dialog box, as shown in Figure 5, below. All existing permitted Microsoft accounts are shown here, and you can add more users within the Read and Change boxes.
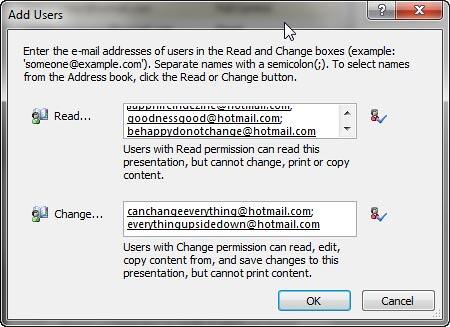
Figure 5: Add Users dialog box- Similarly, you can select any user from the users’ list, and click the Remove button to remove the selected user from the list.
D. This presentation expires on
- Select this check-box to type in a date or use the calendar flyout, as shown in Figure 6, below, to set a specific date for the expiry of the presentation.
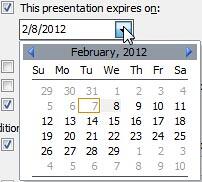
Figure 6: Calendar flyoutE. Print content
- This option enables the selected user to print slides contained within the presentation.
F. Allow users with read access to copy content
- Allows the selected user with Read access to copy the presentation content that can be pasted into another slide, or elsewhere.
G. Access content programmatically
- Allows viewing of content within a programming environment.
H. Users can request additional permission from
- Here you can set any e-mail ID from which the user can request additional permission, this typically is your Windows Live ID (if you are the one that has Full Control access, we discuss this later in this tutorial).
I. Require a connection to verify a user's permission
- This needs an online connection to verify credentials, and this option is typically grayed out.
J. Set Defaults
- Clicking this button opens a message window, as shown in Figure 7, below. Clicking OK in this message window will change defaults for Read and Change access levels depending upon which level the selected user is set to. Unless you have a valid reason to change defaults, it is best to click the Cancel option.

Figure 7: PowerPoint message window- Additionally, place your mouse cursor over the access level of any selected user to get a downward arrow, and click it to bring up a drop-down list as shown in Figure 8, below. Choose any option from the drop-down list to change the selected user's access level.
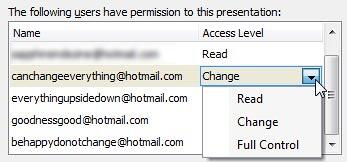
Figure 8: Access Level drop-down list- We have already explored the Read and Change permission levels in this and previous tutorials, setting any user to the Full Control level is akin to providing that user with the same permission level as the creator of the file, such users can also provide and alter permission levels for other users.
- Save your presentation often.


