PowerPoint allows you to save your slides to many graphic file formats, which can later be used in other applications as required. One of the most popular graphic formats that you can export your slides to is PNG. This tutorial will show you how you can export slides to PNG, but using the same process, you can also export to other graphic file formats such as JPG, GIF, TIFF, BMP etc.
Follow these steps to export some or all of your slides to a picture file format such as PNG in PowerPoint 2011 for Mac:
- Open the presentation from which you want to export slides as PNG files or any other graphic file format.
- With the presentation open, choose the File | Save as Pictures menu option, as shown in Figure 1, below.

Figure 1: Save as Pictures option selected within the File menu- This action summons the Save As dialog box, as shown in Figure 2, below. Here choose a location where you want to save the exported PNG. If you don't specify a destination location, the exported PNGs will be saved in the same location as that of the active presentation from which you will export them.
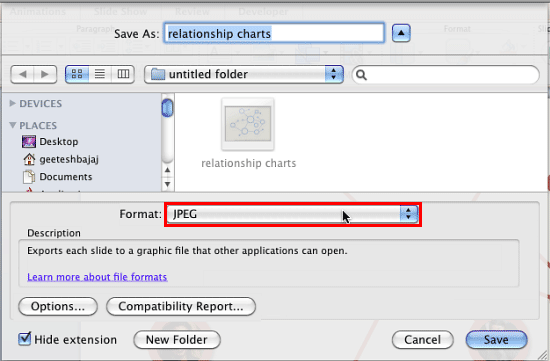
Figure 2: Save As dialog box- Click the Format list, as shown highlighted in red within Figure 2, above. To open a drop-down list, as shown in Figure 3, below. In this drop-down list, select the PNG option, as shown in Figure 3, or you can choose any other graphic file format such as JPEG, GIF, BMP, or TIFF.
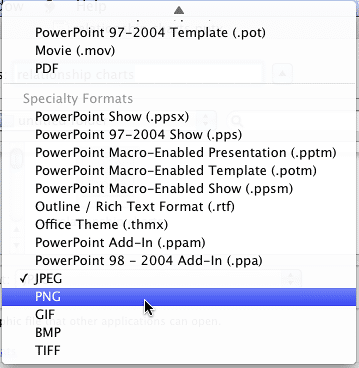
Figure 3: PNG file type chosen- This action will take you back to the Save As dialog box, as shown Figure 4, below. Now you need to choose from whether to export only the active slide as a PNG, or every slide in the presentation. To do so, click the Options button, as shown highlighted in red within Figure 4.
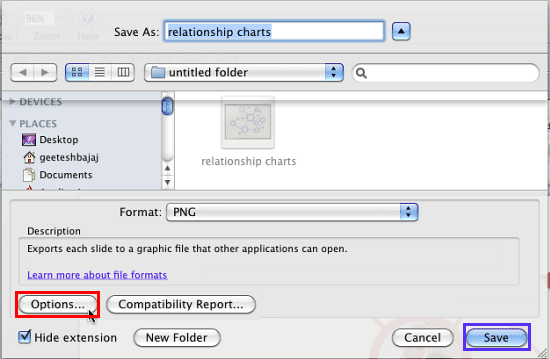
Figure 4: Options button within Save As dialog box- This action opens the PowerPoint Preferences dialog box, as shown in Figure 5, below.
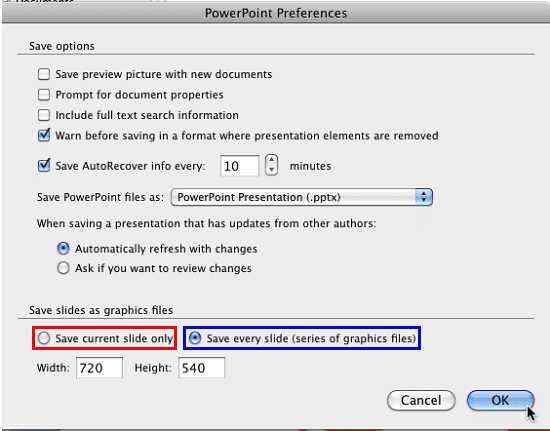
Figure 5: PowerPoint Preferences dialog box- Now, proceed with any of the following options, based on your requirement:
- If you want to export only the active slide, select the Save current slide only radio button, as shown highlighted in red within Figure 5, above, and click the OK button.
- If you want to export each and every slide in the active presentation, select the Save every slide (series of graphics files) radio button, as shown highlighted in blue within Figure 5, above, and click the OK button.
- Either of the above options will take you back to the Save As dialog box, where you have to click the Save button, as shown highlighted in blue within Figure 4, previously on this page.
- If you have opted to save only the active slide, you will find the exported PNG in the specified location. If you have selected to save all slides, PowerPoint creates a new folder in the specified location, and places all graphic files within that folder. It also informs you of the folder location, as shown in Figure 6, below. Click the OK button to dismiss this message box.

Figure 6: Path of the folder where graphics are saved- You can now shut your presentation. Optionally, save the presentation if prompted. All graphic files will be available to you in the location specified.


