Indezine Logo


Edit Points for Shapes in PowerPoint 2003 for Windows

Alter a shape using the Edit Points option in PowerPoint 2003 for Windows. The Edit Points option basically works on individual vertexes.


Author:

Product/Version: PowerPoint 2003 for Windows

OS: Microsoft Windows XP and higher


When you use any of the shapes available in PowerPoint, you are not limited to what their default appearance looks like. You may want to change a rectangle to a rhombus, or even edit a curved or freeform line differently. The good news is that you can do this by using the Edit Points option. This almost makes PowerPoint a drawing program that provides you the option to play with vertexes (points), handles, etc.—very similar to what you would do in Adobe Illustrator or CorelDRAW.

A vertex is a point within the outline of any shape that can be dragged or edited to change the appearance of the shape. A vertex, also referred as a point, is indicated by a small black square (you can see five such black squares in Figure 1). You will learn more about how to get to this Edit Points interface later in this tutorial. Meanwhile also notice that when you select a vertex (other than an Auto Point), one or two blue handles appear as shown in Figure 1. These handles have squares with black outlines and can be dragged to reorient the structure of the selected shape.

Vertexes (small black squares)
Figure 1: Vertexes (small black squares)

What is an Auto Point?

An Auto Point is the default type of point in PowerPoint 2003, that doesn't show any handles to edit. Learn more in our Types of Points (Vertexes) in PowerPoint 2003 for Windows tutorial.

Follow these steps to get to the Edit Points mode and make changes to any freeform shape (line, drawn shape, etc.) in PowerPoint 2003 for Windows:
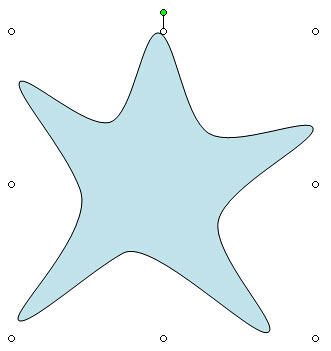
  1. Select the shape or the drawing and you will see it surrounded by eight selection handles as shown in Figure 2, below.
  2. Shape selected
    Figure 2: Shape selected
  3. Right-click the selected shape to bring up the contextual menu you see in Figure 3, below. In this contextual menu, choose the Edit Points option.
  4. Edit Points option
    Figure 3: Edit Points option
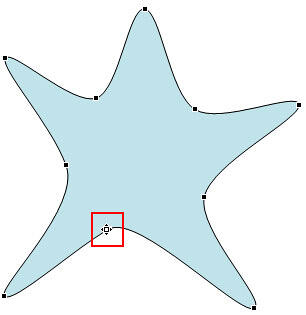
  5. A number of small black squared points will appear on the outline of the shape, as shown in Figure 4. These points are known as vertexes, which mark any point in your shape that denotes an extremity of a curve or line segment, or even the start and end point of an open shape. Place the cursor over any of the vertexes. The cursor will change to a small four directional arrow, as shown in Figure 4 (highlighted in red).
  6. Cursor changed to a four directional arrow
    Figure 4: Cursor changed to a four directional arrow
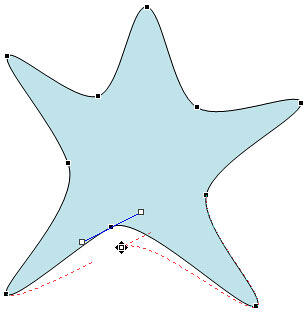
  7. Now, click on the vertex to select it, and reposition the vertex by dragging it to a new position. A red dashed line appears showing the changes to the shape that you are making, as shown in Figure 5.
  8. Dragging vertex
    Figure 5: Dragging vertex
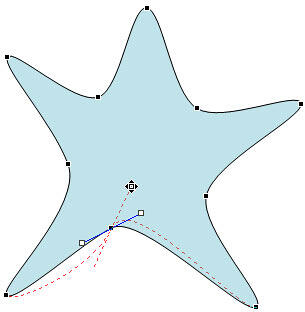
  9. You can also change how the shape looks without repositioning the vertex. A selected vertex (other than an Auto Point) shows one or two blue handles (blue lines emanating from the vertex), as shown in Figure 6. To alter the degree of the curve or line on either sides of the vertex just click on one of the handles and drag it to reorient the line's structure (refer to Figure 6 again).
  10. Editing with handles
    Figure 6: Editing with handles
  11. To alter the degree of the curve or line on either sides of the vertex in relation to the next vertex along the line, you have to press the Ctrl key while dragging.

See Also:

Advanced Drawing Techniques: Edit Points for Shapes in PowerPoint (Index Page)

Edit Points for Shapes in PowerPoint 2016 for Windows
Edit Points for Shapes in PowerPoint 2016 for Mac
Edit Points for Shapes in PowerPoint 2013 for Windows
Edit Points for Shapes in PowerPoint 2011 for Mac
Edit Points for Shapes in PowerPoint 2010 for Windows
Edit Points for Shapes in PowerPoint 2007 for Windows

You May Also Like: Long Story Short: Conversation with Margot Leitman | Happiness PowerPoint Templates


Popular Posts

Pivot Tables in PowerPoint: by Kasper Langmann
One of the most commonly used features in Microsoft Excel is the Pivot Table. A Pivot Table simply allows you to make better sense of data by giving you different options of how to view that data.

Get More SmartArt Graphics
Learn how you can get more SmartArt graphic variants.

Character Spacing in PowerPoint 2013
Explore Character Spacing options in PowerPoint 2013.

Add Secondary Value Axis to Charts in PowerPoint 2013 for Windows
Learn how to add a Secondary Value axis to charts in PowerPoint 2013 for Windows.


Organic Shapes with Brush Edges

You get 8 shape types plus lines as part of this Organic Shapes collection. Each of these 8 shape types have 10 variants. So you end up with 80 hand-drawn shape options! Again each of these 80 shapes have 12 brush stroke styles! Plus you get the lines and arrows in 12 brush stroke styles too. Combine all variations to end up with more than 3000 possibilities.

Buy and Download for $99+ (83 MB)

This is the original page. An AMP (Accelerated Mobile Page) version of this page is also available for those on mobile platforms, at Edit Points for Shapes in PowerPoint 2003 for Windows.


Microsoft and the Office logo are trademarks or registered trademarks of Microsoft Corporation in the United States and/or other countries.

Home | PowerPoint | Photoshop | PowerPoint Templates | PowerPoint Tutorials | Blog | Notes | Ezine | Media Kit | Feedback | Site Map | About Us | Contact Us

Link to Us | Privacy | Testimonials

PowerPoint Backgrounds | Christian PowerPoint Backgrounds | Business PowerPoint Presentation Templates

Plagiarism will be detected by Copyscape

©2000-2023, Geetesh Bajaj. All rights reserved.