Among the many new features in PowerPoint, probably the most useful yet less obvious ones are the capabilities added to guides. Of course, all the existing options available in older versions of PowerPoint are still available for guides. New for this version, these are extra capabilities:
- Guides can be added through the right-click menu.
- You can add new guides that are offset to your existing guides.
- Guides no longer need to be grey in color, you can choose from 10 colors.
- You need not drag a guide off the slide to remove it there's a dedicated Delete option.
- Guides are now hierarchial, you can add guides in Slide Masters, Slide Layouts, and Slides, they all work independent of each other.
Typically, when you make guides visible, you can see two guides by default, as shown in Figure 1, below. Thereafter, you can add as many guides as you want. PowerPoint enables you to add guides by dragging existing guides to spawn new ones, or by accessing options in the right-click contextual menu.

Figure 1: Guides on the PowerPoint slide
Follow these steps to access options in the right-click contextual menu to work with guides in PowerPoint 2013 for Windows:
- Launch PowerPoint, and make sure that the guides are visible. In Figure 2, below, you can see an empty slide with default guides visible.
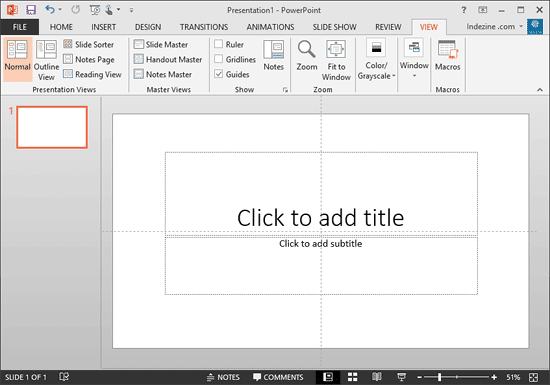
Figure 2: PowerPoint slide with default guides - Now, right-click on an empty area of the blank slide to bring up a contextual menu, as shown in Figure 3, below.
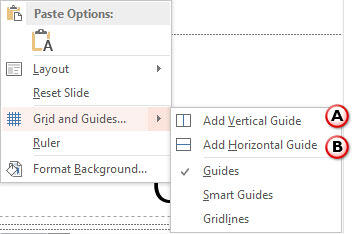
Figure 3: Right-click an empty area on your slide to bring up this menu - Alternatively, carefully place your cursor over an existing guide and right-click on the guide itself to bring up the contextual menu, as shown in Figure 4, below.
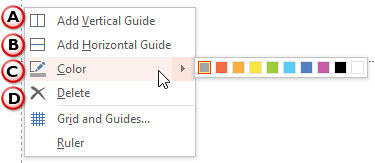
Figure 4: Right-click on an existing guide to bring up this menu - The options within these two contextual menus are explained below, as marked in Figures 3 and 4:
A. Add Vertical Guide
- Adds a new guide on the Vertical plane of the slide. If you accessed this option from the right-click menu by:
- Right-clicking on an empty area of the slide, as shown in Figure 3, above. This adds a new vertical guide that is offset towards the right of an existing vertical guide. This does not give you much control over where your new guide is added. You may have to drag the guide later and move it to a new position.
- Right-clicking on a selected, existing vertical guide, as shown in Figure 4, above. This adds a new vertical guide that is offset towards the right of the selected, existing vertical guide. This approach works best if you want to add a new guide right next to an existing guide.
- Right-clicking on a selected, existing horizontal guide, as shown in Figure 4, previously on this page. This adds a new vertical guide that is perpendicular to the horizontal guide you selected. This approach works best if you want to add a new guide at an exact position.
B. Add Horizontal Guide
- Adds a new guide on the horizontal plane of the slide. The three ways you add a horizontal guide work exactly like the three ways in which you add a vertical guide (explained in the preceding section).
C. Color
- This option is available only when you right-click an existing guide as shown in Figure 4, previously on this page. You can choose from 10 different colors, in the flyout menu, as shown in Figure 5, below. Also notice that you need not bring up the flyout menu to access the last selected color. That's available within the main right-click menu, as shown highlighted in red within Figure 5.

Figure 5: Recolor your Guides D. Delete
- Right-click the guide you want to remove, and then click Delete option within the right-click menu.
Undo May Not Work
You cannot undo any of Guide operations, so be careful before you delete a guide!
- In Figure 6, below, you can see new guides have been added both horizontally and vertically. Also, the color of some guides has been changed.
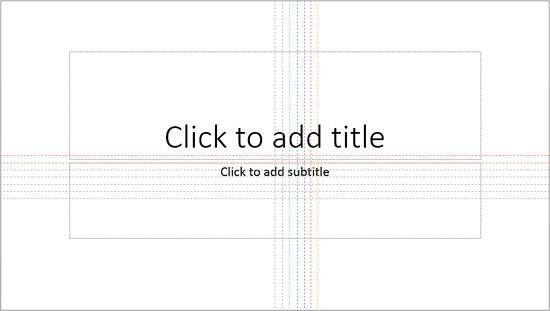
Figure 6: More guides added and recolored - Make sure to save your presentation often.


