Indezine Logo


Using Captions in Photo Album Presentations in PowerPoint 2010 for Windows

Learn how to use captions in Photo Album presentations in PowerPoint 2010 for Windows. The captions can be sourced from file names or can be manually edited.


Author:

Product/Version: PowerPoint 2010 for Windows

OS: Microsoft Windows XP and higher


Learn PowerPoint

Challenge to achieve: One click to close a PowerPoint Show presentation.


In previous tutorials about the Photo Album feature in PowerPoint 2010 for Windows, you learned how to create a new Photo Album and how you can edit existing Photo Albums by reordering pictures and changing the slide's picture layout. One of PowerPoint's most powerful features is to use captions for the pictures you add in a Photo Album presentation. By default, Photo Album uses the file name for your captions. So, if the original file name was "Winter Morning.jpg", the caption you see on your slide will be "Winter Morning" which is so perfect! Unfortunately not many people provide such nice names to their pictures. Most pictures are just subsequent numbers from a digital camera these days. Names like IMG06712.jpg are more common! You really don't want a caption like IMG06712. Fortunately, PowerPoint lets you change captions too!

First let us show you how to enable captions in PowerPoint 2010 for Windows:
  1. Open your existing Photo Album presentation, and choose the Insert tab | Photo Album | Edit Photo Album option.
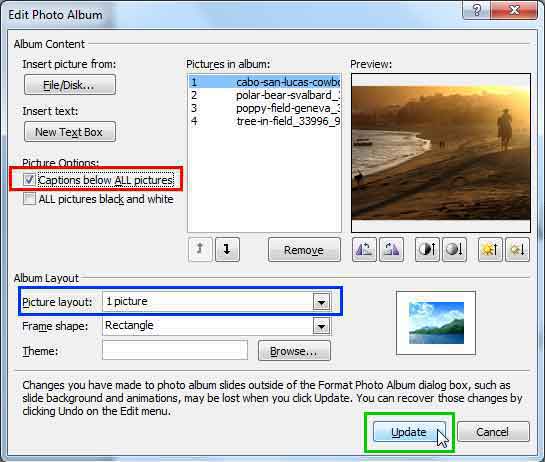
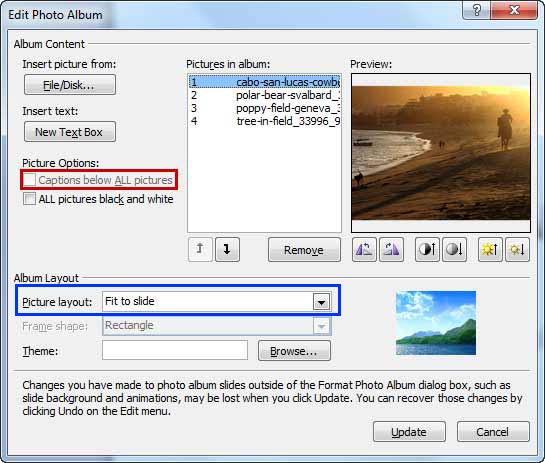
  2. The Edit Photo Album dialog box opens as you see in Figure 1. The Caption below ALL pictures check-box may or may not be grayed out (highlighted in red within Figure 1 below).
  3. Edit Photo Album dialog box
    Figure 1: Edit Photo Album dialog box
  4. The Caption below ALL pictures option works for all picture layouts other than the Fit to slide option (highlighted in blue in Figure 1, above). You must first change the Picture layout to some other type.
  5. We choose the 1 picture layout (highlighted in blue within Figure 2 below) and you can see that the Caption below ALL pictures option is now enabled. Select it by clicking on the checkbox, highlighted in red within Figure 2.
  6. Caption below ALL pictures option selected
    Figure 2: Caption below ALL pictures option selected
  7. When done, click the Update button (highlighted in green within Figure 2 above).
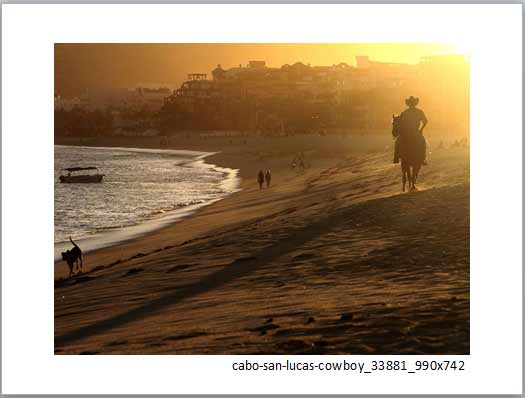
  8. This adds a caption beneath the picture, as shown in Figure 3.
  9. Caption added beneath the picture
    Figure 3: Caption added beneath the picture
  10. By default, PowerPoint 2010 inserts the file name of the photo as the caption (refer to Figure 3 above).
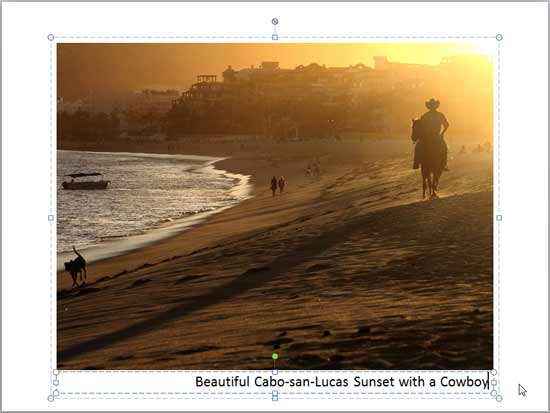
  11. These captions can be edited any time. Simply click in the text box containing the caption and type in your new caption, as shown in Figure 4.
  12. Edited caption
    Figure 4: Edited caption
  13. Save you Photo Album presentation.

See Also:

Photo Album: Using Captions in Photo Album Presentations (Glossary Page)

Using Captions in Photo Album Presentations in PowerPoint 2013 for Windows

You May Also Like: How to Create Dashboard Software Using PowerPoint | Vietnam Flags and Maps PowerPoint Templates


Popular Posts

Playing Video Across Slides in PowerPoint 2016 for Windows
Play a video clip across slides in PowerPoint 2016 for Windows.

Set Document Resolution in PowerPoint 2016 for Windows
Learn how to set document resolution in PowerPoint 2016 for Windows.

Creating Anchor Points for Connectors in PowerPoint 2010 for Windows
Learn how to create Anchor Points for connectors in PowerPoint 2010.

Working With Slide Numbers in PowerPoint 2016 for Windows
Learn how to add Slide Numbers on slides and Masters and more tricks on making them work to your will in PowerPoint 2016 for Windows.


Feature List 01 (Layout with Tabs)

The Feature List Layout comprises three sample PowerPoint presentations: one each to create a visual list for 4 features, 5 features, and 6 features. These work great when you have too much information to fit within one slide. This solution lets you use multiple slides, but the visual result is still that of one single slide!

Buy and Download Feature List 01 (Layout with Tabs) for $4.99+ (671 kb)


Microsoft and the Office logo are trademarks or registered trademarks of Microsoft Corporation in the United States and/or other countries.

Home | PowerPoint | Photoshop | PowerPoint Templates | PowerPoint Tutorials | Blog | Notes | Ezine | Media Kit | Feedback | Site Map | About Us | Contact Us

Link to Us | Privacy | Testimonials

PowerPoint Backgrounds | Christian PowerPoint Backgrounds | Business PowerPoint Presentation Templates

Plagiarism will be detected by Copyscape

©2000-2025, . All rights reserved.