You can link to a Word document from a PowerPoint slide object. We explained this process within our Linking to Any File in PowerPoint 2013 for Windows tutorial. However, that process only links to the Word document. Most of the time, this will open the Word document with the first page active. But what if you wanted to link to page 33 of a 50-page Word document? This action is doable, but it must be one of the least-known secrets.
Follow these steps to link to a bookmark in Word from PowerPoint:
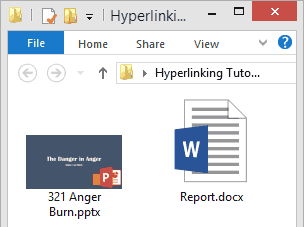
- Make sure that both the Word document you want to link to, and the PowerPoint presentation you want to link from are within the same folder in your computer, as shown in Figure 1, below.

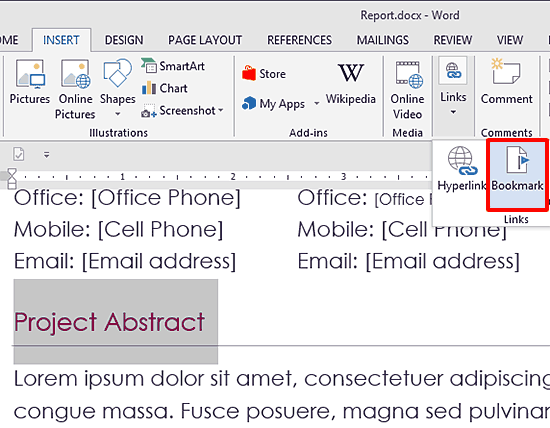
Figure 1: Word and PowerPoint files within the same folder - Open the document you want to link to within Microsoft Word. Ensure your cursor is active within the part of the Word document you want to link to. Optionally select some text, as shown in Figure 2, below. This selection is optional and unnecessary, but your cursor must be active in the area you want to link to.

Figure 2: Area selected in Word document - Now access the Insert tab of the Ribbon and locate the Links group. Next, click the Bookmark button, as shown highlighted in red within Figure 2, above.
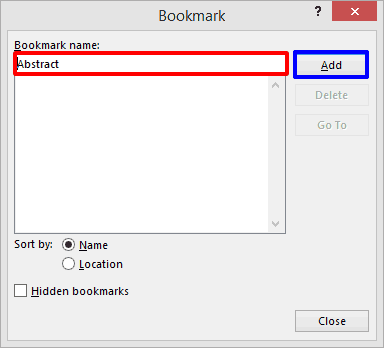
- Doing so will bring up the Bookmark dialog box shown in Figure 3, below. Type in a name for your Bookmark as shown highlighted in red within Figure 3. Then click the Add button highlighted in blue within Figure 3. Save your Word file and exit.

Figure 3: Add a Bookmark
Bookmark Naming Limitations
- There are some limitations for naming a Bookmark in Microsoft Word. Here are some guidelines:
- You cannot use more than 40 characters.
- You cannot use spaces in your bookmark names.
- Bookmark names need to start with a letter and cannot begin with a number.
- If you need to separate words, you can use the underscore character, but dashes are not permitted.
- Several special characters such as /, ^. cannot be used.
- Now open your PowerPoint presentation and navigate to the slide where you want to add a link.
- Now select an anchor on any slide. An "anchor" is any slide object that you can select, as explained in our Anatomy of a Link tutorial. As you can see in Figure 4, below, we selected a basic Rectangle shape.

Figure 4: Select your anchor - With your shape selected, access the Insert tab of the Ribbon. Then click the Hyperlink button as shown highlighted in red within Figure 5, below.

Figure 5: The Hyperlink button - You can also press the Ctrl + K keyboard shortcut instead of clicking the Hyperlink button.
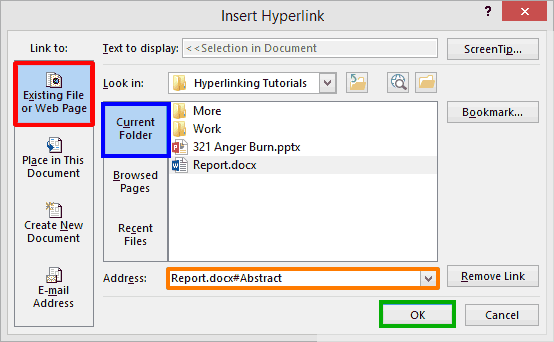
- Doing so will bring up the Insert Hyperlink dialog box that you can see in Figure 6, below. Make sure you select the Existing File or Web Page option in the sidebar, as shown highlighted in red within Figure 6.

Figure 6: Link to a Word document - Next choose the Current Folder option within the Look in area, highlighted in blue within Figure 6, above. Select the Word file within the same folder that already has a Bookmark added. Then within the Address area, suffix the file name with a # sign, and also the name of the Bookmark that you want to link to, as shown highlighted in orange within Figure 6. The format you will use is:
- <FileName>#<BookmarkName>
- Finally, click the OK button, highlighted in green within Figure 6.
- Play the presentation in Slide Show view and click the anchor to test the hyperlink. You can also link to multiple Bookmarks in the same Word document. For example, one anchor in your PowerPoint may link to a Bookmark on page 16 of your Word document, whereas another anchor may link to another Bookmark on page 19.
You can also similarly link from your PowerPoint slides to an Excel cell or named range. Learn more in our Link to Excel Cells and Ranges in PowerPoint 2013 for Windows tutorial.


