Do you want to link to an Excel file from within your PowerPoint? Of course, you can use the technique explained within our Linking to Any File in PowerPoint tutorial. However, click on the link, and you will end up opening your Excel file at the last saved location. What if you always wanted your link to access a particular cell or a range of cells in Excel? This is possible, but you will rarely find this option documented at all!
To get started, ensure that both the Excel file you want to link to and the PowerPoint presentation you wish to link from are located within the same folder on your computer, as shown in Figure 1, below.
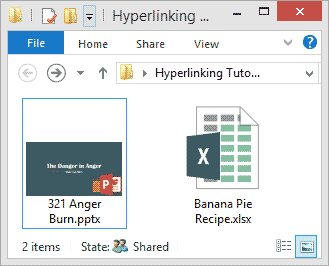
Figure 1: Excel and PowerPoint files within the same folder
We will look at how you can link to a particular cell or a named range in Excel
1. Link to an Excel Cell
2. Link to a Named Range in Excel
1. Link to an Excel Cell
Follow these steps to link to a particular cell in Excel from within PowerPoint 2013 for Windows:
- Launch Excel and open the file you want to link to, as shown in Figure 2, below.
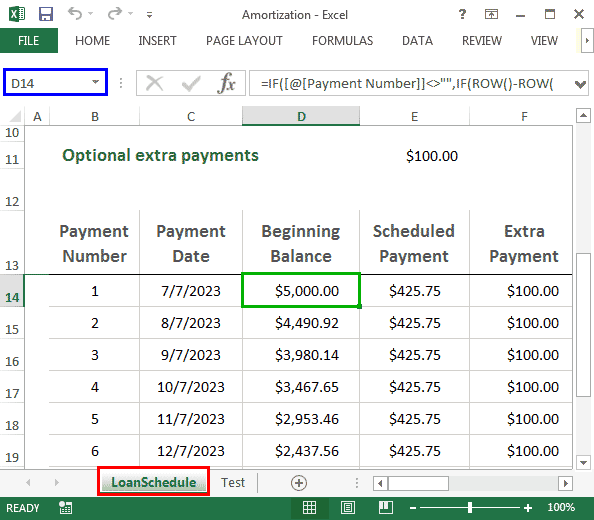
Figure 2: Excel cell to link to - Make a note of the cell that you want to link to, and save the following information:
- Name of the sheet within the Excel file, as shown highlighted in red within Figure 2. Do note that the sheet name should have no spaces. In our case, the original sheet name was Loan Schedule, so we renamed to LoanSchedule. If you rather not change the sheet name to not have any spaces, you can use our second technique of linking to a named range instead.
- Cell location within the Excel file, as shown highlighted in blue within Figure 2. In our case, this cell location is D14. The actual cell is highlighted in green.
- Now, open your PowerPoint presentation and navigate to the slide where you want to add a link.
- Select an anchor on any slide. An anchor is any slide object that you can select, as explained in our Anatomy of a Link tutorial. As you can see in Figure 3, below, we selected a basic rectangle shape.

Figure 3: Select your anchor - With your shape selected, access the Insert tab of the Ribbon. Then, click the Hyperlink button, as shown highlighted in red within Figure 4, below.

Figure 4: The Hyperlink button - You can also press the Ctrl + K keyboard shortcut instead of clicking the Hyperlink button.
- Doing so will bring up the Insert Hyperlink dialog box, as shown in Figure 5, below. Make sure you select the Existing File or Web Page option in the sidebar, as shown highlighted in red within Figure 5.
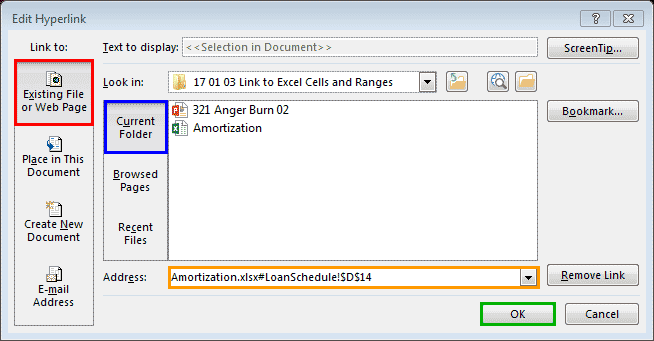
Figure 5: Link to an Excel cell - Next, choose the Current Folder option within the Look in area, as shown highlighted in blue within Figure 5, above. Select the Excel file within the same folder. Then, within the Address area, suffix the file name with a # sign, and the column and row numbers of the cell you want to link to, as shown highlighted in orange within Figure 5. The format you will use is:
- < FileName >#< SheetName >!$< ColumnNumber >$< RowNumber >
- In our case, we used Amortization.xlsx#LoanSchedule!$D$14
- Finally, click the OK button, as shown highlighted in green within Figure 5, previously on this page.
- Now play the presentation in Slide Show view. Click the anchor to test the hyperlink.
Back
2. Link to a Named Range in Excel
Now that we explored how you can create a link to a particular cell in Excel from PowerPoint, you may discover that this technique doesn’t work for you all the time. Maybe, you have spaces in your Sheet names or you do not want to link to an absolute cell reference. In either case, you can use this more efficient approach of linking to a named range in Excel from within PowerPoint 2013 for Windows:
- Launch Excel and open the file you want to link to. Make sure you select one cell or even a range of contiguous cells area, as shown highlighted in red within Figure 6, below. Note that the top left cell within the range (or an individual cell) you selected is mentioned in the cell address area, as shown highlighted in blue within Figure 6.
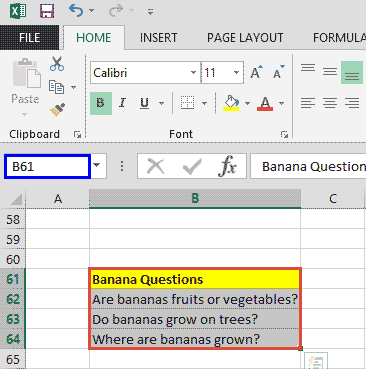
Figure 6: Select a cell or a range of cells
What is a Range?
- A range spans contiguous cells in Excel. The range address uses the syntax top-left cell:bottom-right cell, as in A1:D4. Such a range would encompass all cells from A1 until D4, including any empty cells, as shown in Figure 7, below. However, there’s no reason why your range cannot contain just one cell or even one chart!
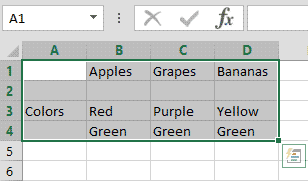
Figure 7: A range in Excel
- Now, type a name for your range within the Name Box area, overwriting any existing cell address, as shown highlighted in red within Figure 8, below. Then, press the Enter key immediately. If you click anywhere else and not press the Enter key, your range name will not be saved. Remember this name. Save your Excel file and exit.
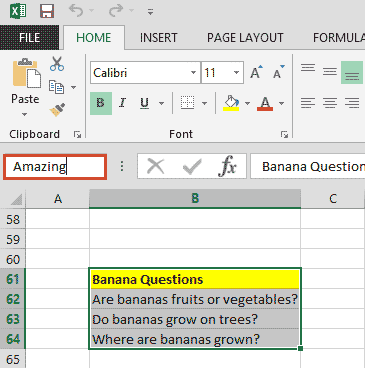
Figure 8: Your named range
Range Naming Limitations
There are some limitations for a name you can provide for a range in Microsoft Excel. Here are some of them:
- You cannot use spaces in your range names.
- Range names need to start with either a letter, an underscore (_) or a back slash (\).
- Although you can use numbers in range names, you cannot start a range name with a number.
- If you need to separate words, you can use the underscore (_) but dashes are not permitted.
- You cannot use several special characters, such as /, ^.
- You cannot use names that appear like cell addresses, such as D15 or A2$33.
- Names for ranges are case insensitive. So, LETTER, Letter, and letter are treated the same.
- Now, open your PowerPoint presentation and navigate to the slide where you want to add a link.
- Select an anchor on your PowerPoint slide. An anchor is any slide object that you can select, as explained in our Anatomy of a Link tutorial. As you can see in Figure 3, shown previously on this page, we selected a basic rectangle shape.
- With your shape still selected, you can now access the Insert tab of the Ribbon. Here, click the Hyperlink button, as shown highlighted in red within Figure 4, previously on this page. Alternatively, press the Ctrl + K keyboard shortcut.
- This action will bring up the Insert Hyperlink dialog box, as shown in Figure 9, below. Make sure you select the Existing File or Web Page option in the sidebar, as shown highlighted in red within Figure 9.
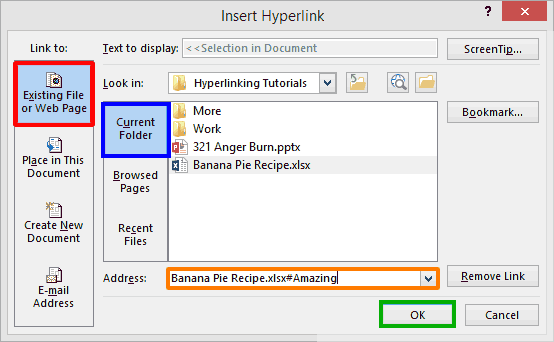
Figure 9: Link to an Excel range - Next, choose the Current Folder option within the Look in area, as shown highlighted in blue within Figure 9, above. Select the Excel file within the same folder that already has a named Range added. Then, within the Address area, suffix the file name with a # sign, and the name of the Range that you want to link to, as shown highlighted in orange within Figure 9. The format you will use is:
- < FileName >#< RangeName >
- Finally, click the OK button, as shown highlighted in green within Figure 9, previously on this page.
- Now play the presentation in Slide Show view. Click the anchor to test the hyperlink. Also do note that you can thus link to multiple ranges in the same Excel file. So, one anchor in your PowerPoint may link to a range on Sheet 1 of your Excel file whereas another anchor may link to another range in the same Excel file on Sheet 1 again (or any other worksheet, range, or cell).
So, as you learned, you can link to an Excel cell or a named range. Choose the option that works best for you.
Back


